Create an invoice
The images and steps in this topic are based on our new design (which you can currently switch on and off). If you haven't switched the new design on, the images may look different.
Alternatively, create an invoice with quick capture.
Any previously create quotes can be converted to invoices. If not, create a new invoice.
Make sure that you have set up your invoices before proceeding.
-
Go to Sales then select Sales invoices and select Create new Sales invoice.

- The Sales Invoice Number is automatically generated based on your last highest numbered invoice. You can enter a different number, but it must be unique.
- Select a Customer from the list or select +to add a new customer.
- If the customer has sent you a purchase order, enter the reference in Purchase Order.
- The Billing Address and Delivery Address are populated from the selected customer but can be changed.
-
The Issue Date is the date the invoice was raised. It defaults to today's date, but can be changed
-
The Due Date is the date that the payment is due based on your default payment terms, but can be changed.
- The Currency defaults to your chosen currency but can be changed if you are invoicing this customer in a different currency.

By default the first line item is added when you select Create new Sales invoice.
Adding additional lines items
-
Select Add Line Item.

-
Select the Sales Code from the list to set the nominal code (this is mandatory if you use stock linking).
Sales codes can be configured to meet your chart of account needs. You can also create products and attach them to sales codes. You can then select a product and the Description and Price are automatically populated.
-
If you have set up Products, select one from the list or select + to add a new code and product name. You can also leave this field blank.
-
Enter the Qty then add a Description if needed.
-
If you use projects, select which Project to link the invoice to from the list. This helps you track project income and expenditure.
-
Enter the cost per item without VAT in Rate (known as the net value). The Total is automatically calculated based on the Qty and Rate.
If you are VAT registered, select the VAT Rate charged from the list. The VAT amount is calculated based on the Rate and VAT Rate, but can be changed. The Total is the sum of Rate and VAT for the line item. -
Select Disallowed if this amount represents an expense or partial expense that cannot be claimed for tax purposes. Selecting this option will ensure the values feed the SA103 report correctly, where required.
-
Depending on your discount settings, you can apply a manual discount by selecting Apply *% discount. If automatic discounts have been chosen, these are applied when the product code is selected.
-
Select Add Comment to add a comment relating to the line item.
-
If configured, you can add a PayOnline button to the invoice so that your customers can click the button and pay straight away.
-
Repeat these steps to add any further items.
You can drag and drop line items to re-order them.
-
Select Save.
IRIS Pay widget
The IRIS Pay widget is a powerful tool that can streamline your payment process, making it easy for you to efficiently manage your finances.
To use the widget, IRIS Pay setup must be complete and the invoice should not be paid.
The widget will not display for overpaid invoices, credits notes, or bad debts.
Once you have created the invoice and added the line items as required, from the IRIS Pay widget you can:
-
Select Instant Bank Transfers and Cards.
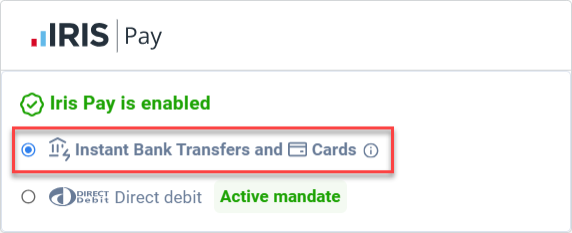
The PayOnline button will be included on the invoice when it is sent to the customer. When selected the customer can choose to pay using debit/credit card payments or via instant bank transfer.Requires IRIS Pay as default payment processor and configuration of PayOnline button
-
Select Request Mandate.
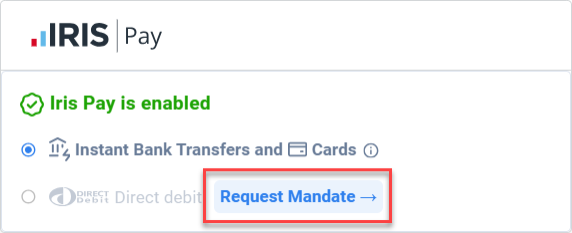
This will start the process of creating a direct debit mandate with the customer. Once sent, you can monitor the status of the mandate request in the IRIS Pay portal. Once the mandate is accepted by the customer the invoice balance will automatically be added to your upcoming collections. -
Select Direct Debit.
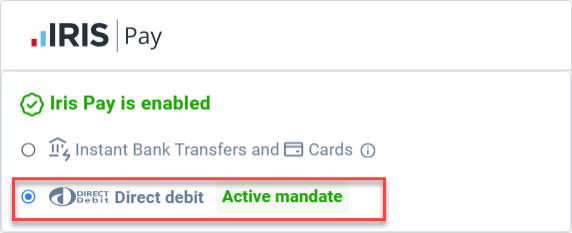
If you already have a direct debit mandate agreed with the customer you can select the direct debit option. When you save this invoice the invoice balance will be automatically added to your upcoming collections.
- The invoice number should not be changed.
- Within three days of the collection, the customer on the invoice should not be changed.
- If you change the customer on an invoice with an upcoming collection, make sure to cancel the previous collection created.
- Within three days of a collection, an invoice should not be deleted.
- If you delete an invoice with an upcoming collection, remember to cancel the previous collection created.
Next steps: