Run and Edit Student Reports
A comprehensive student report is available in IRIS Reach that includes data extracted from your Management Information System (MIS), together with a complete record of all inbound and outbound communications with any person A parent, legal guardian, carer, or someone responsible for a student. linked with the student.
- Select Reports Manager > Student Report.
- The Reports Manager - Student Report page is displayed. In the Search for a Student panel, enter the Student Name*. Select the student from the list, then select Go.
- The Reports Manager - Student Report page is displayed for the selected student consisting of a number of panels. There a various functions that can be carried out within each panel, and the panel order can also be changed to suit your requirements. For more information, go to Managing Data Panels.
The following panels are available on the student report:
- Student Attendance Report Reports created from attendance mark records in your Management Information System (MIS).
- Student Notes
- Unanswered Absence Breakdown Report
- Answered Absence Breakdown Report
- Absence Day Breakdown Report
- Lates Day Breakdown Report
- Absence Reporting Log
- Group Message Log
- In App Message Log
- Email Log
- InBound Message Log From Matching Contacted Numbers
- Inbound Voicemail
- Outbound Reply Message Log From Matching Contacted Numbers
- Group Letter Log
- Extended Behaviour Log
- Blocking and Language
- Student Digital Documents
- Student Additional Data
Student Attendance Report
In Quick Tools, select Send Message, Send Email, or Create Letter to send communications to a person linked to the student.
An attendance summary for the following is displayed:
- Attendance — the attendance performance as a percentage.
- Auth Absences — the percentage of absences where the organisation A school, multi-academy trust (MAT), single academy trust (SAT), club, nursery or organisation that uses the software. has approved the absence or has accepted an explanation provided.
- Unauth Absences — the percentage of unauthorised absences.
- Possible — the number of am/pm sessions the student should have attended.
- Missing — the number of am/pm sessions the student did not attend.
- Attendance Not Required — the number of am/pm sessions the student was not required to attend.
- Authorised Absences — the number of days of authorised absences where the organisation has approved the absence or has accepted an explanation provided.
- Unauthorised Absences — the number of days where authorisation for the absence was not given.
- Unexplained Absences — the number of days of absence where an explanation has not yet been provided.
- Late Before Reg — the number of days (and percentage) the student was late but arrived before registration.
- Late After Reg — the number of days (and percentage) the student was late and late for registration.
- Late Both — the total for both before and after registration lateness.
The Attendance Doughnut provides a visual representation of the attendance performance, broken down into attendance, authorised absences, and unauthorised absences.
Student Notes
The Student Notes panel is used to view or add any notes to the student record. Notes can be added manually or automatically, for example, an attendance code which is automatically generated when unauthorised absence codes are added. Notes are displayed with the Date the note was posted, the Staff Name who entered the not, and the content of the Note.
- To add a note, enter the content in Notes, then select Go.
- A message is displayed to confirm the note has been added. Select OK to return to the Student Report page.
Unanswered Absence Breakdown Report
The Unanswered Absence Breakdown Report panel displays every registration period (AM and PM) for today through to the following week where no reason has been given for absence.
- The list includes the Date, Day, and Status. To change an attendance mark, select an option from the Change Status to drop-down list. If required, you can add information about the reason in the empty box, then select Save.
- A message is displayed prompting for confirmation that you want to write this change back to your MIS. Select OK.
If Write Back has been activated for your system, you can select a mark, e.g. N, I, L, etc., which is exported to your Management Information System (MIS). Please contact our Support Team if you would like to activate the function.
Repeat these steps for all other unanswered absences to ensure this is up to date for the student. Any changes made to absence marks automatically generate a note, which can be viewed in the Student Notes panel.
Answered Absence Breakdown Report
The Answered Absence Breakdown Report panel displays every registration period (AM and PM) for the current year where a reason for absence has been provided. The list includes the Date, Day, and Status. Any attendance mark can be changed selecting the required mark from the Status drop-down list.
If Write Back has been activated for your system, you can select a mark, e.g. N, I, L, etc., which is exported to your Management Information System (MIS). Please contact our Support Team if you would like to activate the function.
Absence Day Breakdown Report
The Absence Day Breakdown Report panel displays the percentage of absence by morning, afternoon, and full days, for you to investigate further if necessary.
Lates Day Breakdown Report
The Lates Day Breakdown Report panel displays the percentage of late marks for each day of the week, broken down by AM, PM, and total days, for you to investigate further if necessary.
Absence Reporting Log
The Absence Reporting Log panel lists all the absence messages that have been sent relating to this student, together with the costs incurred. The list includes the date the message was Sent, the Student Name, Reg group, Recipient, a summary of the Message, the message Type, who it was Sent By, and whether it was Delivered.
Group Message Log
The Group Message Log panel lists all messages sent to groups to which the student belongs, e.g. registration group, together with the costs incurred. The list includes the date the message was Sent, the Student Name, Reg group, Recipient, a summary of the Message, the message Type, who it was Sent By, and whether it was Delivered.
In App Message Log
The In App Message Log panel lists all messages sent via the MyEd Name of the application parents and carers use to receive messages sent by schools using IRIS Reach. app. The list includes the date the message was Sent, the Student Name, Reg group, Recipient, a summary of the Message, the message Type, and who it was Sent By.
Email Log
The Email Log panel lists all messages sent or received relating to the student. The list includes the date the message was Sent, whether the message was sent or received (In / Out) the Recipient/Sender of the message, a summary of the Message, and who it was Sent By.
From the Audit Trail - View Email page, select the Message hyperlink to view the message.
Inbound Message Log From Matching Contacted Numbers
The Inbound Message Log From Matching Contacted Numbers panel lists all messages received relating to the student. The list includes the date the message was Received, the Number the message was sent from, and preview of the Message.
Inbound Voicemail
The Inbound Voicemail panel lists the date and time of any voicemail Received relating to the student. From Action, select Download Voicemail to listen to the message.
Outbound Reply Message Log From Matching Contacted Numbers
The Outbound Reply Message Log From Matching Contacted Numbers panel lists outgoing messages to the student sent using the virtual contact numbers created for your organisation.
Group Letter Log
The Group Letter Log panel lists all group letters sent relating to the student and includes the Date/Time the letter was sent, who it was Sent By, the Send Reference. From Action, select Reprint Letter to download a PDF of the letter, which can be opened and printed in the usual way (the method depends on which internet browser you are using).
Extended Behaviour Log
The Extended Behaviour Log panel provides details of any behaviour issues that have been recorded - only if this section is used in your SIMS system. It includes:
- Date — dates of the behaviour
- Type — the type of the behaviour
- Location — the location the behaviour occurred
- Time — the time the behaviour occurred
- Description — the description of the behaviour
- Outcome — the outcome of the behaviour
- Status — the status of the behaviour
- Lesson - Period — the lesson - period when the behaviour occurred
- Lesson - Class — the lesson - class where the behaviour occurred
- Lesson - Subject — the lesson - subject being taught when the behaviour occurred
Blocking and Language
The Blocking and Language panel allows you to view the language set in Section 5, subsection 5, Home Language of your Management Information System (MIS), or select the Message Translation Language that communications should use in the system where the recipient does not use English as their first language, and the language has not been set in your MIS.
Languages only apply to group messages or In-App messages sent from IRIS Reach. It does not apply to any other type of communication or attachments.
If you need to stop all communications to a person about a student, select Blocked Communications. For more information, go to Block and Unblock Communications.
If either setting has been changed, select Go to confirm the changes.
Student Digital Documents
The Student Digital Documents panel displays all documents that have been sent using the Send a Digital Document option in Parent Reach Module for IRIS Reach used to send MyEd app messages, texts, or emails to parents and carers for individual or all students., or that have been added in this panel. For more information, go to Send Digital Document Communications.
- # — document number
- Document — select the hyperlink to view a copy of the sent document
- Last Update — the date and time the digital document was last updated
- Downloaded — the date and time the digital document was downloaded by the recipient
- Last Sent — the date and time the digital document was last sent
- Update — select to update the digital document
- Remove — select to remove the digital document
Update Digital Documents
- Select Update.
- The Update Student's Digital Document page is displayed. Select Choose File to upload your document, then find and select the required document.
- Select Go to confirm the update.
Remove Digital Documents
- Select Remove.
- The document is removed instantly.
If a document is removed in error, it needs to be uploaded again.
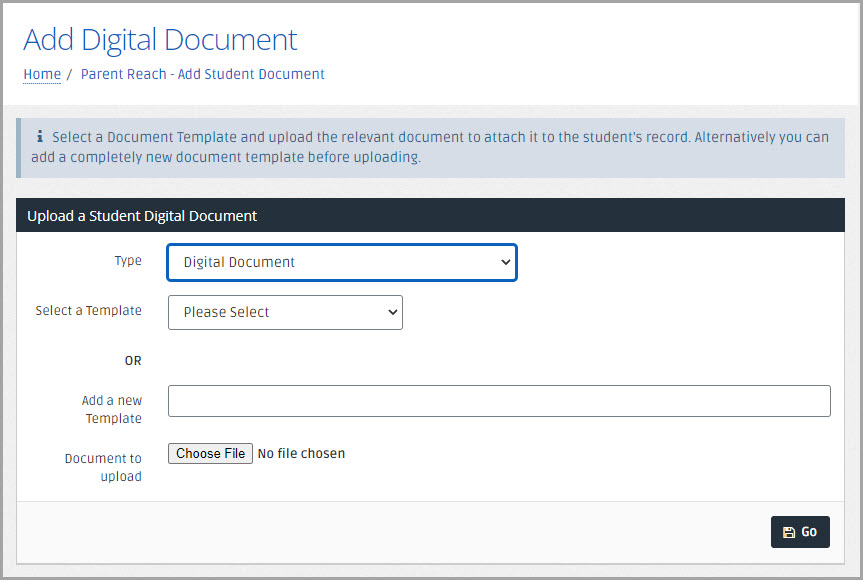
Adding Digital Documents
- Select Add a digital document.
- The Add Digital Document page is displayed. From Type, select Digital Document or Exam Timetable (RSConnectEd format csv only). (In most circumstances, Digital Document should be selected).
- From Select a Template, select the required document template. Alternatively, enter the name of a new template in Add a New Template.
- Select Choose File to find and select the required document. The name of the file is displayed adjacent to Document to upload.
-
Select Go to add the digital document to the student.
Student Additional Data
The Student Additional Data panel displays a variety of information extracted from your Management Information System (MIS) such as Mode of Transport, Dietary Preference, Emergency Consent, etc.