Student contact details
Once you have opened a student record in the Pupil Manager module, use the Contacts tab to view and manage contact information.
This tab may contain Custom Fields.
To amend Contact details:
- In the Pupil Manager module, select a student records tab.
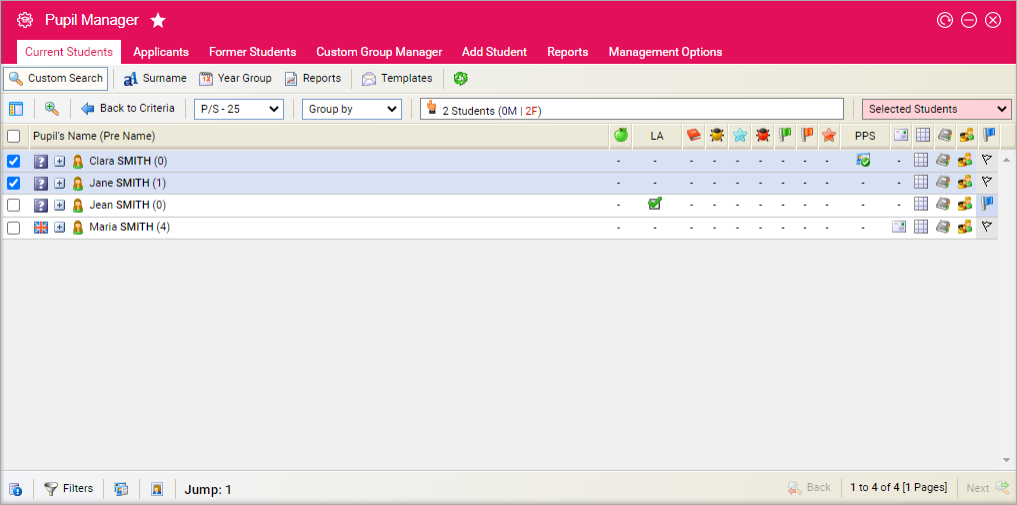
- Use your preferred search method to find the student records that you want to work with. The Student/Pupil Records List is displayed:
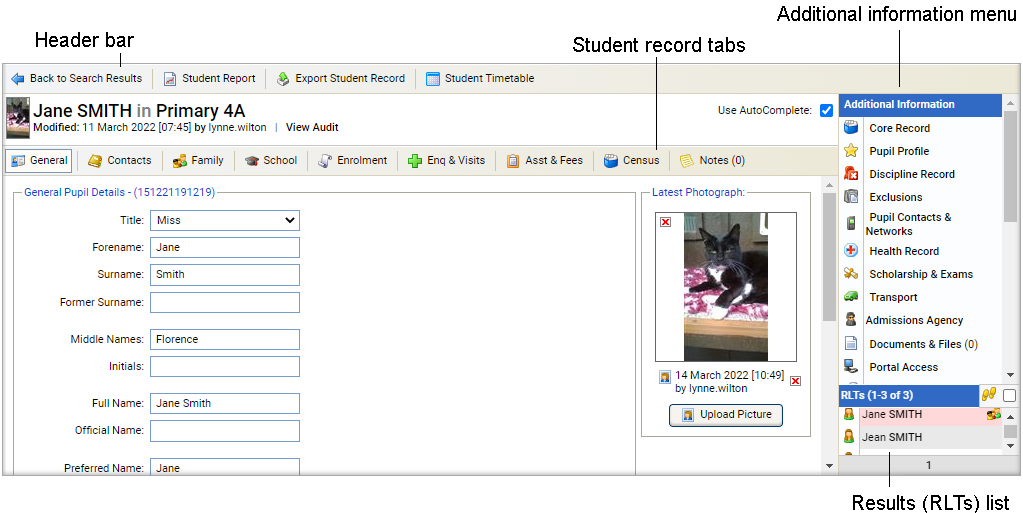
- Click on a student's name to display their record:
- Select the Contacts tab:
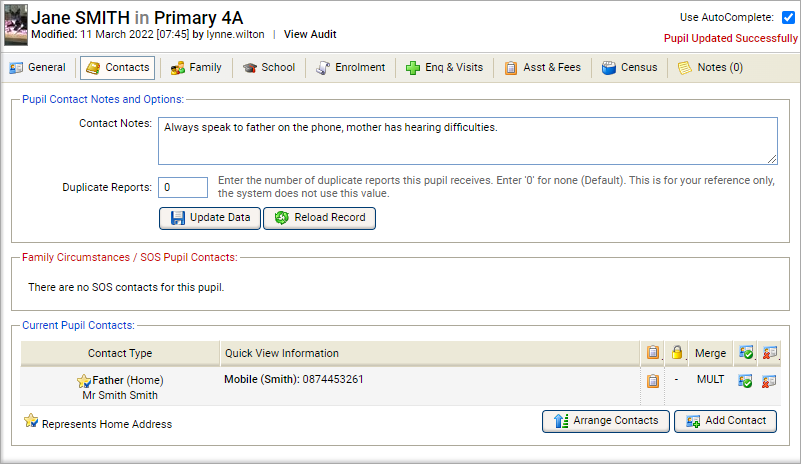
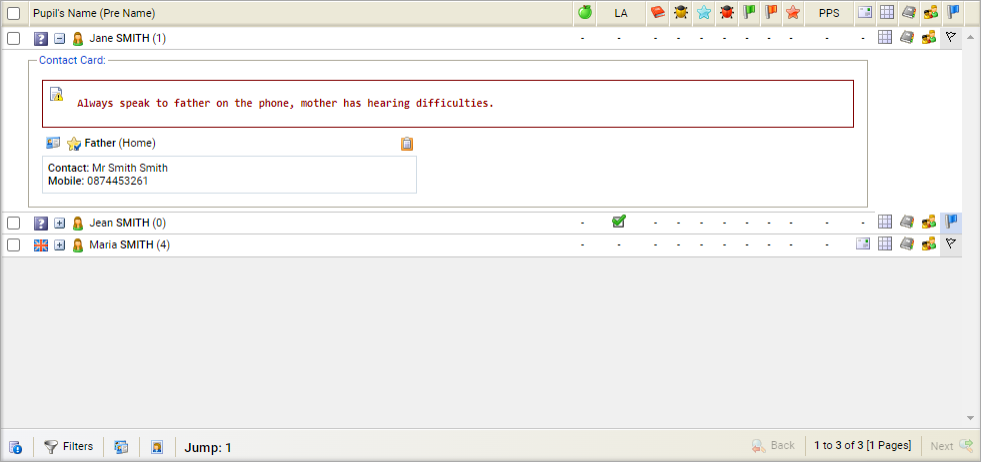
- Enter Contact Notes to highlight information regarding student contacts. This is useful for explaining relationships between the student and their contacts. Contact notes can be viewed in the student record or in a student record list when you choose to display contact cards:
- Use the Duplicate Reports field to enter the number of duplicate reports you want to produce. Use this if you want to produce multiple copies of reports to send to student contacts. This is for your reference only, duplicate reports are not automatically produced.
-
ClickUpdate Data
to save Student/Pupil Contact Notes and Options entries.
All Current Student/Pupil Contacts are listed at the bottom of the screen.
Contact properties are identified using icons and abbreviations:
Icon/Identifier Explanation 
Private contact. 
Contact only. ALL Contact receives all mail options. COR Contact receives all school correspondence. RPT Contact receives school reports. MULT Contact receives multiple (but not all) mail options. -
Use the buttons available in the Current Student/Pupil Contacts section to manage student contacts:
Add a new contact
Add more student contacts, including emergency contacts:
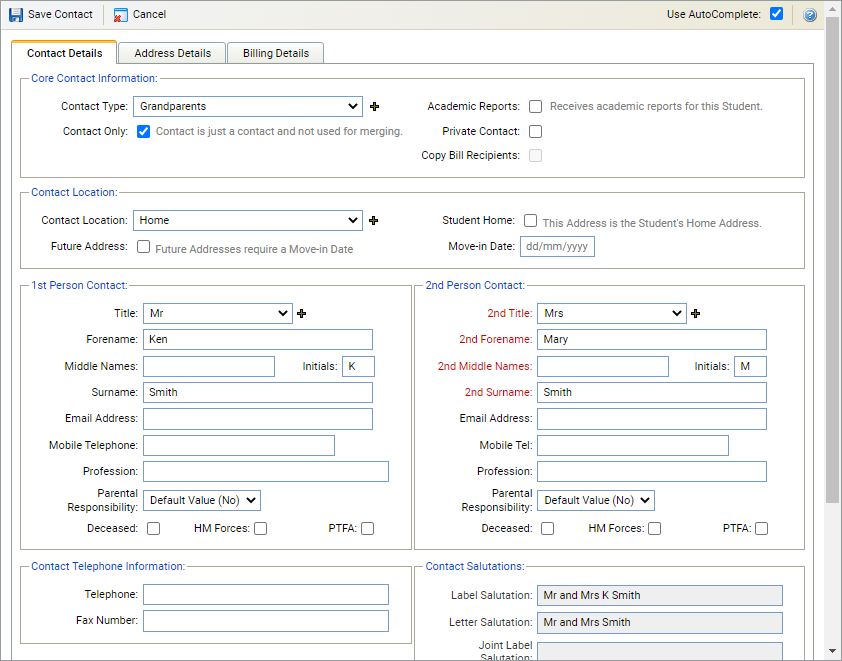
- Click Add Contact in the bottom right of the section to display the Student Contacts window:
- Select the Contact Details tab:
- Check the AutoComplete box in the top right of the window for fields to capitalise automatically as you complete them. Uncheck the AutoComplete box to override automatic capitalisation.
-
Complete the Core Contact Information section:
Field Explanation Contact Type Select the Contact Type which best describes the student contact. Only select joint contacts for contacts who reside at the same address.
Click the add icon to add a new contact type, if required.
Additional contacts can be set up once a student record has been created.
Your selection in Contact Type may change where the Address Details are displayed in the window (for 1st person only contacts address details are added in this tab and for contacts with a 2nd person an Address Details tab is displayed).
Academic Reports
This checkbox is not in use.
Contact Only
Check the box if the student contact is to receive no correspondence. Use this to list a student contact for information only.
Contacts marked as Contact Only are identified by the red envelope icon in contact records.
Private Contact
Check the box if the student contact is not be linked automatically to the student's siblings. An additional tab (Linked Students/Pupils) is displayed once you save this contact. Use the Linked Students/Pupils tab to link selected student to this contact, if required.
Private Contacts are useful for blended families where the student contact is only linked to selected siblings or other students.
Contacts marked as a Private Contact are identified by the lock icon in contact records.
Mail Options
Check the boxes to select the type of correspondence that the student contact receives:
- All Merges (ALL). To receive all correspondence. This is not being used.
- Billing (BIL). To receive student invoices. This is not being used.
- Correspondence (COR). To receive all general school correspondence, such as weekly newsletters.
- Reports (RPT). To receive the student's academic reports.
Mail options are identified by the abbreviations shown above in the Merge column of contact records.
Contact can be shared with other Parents
Check the box if the student contact is happy for their details to be shared with other parents. It is sometimes useful for student contacts to be shared among form groups so that parents can contact each other.
List Shared Contacts in a SSRS report, if required. Contact the Help Desk if you need help writing an SSRS report.
-
Select a Contact Location from the drop-down list
and check the Student Home box if this is the same
as the student's home address.
- Student Home must be checked if you want use the Send to Home selection when writing to student contacts. Only one contact should be marked as the Student Home address. These are identified with a star icon in the Current Pupil Contacts list in a student contact record. If more than one contact is marked as a Student Home address this causes issues in the External Exams Manager module when registering candidates for exams.
- Use the Future Address checkbox to set the address as a future address and add a Move-in Date if required.
-
Complete the 1st Person Contact and 2nd Person Contact sections,
as required. The 2nd Person Contact section is
only displayed for selected joint Contact Types.
- Enter male contact details in the 1st Person Contact section when adding joint contacts. This ensures that the Family tab operates as expected in a student record.
- Use the Parental Responsibility drop-down to override the default setting of parental responsibility over the student, as required. Defaults are set in Control Panel > Global List of 'ContactType'. The selection made here is pulled into the ISC Census.
- Check the Deceased box if a contact has died. All contact and address details for contacts marked deceased are removed. The contact is listed as deceased in student records.
- Check the HM Forces box if a contact is a member of the Royal Navy, British Army or Royal Air Force. The selection made here is pulled into the ISC Census.
- Check the PTFA box to indicate that the contact is a member of the 'Parent, Teachers and Friends Association'. List contacts marked PTFA in a SSRS report, if required. Contact the Help Desk if you need help writing a SSRS report.
-
Complete the Contact Address section (this section
is only displayed in the Contact Details tab when
a 2nd Person Contact is not listed). You cannot
add multiple addresses here. Either:
-
Enter the contact's address details manually.
or - Enter a postcode in the appropriate field and select the Find Address button. Select the correct address, this saves time.
-
Enter the contact's address details manually.
- Enter Contact Telephone Information. Also use this section to enter a fax number and second email address, if required.
- Enter Contact Salutations for written correspondence, as required. Salutations are configured in the Management Options tab.
- Enter Emergency Contact Information for the student. Use the text box to enter the emergency contact's name, telephone number and address.
- Either:
-
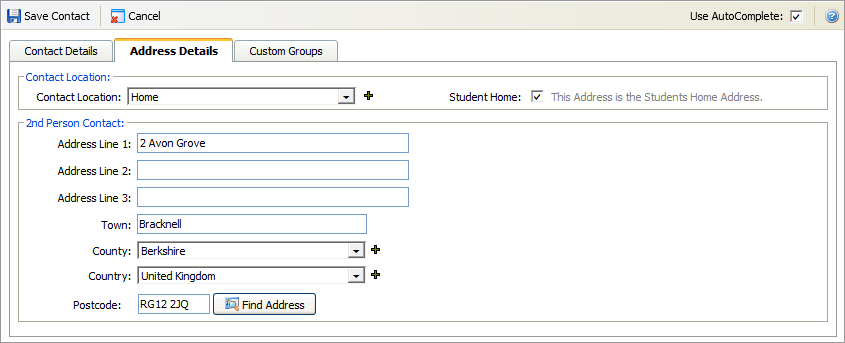
Select the Address Details tab.
This tab is only available if a 2nd Person Contact
is listed for the student.
or -
Select the Custom Groups tab
to add student contacts to Custom Contact Groups. Custom Contact Groups
are used to group together student contacts and can be selected for
mail merges.
or - Click Save Contact. The new contact is listed in the student record.
-
Select the Address Details tab.
This tab is only available if a 2nd Person Contact
is listed for the student.
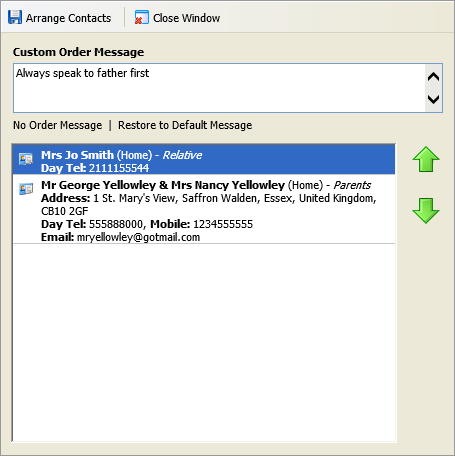
Arrange contacts
Choose to arrange the order that student contacts are listed. This is useful if you have added student contacts and you want to arrange the list in a logical order. You also have the option of adding a message above your list of student contacts. The message you add can be used to highlight who should be contacted first.
- Click Arrange Contacts. The Arrange Contacts window is displayed:
- Either:
-
Add a Custom Order Message in the field
available.
or -
Click No Order Message if no message is
required.
or - Click Restore to Default Message. Select this to inform other users that contacts are listed in order of priority.
-
Add a Custom Order Message in the field
available.
- Click on a student contact and use the arrows available to move the contact up or down the list. This determines to order that contacts are listed in the student record.
- Click Arrange Contacts. The Arrange Contacts window closes and contacts are displayed in the revised order.
Copy contacts
Copy student contacts into an alternative format. This is useful if you want to compile a list of contacts in Word or Excel.
- Click the clipboard icon in your selected contact. The contact details are saved on your clipboard.
- Open your preferred format and paste the details.
Edit student contact details
Use this to ensure that student records are up to date. Select preferred methods of contact and the type of information which can be forwarded to contacts.
- Click the green tick icon in your selected contact to display the Student Contacts window:
-
Select the Contact Details tab and edit the Core Contact Information section:
Field Explanation Contact Type
Select the Contact Type which best describes the student contact. Only select joint contacts for contacts who reside at the same address.
Your selection in Contact Type may change where the Address Details are displayed in the Student Contacts window (for 1st person only contacts address details are added in this tab and for contacts with a 2nd person an Address Details tab is displayed).
Academic Reports
This checkbox is not in use.
Contact Only
Check the box if the student contact is to receive no correspondence. Use this to list a student contact for information only.
Private Contact
Check the box if the student contact is not be linked automatically to the student's siblings. An additional tab (Linked Students/Pupils) is displayed once you save this contact. Use the Linked Students/Pupils tab to link selected students to this contact, if required.
Private Contacts are useful for blended families where the student contact is only linked to selected siblings.
Mail Options
Check the boxes to select the type of correspondence that the student contact receives:
- All Merges. To receive all correspondence. This is not being used.
- Billing. To receive student invoices. This is not being used.
- Correspondence. To receive all general school correspondence, such as weekly newsletters.
- Reports. To receive the student's academic reports.
Mail options are identified by the abbreviations shown above in the Merge column of contact records.
Contact can be shared with other Parents
Check the box if the student contact is happy for their details to be shared with other parents. It is sometimes useful for student contacts to be shared among form groups so that parents can contact each other.
List Shared Contacts in an SSRS report, if required. Contact the Help Desk if you need help writing an SSRS report.
-
Select a Contact Location from the drop-down list and check the Student Home box if this is the same as the student's home address.
-
Student Home must be checked if you want use the Send to Home selection when writing to student contacts. Only one contact should be marked as the Student Home address. These are identified with a star icon in the Current Pupil Contacts list in a student contact record. If more than one contact is marked as a Student Home address this causes issues in the External Exams Manager module when registering candidates for exams.
- Use the Future Address checkbox to set the address as a future address and add a Move-in Date if required.
-
-
Edit the 1st Person Contact and 2nd Person Contact sections,
as required. The 2nd Person Contact section is
only displayed for selected joint Contact Types.
- Enter male contact details in the 1st Person Contact section when adding joint contacts. This ensures that the Family tab operates as expected in a student record.
- Use the Parental Responsibility drop-down to override the default setting of parental responsibility over the student, as required. Defaults are set in Control Panel > Global Lists of 'ContactType'. The selection made here is pulled into the ISC Census.
- Check the Deceased box if a contact has died. All contact and address details for contacts marked deceased are removed. The contact is listed as deceased in student records.
- Check the HM Forces box if a contact is a member of the Royal Navy, British Army or Royal Air Force. The selection made here is pulled into the ISC Census.
- Check the PTFA box to indicate that the contact is a member of the 'Parent, Teachers and Friends Association'. List contacts marked PTFA in an SSRS report, if required. Contact the Help Desk if you need help writing an SSRS report.
-
Edit the Contact Address section (this section
is only displayed in the Contact Details tab when
a 2nd Person Contact is not listed). You cannot
add multiple addresses here. Either:
-
Enter the contact's address details manually.
or - Enter a postcode in the appropriate field and select the Find Address button. Select the correct address, this saves time.
-
Enter the contact's address details manually.
- Edit the Contact Telephone Information. Also use this section to enter a fax number and second email address, if required.
- Edit Contact Salutations for written correspondence, as required.
- Edit the Emergency Contact Information for the student. Use the text box to enter the emergency contact's name, telephone number and address.
- Click Save Contact.
Parent details can also be edited by selecting the Family tab in a student record and selecting the edit icon next to your selected contact.
Use the AutoComplete checkbox in the top of the Student Contacts window for fields to capitalise automatically as you complete them. Uncheck the AutoComplete box to override automatic capitalisation.
Click the add icon next to a field to add a new option to a drop-down list.
Edit student address details
Use this to ensure that student records are up to date. This tab is only displayed when a 2nd Person Contact is listed in the Contact Details tab. Use the Contacts Details tab to edit the student address if no 2nd Person Contact is listed.
-
Click the green tick icon in your selected contact to display the Student Contacts window.
- Select the Address Details tab:
-
Select a Contact Location for the contact. Check the Student Home box if this is the same as the student's home address. Student Home must be checked if you want use the Send to Home selection when writing to student contacts. Only one contact should be marked as the Student Home address. These are identified with a star icon in the Current Pupil Contacts list in a student contact record. If more than one contact is marked as a Student Home address this causes issues in the External Exams Manager module when registering candidates for exams.
- Either:
-
Complete the tab with the address details of the contacts listed
in the Contacts Details tab.
or - Enter a postcode in the appropriate field and select the Find Address button. Select the correct address, this saves time.
-
Complete the tab with the address details of the contacts listed
in the Contacts Details tab.
- Click Save Contact.
Address details can also be edited by selecting the Family tab in a student record and selecting the edit icon next to your selected contact.
Use the AutoComplete checkbox in the top of the Student Contacts window for fields to capitalise automatically as you complete them. Uncheck the AutoComplete box to override automatic capitalisation.
Click the add icon next to a field to add a new option to a drop-down list.
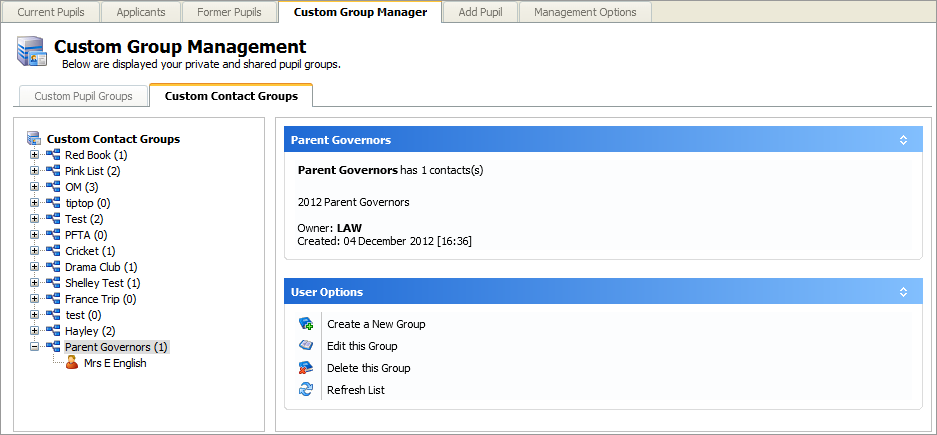
Edit student custom contact groups
Edit which Custom Contact Groups a student contact is linked to. Custom Contact Groups are used to group together student contacts and can be selected for mail merges. For example, add a student contact to a parents association group to include them in correspondence sent to the parent's association.
-
Click the green tick icon in your selected contact to display the Student Contacts window.
- Select the Custom Groups tab:
-
Select Contact Groups for the student contact. Hold Ctrl to make multiple selections.
- ClickSave Contact. The student contacts which you add to the Custom Contact Groups are listed in the Custom Group Manager tab:

Custom group details can also be edited by selecting the Family tab in a student record and selecting the edit icon next to your selected contact.
Use the AutoComplete checkbox in the top of the Student Contacts window for fields to capitalise automatically as you complete them. Uncheck the AutoComplete box to override automatic capitalisation.
Click the add icon next to a field to add a new option to a drop-down list.
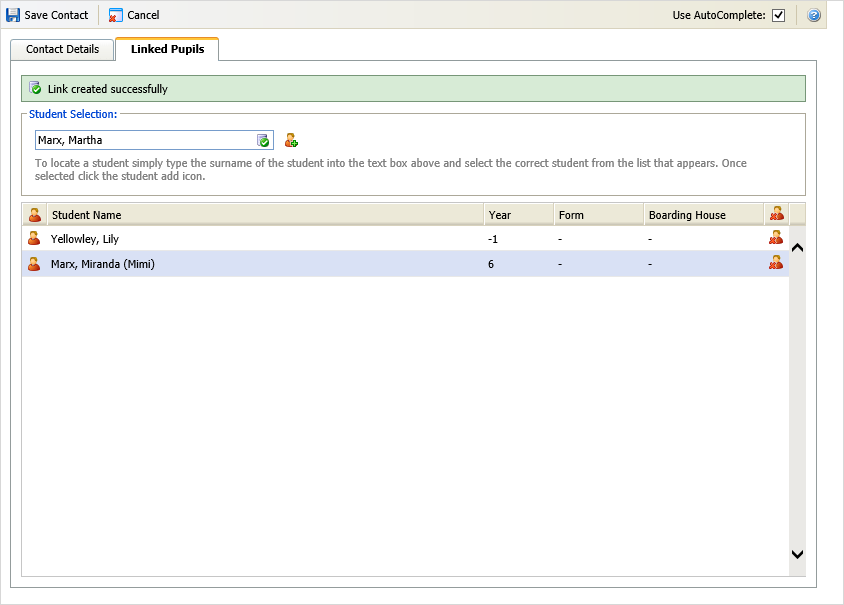
Link Other Students to the Student Contact
Link additional students to a student contact. This is useful for blended families where the student contact is only linked to selected siblings.
The students that you link do not have to be siblings.
The Linked Students/Pupils tab is only available when the Private Contact box has been checked in the Contact Details tab.
- Click the green tick icon in your selected contact to display the Student Contacts window.
- Select the Linked Students/Pupils tab:
- In the Student Selection field start to type a student name and select a student from the list displayed.
- Click the green add icon to link the selected student to the applicant record. All students linked to the contact are listed in the Linked Students/Pupils tab. Click the red delete icon in the list to remove selected linked students.
- Click Save Contact. The linked student is listed in the Linked Students/Pupils tab and the contact is listed in all linked student records.
Delete a student contact
Deleting a student contact from a student record also removes that student contact from sibling records.
-
Click the red delete icon in your selected contact.
You are prompted Are you sure you want to delete this contact from this student?
-
Select Yes.
The contact is removed.