Creating or Editing Payment and Discount Terms
For Sales and Purchase ledger types, it is possible to create/edit a set of payment or discount terms that can be applied to one or more accounts within the ledger via the Payment Terms tab.
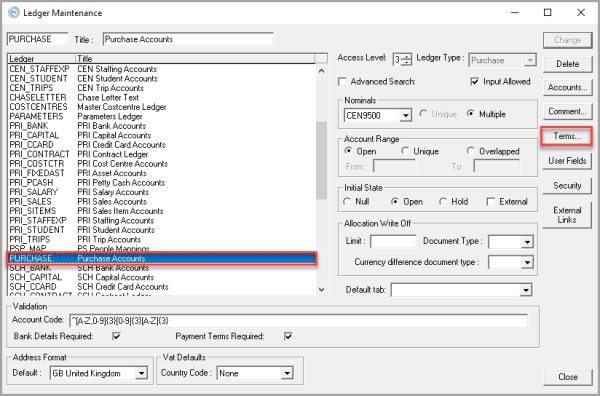
The terms are created by clicking the Terms button on the Ledger Account Maintenance dialog.
The Terms Profile Maintenance dialog is displayed.
The following options are available:
-
Creating/editing payment terms
-
Specifying a grace period
-
Crediting/editing discounts for a payment term
-
View accounts with the payment/discount term
-
Deleting an existing payment/discount term
Creating/editing payment terms
For each term that you want to create, you will need to create a profile by clicking the New button on the Terms Profile Maintenance dialog.
To edit an existing term, highlight it then click the Edit button.
- From the Discount Terms dialog, enter a code in the Profile field together with a Title, e.g. 90_DAYS.
- Choose from the following payment term options. If you do not intend to apply any discounts, click the OK button once the payment term details have been added.
Setting payment terms for a set number of days from invoice
The standard for most UK companies is 30 days from the invoice date, but this can be set to any number. The following example shows the payment term will be for 90 days.
- Select Days from the Type drop-down list. The Expiry field is automatically greyed out.
- Enter the number of days from the invoice date in the Days field.
Setting payment terms for a specific date
This option enables you to specify a specific date when payment is due. This is calculated based on the chosen number of months after the invoice date, together with the specific day of the month entered.
If the due date for the invoice will be the last day of the month, select the Net Monthly option (please see the next section).
- Enter the number of months after the invoice date in the Months field.
- Enter the date within the month in the Days field.
The previous example shows that the payment will be due on the 1st of the month after the invoice date. If the invoice date was 15th June, then payment would be due on 1st July.
Setting payment terms for the end of the month
This option enables you to set payment terms for a set number of months after the invoice date, e.g. the same date of the following calendar month.
- Select Months from the Type drop-down list. The Days field is automatically greyed out.
- Enter the number of Months after the invoice date (typically 1). Using the previous example, an invoice raised on the 5th June would be due for payment on the 5th July.
Setting payment terms to net monthly
This option enables you to set the payment to be due at the end of a future month, typically one month in the future.
- Select Net Monthly from the Type drop-down list. The Days field is automatically greyed out.
- Enter the number of whole Months in the future, typically 1. Using the previous example, if the invoice was dated 15th June then the invoice would be due 31st
Specifying a grace period
For any payment terms created, you can also specify a grace period. If entered, the length of time will be added to the payment term. The debt will still appear on the Aged Debtors/Creditors report, but in the Current section. It will not appear on any payment lists.
Enter the number of days in the Grace period.
Creating/editing discounts for a payment term
or each payment term that has been set up, it is possible to add a discount term which is applied if the payment is made within the specified payment term. This can relate to both sales and payments.
In order to make use of the discount terms, you must have created a suitable nominal to record discounts for reporting and audit purposes. See Creating a New Nominal.
Create the payment term as described in the previous section.
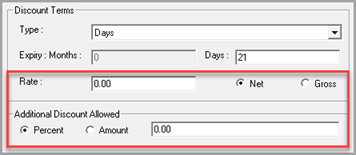
- Enter the amount of discount to be applied if the invoice is paid within payment term, in the Rate Select the Net or Gross radio button as applicable.
- To apply an additional discount on the whole invoice, irrespective of when it is paid, enter the discount in the Additional Discount Allowed field.
- If you want to allow a grace period before sales invoices will be chased, enter the number of days in the Grace field.
- Finally, select the Nominal you want to post the discounts to. Click the OK button to add the payment/discount term.
View accounts with the payment/discount term
Once any payment/discount terms have been added, you will be returned to the Terms Profile Maintenance dialog.
- You can view any accounts who have the payment/discount term applied by highlighting the required payment/discount term then clicking the Accounts button.
- Any applicable accounts are displayed in the Accounts For dialog.
- Click the Close button.
Deleting an existing payment/discount term
Great care should be taken when deleting payment/discount terms, especially those that related to sales invoices as these are used to determine when payment is due.
- Highlight the required payment/discount term then click the Delete button.
- A message dialog will be displayed prompting for confirmation to delete. Click the Yes button.