Creating a Nominal
CUSTADMIN access only
The nominals and ledgers used in this topic may be different to those in your chart of accounts.
When creating nominals, two options are available:
- Create the nominal for a specific location.
- Designate one location in the MAT as a master location. Any nominal subsequently created will automatically be copied across to the remaining locations, saving time and maintaining consistency. See Defining the Master Location for Creating Nominals for more information. The Master location is only configured to work in your LIVE environment. No nominals will be created across other locations if you are in TEST.
Creating the core nominal
The numerical part of the nominal (the core) must be created first. It is strongly recommended that you maintain the chart of accounts number ranges.
- Select Masters > Key Lists from the menu bar.
- The Key List Maintenance dialog is displayed. Select the NOMINALS – Core Nominals key list then right-click anywhere in the Value panel and select Insert from the pop-up menu.
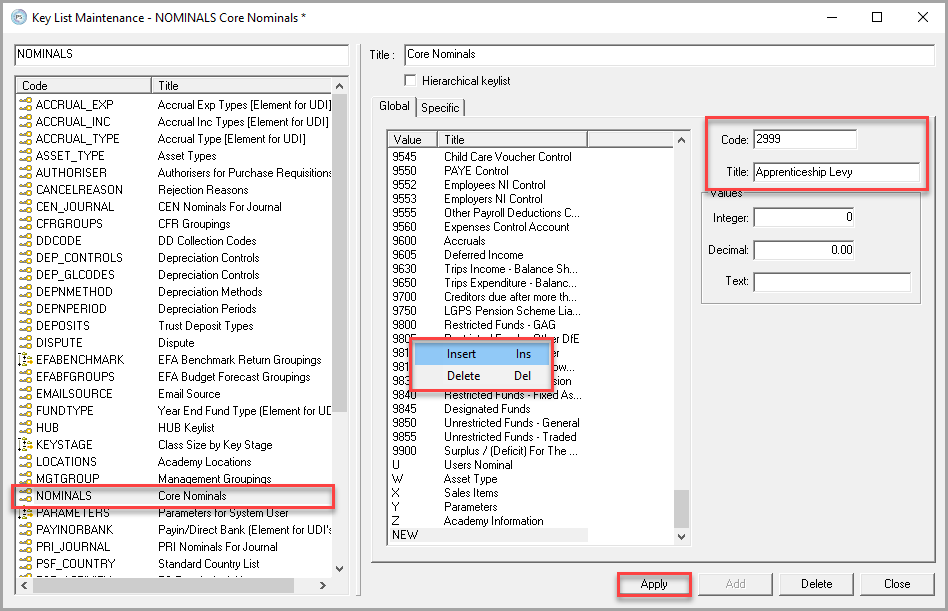
- The word NEW will appear in the Code Overtype this with the core nominal code (4 digits in a standard nominal structure)
- The remaining fields can be left blank. The Text field can be used to set the default VAT rate for the nominal if required (e.g. X, Z, R).
- Click the Apply The core nominal has now been added to the key list.
Creating the nominal account
Creating the account
Once the core nominal has been created, you can now proceed to create a new nominal account.
- Select Masters > Nominal from the menu bar.
- The Nominal Maintenance dialog is displayed. Click the Add button.
- Select the location from the Location drop-down list. If you are creating a nominal to be copied across to all locations, select the master location (see Defining the Master Location for Creating Nominals if you need to define one). If you are creating the nominal for a single location, select the individual location code. The following graphic shows that the master location has been selected, which automatically populates the nominal code with the three location code characters, in the following example, CEN.
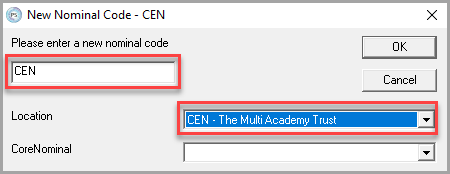
- Select the Core Nominal previously created, from the drop-down list. This automatically updates the New Nominal Code field with the full nominal code (location plus the core nominal)
- Click the OK button. You will be returned to the Nominal Maintenance dialog. Enter the name of the nominal in the Title field.
- Complete the applicable tabs as outlined in the following sections. Once complete, click the Apply button then the Close button to add the nominal.
Linking the nominal to a ledger
If required, the nominal can be linked to a ledger. If linked, an account from the specified ledger will need to be selected when posting. You could for example, link the nominal to an applicable cost centre ledger (e.g. CEN_COSTCTR). When the nominal is selected, an applicable cost centre must also be chosen.
You can only link nominal to a ledger if the nominal has no exiting entries against it. In this circumstance, you would need to create a new nominal, link the ledger to the new nominal, then post a journal to transfer the balance form the old nominal to the new nominal.
If a nominal has no existing entries against it and you wish to link it to a ledger or amend the ledger it is linked to, it can be amended via the Details tab of the Nominal Maintenance dialog.

- From the Details tab, choose the ledger to link the nominal to from the Ledger drop-down list.
- Click the Apply button to save the changes. You will be prompted to select an account to which the details should be posted, after which, any account can be selected. This is a one-off process and is required to create the link. No details are posted to the selected account.
Specifying the nominal type
The type of nominal being created needs to be identified to determine how the nominal is used. Choose whether this is a Balance Sheet (appears on balance sheet reports and rolls over each year) or Trading (appears on surplus/deficit reports and starts afresh each year) nominal from the Details tab by selecting the applicable nominal.
The Detail Analysis drop-down list is used by our commercial customers only and does not require completion.
Setting the quantity options for the nominal
The Quantity panel is used to determine whether a quantity value is required when posting a document (such as for sales or purchase invoices). The most common choice is Optional but can be set to None or Compulsory if required.
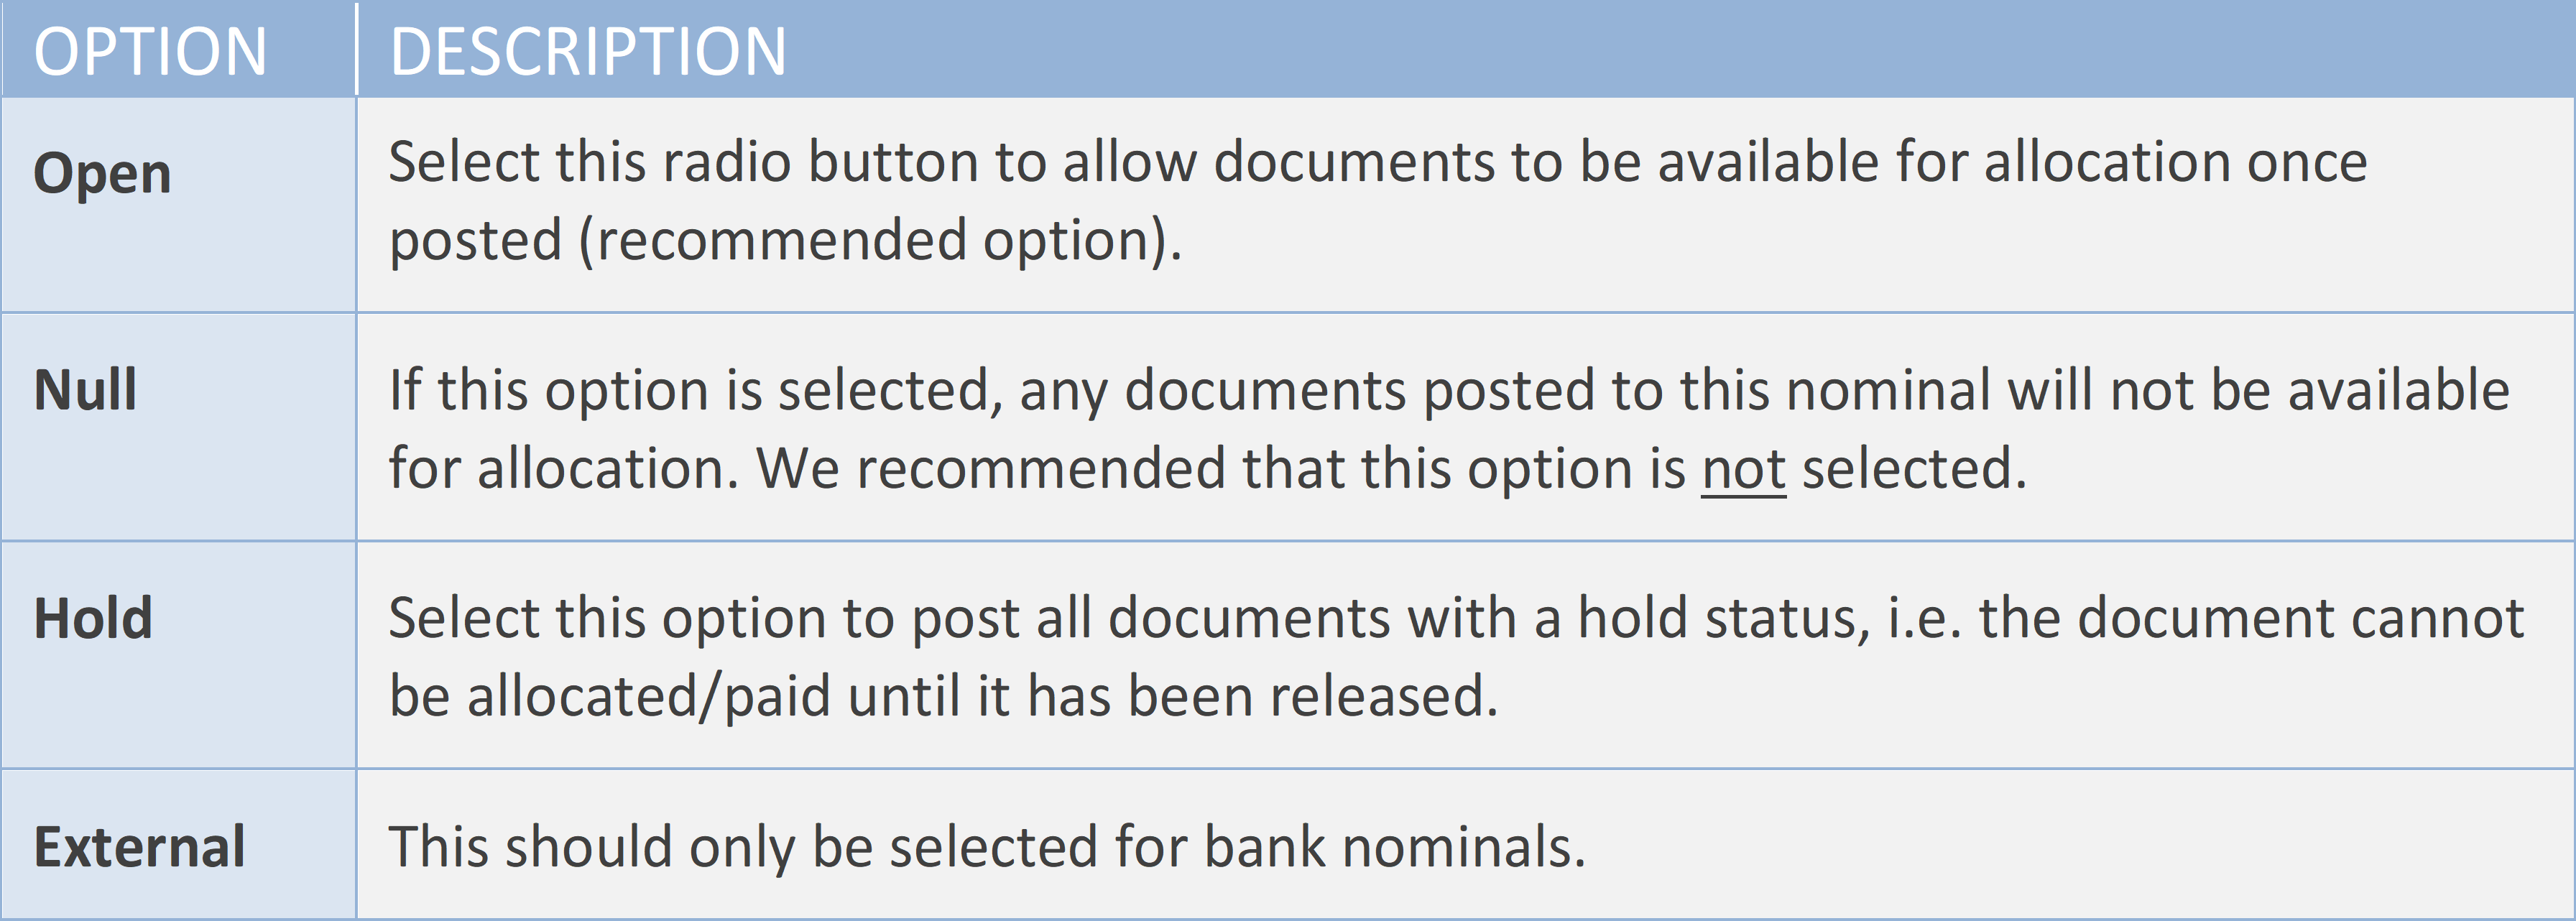
Defining the initial state of documents
The Initial State panel is used to set the initial state of a document posted to this nominal. Choose from the following options:
Specifying the reporting mapping codes
The Analysis tab contains the mapping codes used to determine where the nominal code will be displayed on various reports.
Select a suitable option in the Code Value column for each of the headings. If you are unsure, check a similar nominal code and copy the settings, or use select ZZZ and edit when known.
Adding comments to the nominal
The Comment tab provides the facility to add any required comments to the nominal properties.
This can be useful for providing any information on the setup of the nominal which may be useful to anyone else who manages nominals.
Selecting the nominal indices
Nominal indices help to categorise each nominal code for reporting purposes, as well as being linked to other functions within the system, such as the search facility.
The following table provides an example of some of the indices that may be available:
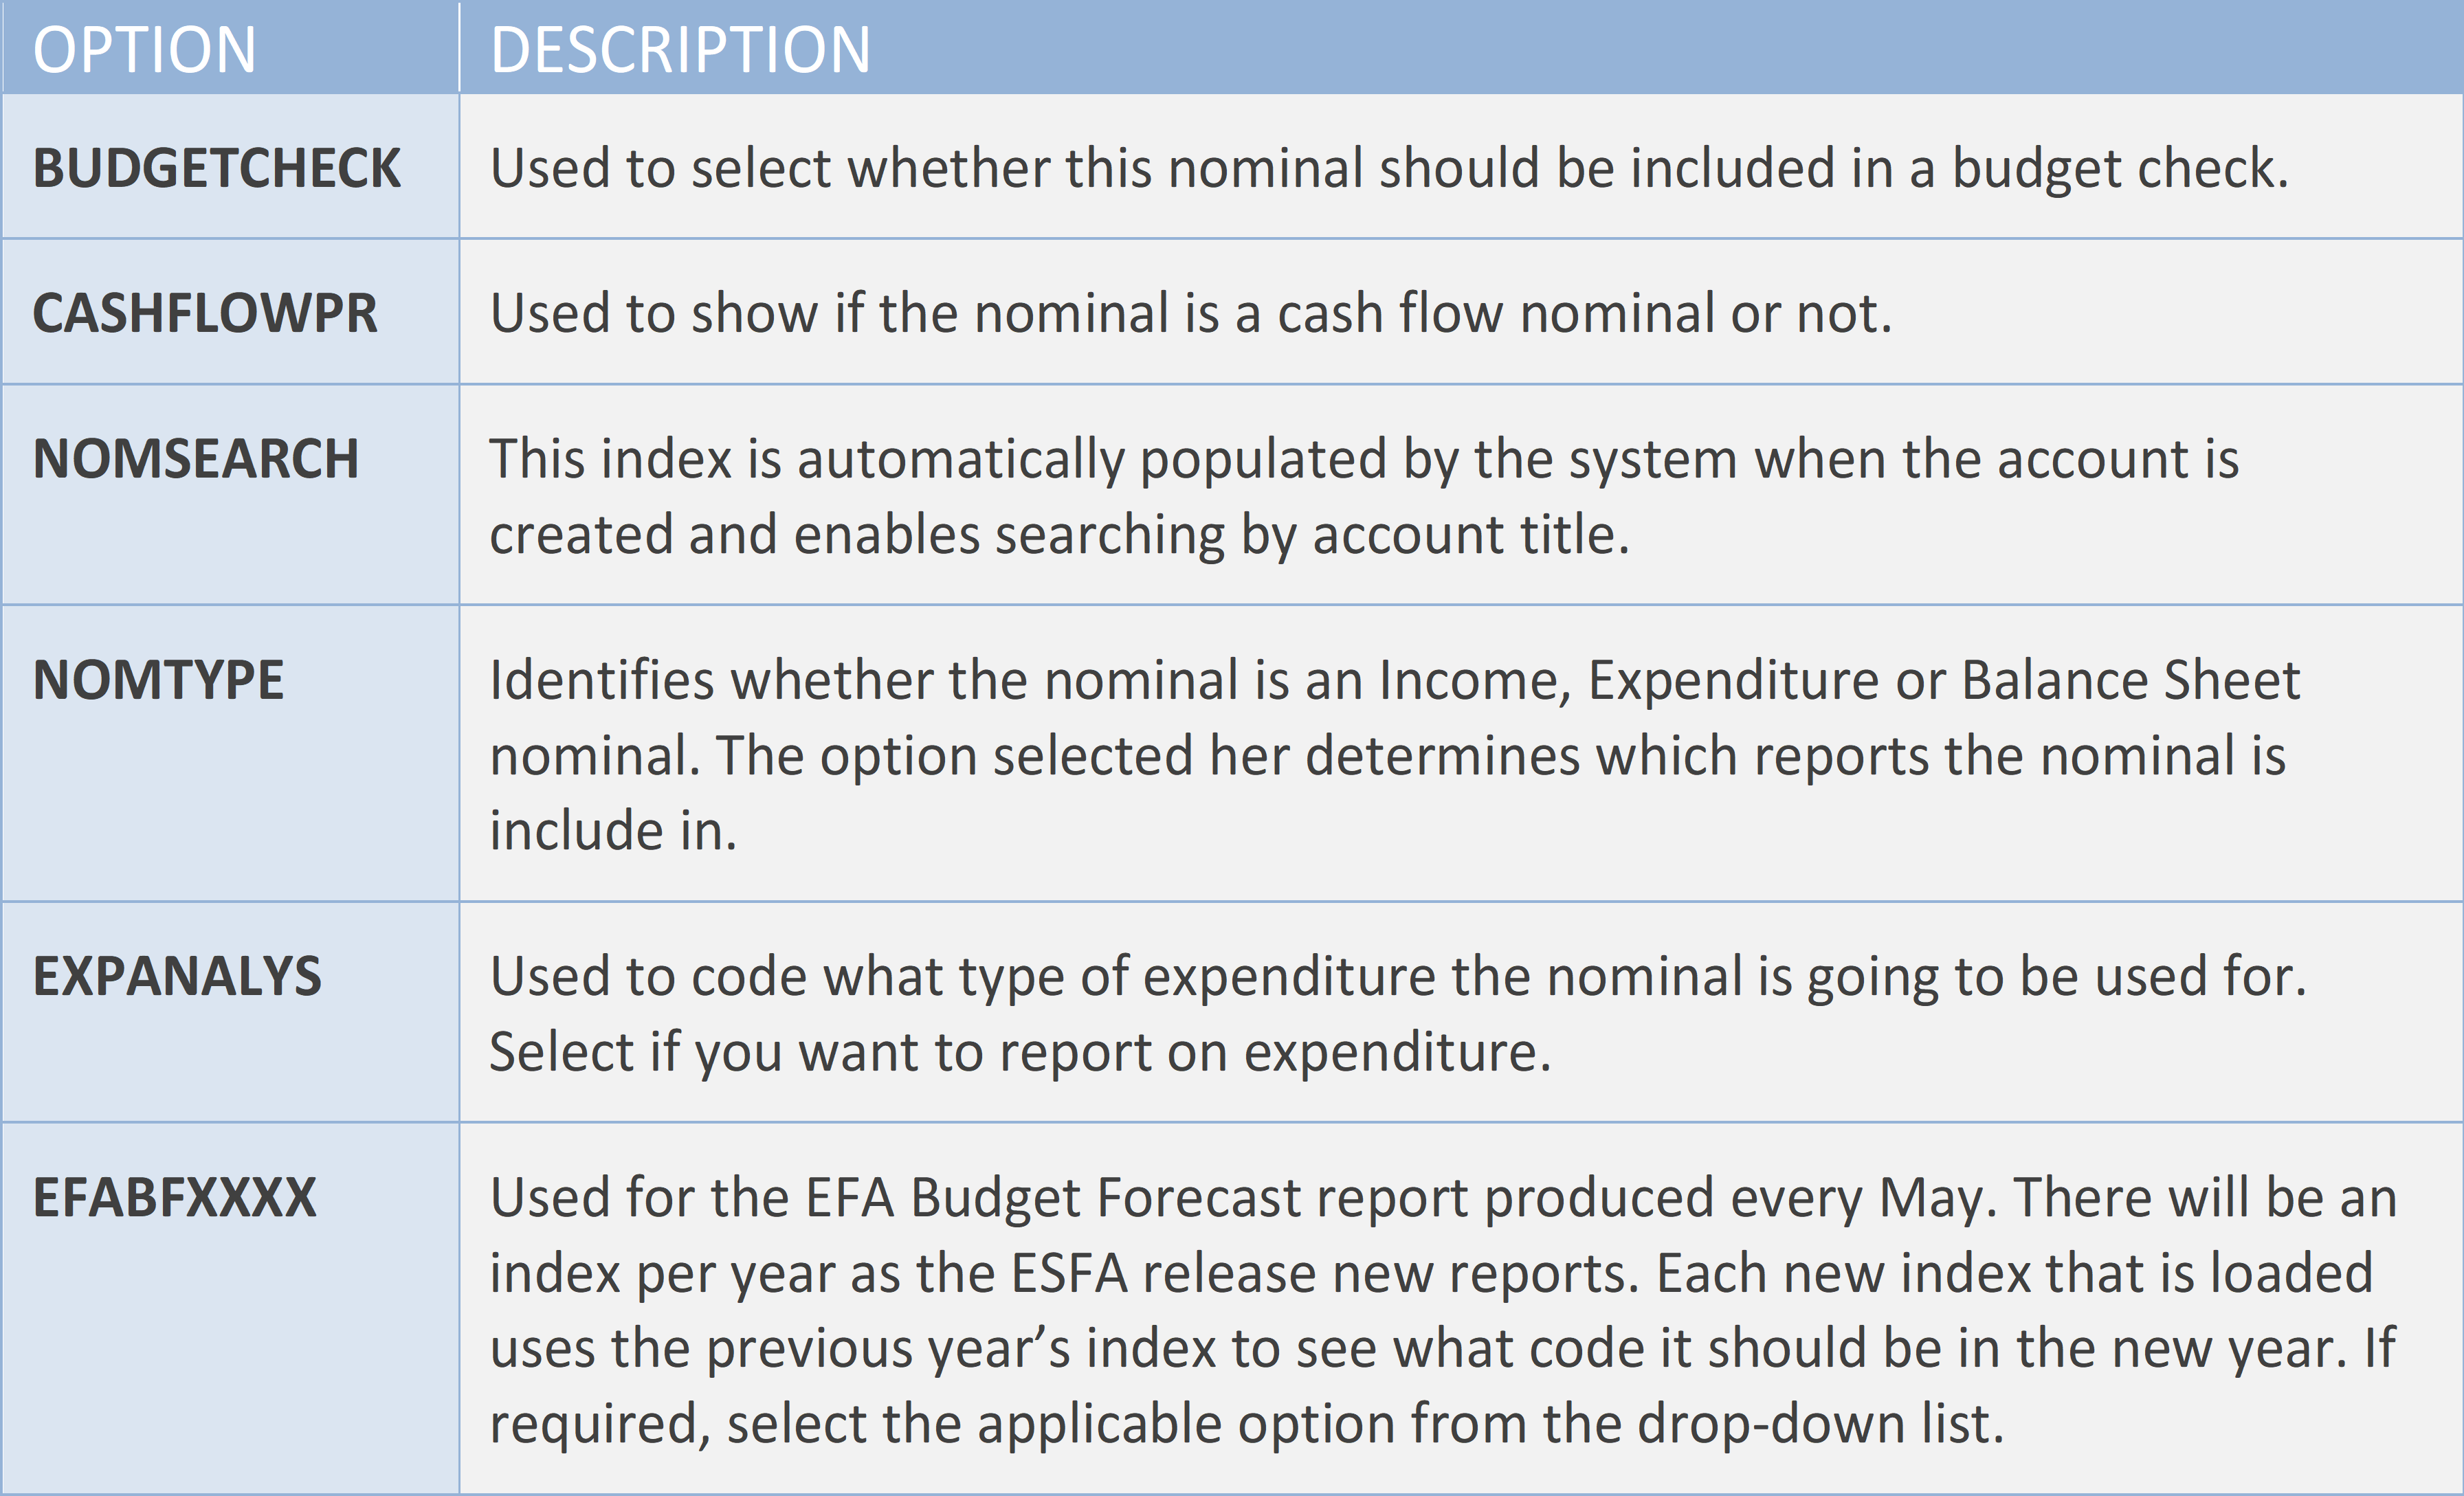
For each index, select the required option form the drop-down list. If required, additional index types/entries can be created as described in Maintaining Indices .
Specifying the nominal security
Security roles can be used to apply security restrictions to nominals. Without them, any user with the applicable access level can view and maintain the nominal and its associated data.
If no security roles are selected, then all users with appropriate access levels can carry out all the functions (view, modify, post, etc).
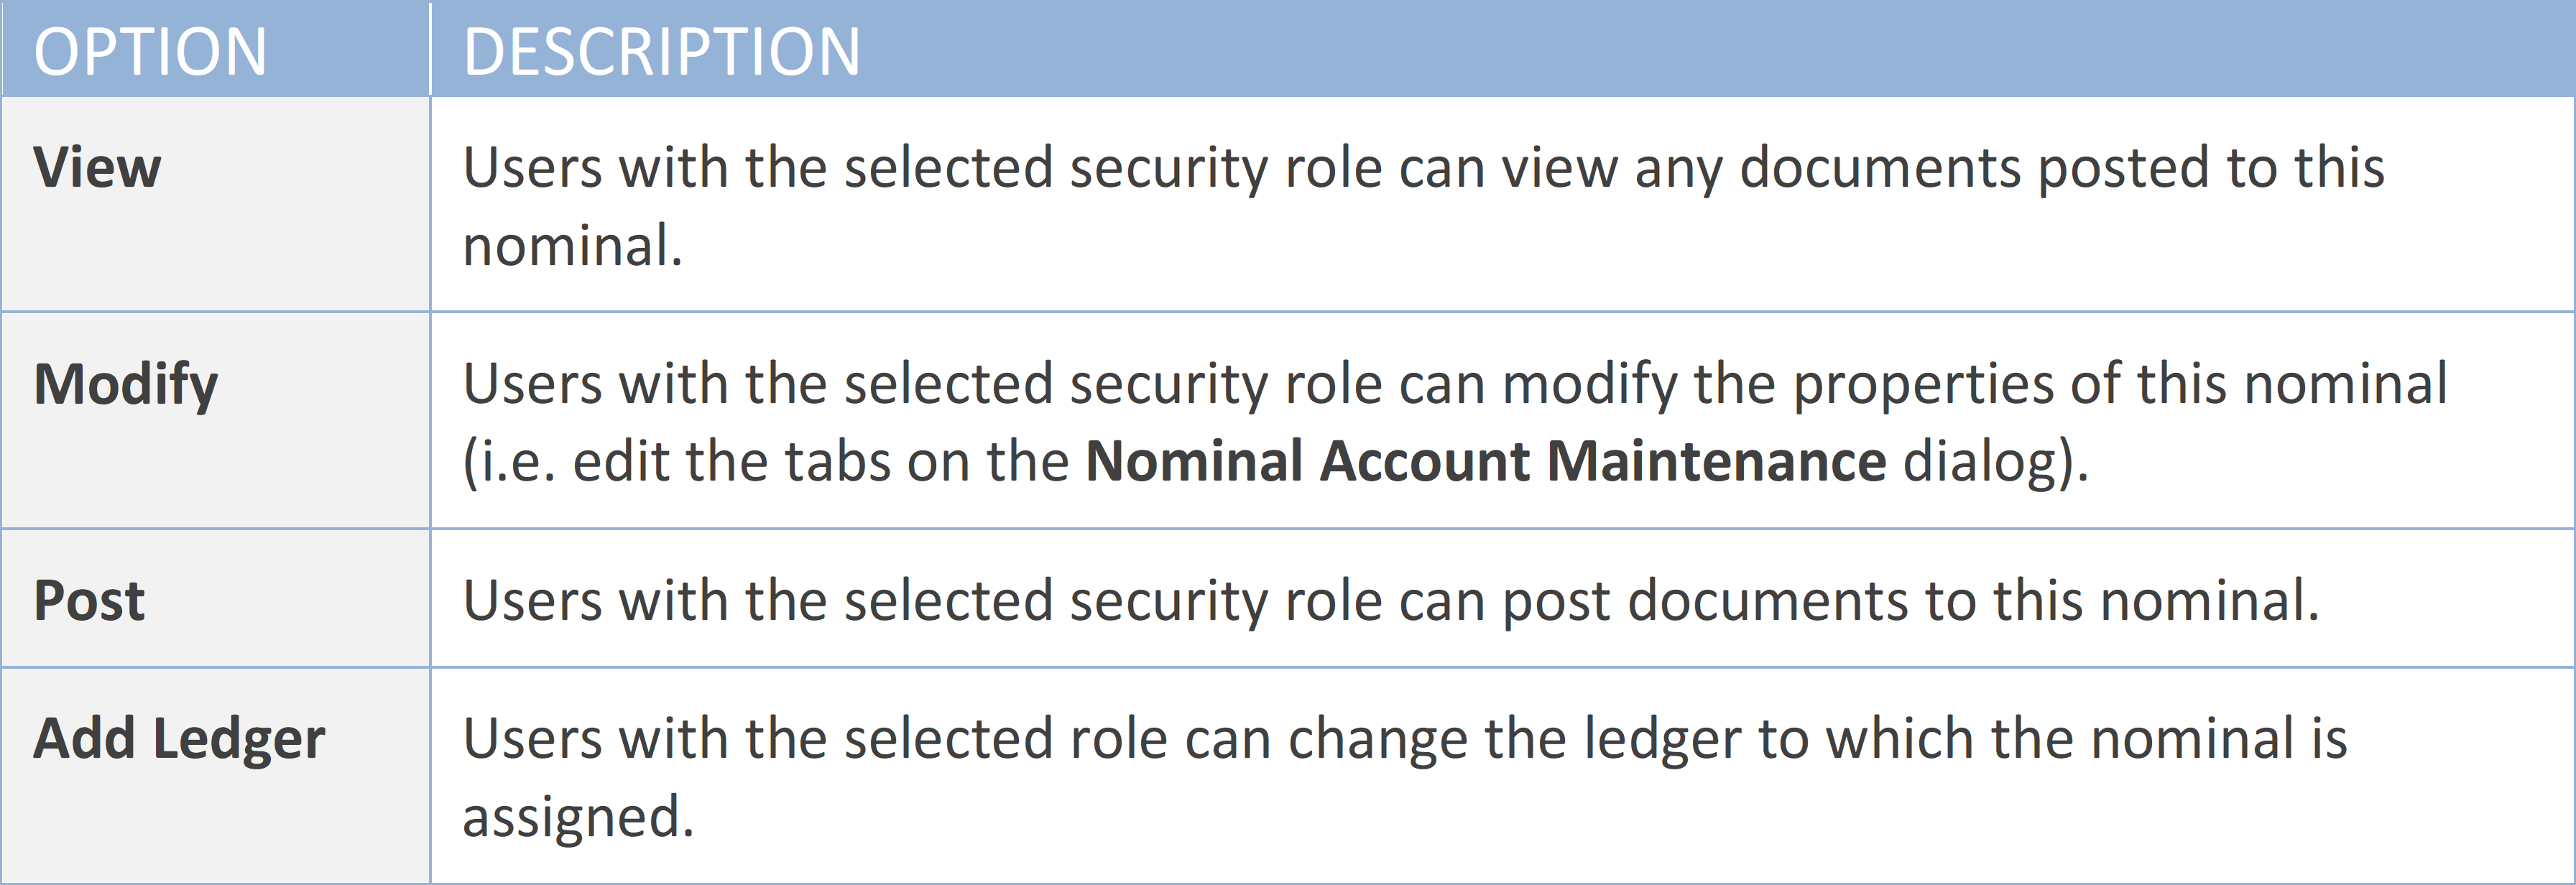
- From the Nominal Maintenance dialog, select the Security tab.
- Select the required roles from the applicable drop-down lists then click the Apply button to save the changes.
In the previous example, users who have the CEN security role assigned can view documents posted to this nominal (as well as the nominal itself), users with NOMMAIN can modify the nominal properties, users with CCMGRS can post documents to this nominal and users with LEDMAIN can link the nominal to a ledger.
Whichever role is shown in the drop-down list, the same role must be assigned to the applicable user group in order to give them access to that part of the system.
Where a nominal has been copied from the Master location, the security settings are not copied (because each location may have a different requirement/setup) and will need to be set for each location.