Install IRIS Financial Planner Sync Tool
The IRIS Sync application transfers key information between PS Accounting andIRIS Financial Planner.
Once the application is installed, you can configure it to transfer the applicable data between IRIS Financials and IRIS Financial Planner. If the IRIS Sync application has been installed and you require information on using it, see Using IFP Sync Tool. If you are a PS Cloud customer, contact the support team who will install this for you.
IRIS Financial Planner Sync should be installed alongside IRIS Financialsso that your intended users can easily access it.
For example, if you use Remote Desktop Protocol (RDP) to connect directly to the server and access PS Financials, it should be installed directly on the server under each users login profile.
However, if users have the IRIS Financials client installed on their desktop and connect to IRIS Financialsserver across the network, IRIS Financial Planner Sync should be installed alongside IRIS Financials on their desktop.
Installing IRIS Financial Planner Sync
To install IRIS Financial Planner sync:
-
Log on to IRIS Financial Planner via the following URL https://authentication.irisfinancialplanner.co.uk/.
This will have been sent to you as part of your IFP onboarding.
-
The IRIS Financial Planner Home page displays. Click the Download button in the IRIS Sync panel. The file will immediately start to download.

-
When the file has finished downloading, select the IFPLinkSetup.exe icon at the bottom of your browser. Alternatively, browse to the location you saved the file and double-click the application to begin the installation.
-
The Setup dialog displays. Select Browse to select an applicable location to install IRIS Sync, then select Next.

-
The Ready to Install dialog displays, confirming the destination location IRIS Sync will be installed. Select Install to proceed, or select Back to return to the previous dialog to choose another installation location.
-
When the installation is complete, selectFinish .
Creating a Database User
To read data from IRIS Financials, IRIS Financial Planner needs to be able to connect to the applicable IRIS Financials database. To achieve this, a new database user (with limited permissions) needs to be created on your IRIS Financials server.
Prior to undertaking any work, you should you back up your SQL server.
-
Access the applicable SQL server and log in to SQL Server Management Studio.

- Expand the IRIS Financials server from the Object Explorer pane.
-
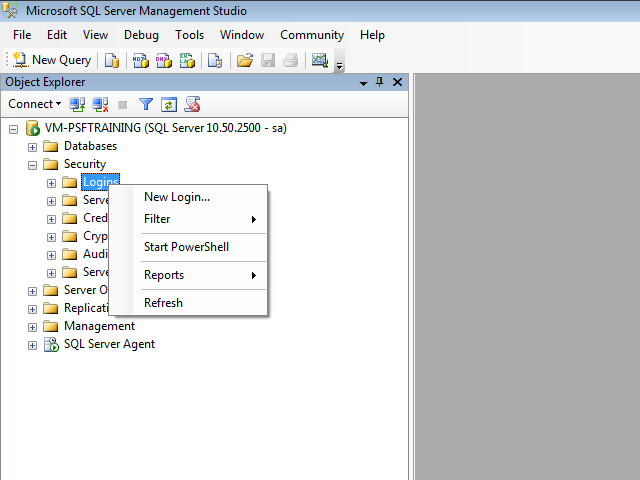
Expand the Security folder and right-click on the Logins folder. Select New Login... from the pop-up menu.

-
The Login – New window displays. Enter an applicable username in the Login name field and select SQL Server authentication radio.
The username in the following graphic is for guidance purposes only. You can choose any username and password, but please note these down as you will need to enter these when configuring the IRIS Sync application on client machines.

-
Enter a suitable password in the Password and Confirm Password fields.
-
Ensure that the Enforce password policy, Enforce password expiration and User must change password at next login radio check boxes are all de-selected.

- Select OK to finish creating the new login.
- Expand the applicable IRIS Financials database (PSFLIVE for example) and right-click on the Security folder.
-
Select New > User... from the pop-up menu.

-
The Database User – New window is displays. Enter the name of the login you created in step 4 (eg. IFPUser) in the Username and Login name fields and select OK.

-
Repeat this for any other IRIS Financials databases your users will need to access, such as trading databases.
The user is now active and needs to be given permission to perform certain tasks on each database.
- Download and open the Grant_Access.txt file.
- Replace the ADD DATABASE NAME HERE text with the applicable PS Financials database name - PSFLIVE for example.
-
Replace [IFPUser] with the name of the database user you created earlier, leaving the brackets intact. If you used IFPUser as per the example, you can leave this in.

- Press Ctrl+A to select all, then press Ctrl+C to copy the text.
-
In Microsoft SQL Server Management Studio, select New Query from the top menu.

-
Click into the New Query window, press Ctrl+V to paste the data from the Grant_Access.txt file. The following graphic is an example of how the script should look using the PSFLIVE database.
It is recommended that you take a backup of the applicable database prior to executing the script.

-
Select Execute to run the script.

-
The Command(s) completed successfully message will display in the Messages tab.

The database user will now have access to the applicable tables in PS Financials. Please repeat this process for any other databases as applicable.
Creating a Database View (PSF version 6 only)
If your version of PS Financials is version 6 or greater, you will need run an additional script to create a database view.
- Download and open the Create_View.txt file.
-
Press Ctrl+A to select all, then press Ctrl+C to copy the text.

-
In Microsoft SQL Server Management Studio, select New Query from the top menu.
- Click into the New Query window, press Ctrl+V to paste the data from the Create_View.txt file.
- Select the applicable database from the Databases drop-down list.

It is recommended that you take a backup of the applicable database prior to executing the script. -
Click the Execute button to run the script.

-
The Command(s) completed successfully message will display in the Messages tab.

IRIS Sync is now installed and ready to be configured. See Configure IFP Sync Tool for more information.