Dispense medication
Use the Dispense Medication wizard to quickly add details of medication that has been administered to a staff or student patient.
The Medical Centre Options wizard must be enabled before this feature can be used. Medical Centre > Configuration > User Permissions > Medication > Create 'Allowed'.
To use the Dispense Medication wizard:
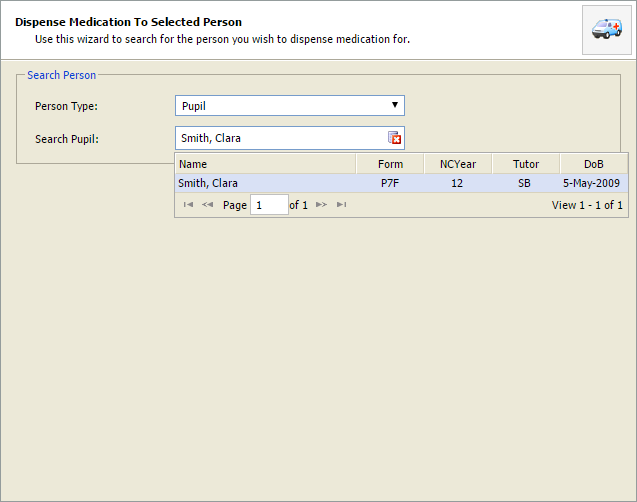
- Open the Medical Centre heading in the wizard bar on the right of your desktop and select Dispense Medication. The Create New Appointment popup window is displayed:
- Select the Person Type (Pupil/Student or Staff) that you want to dispense medication to.
- Start typing a name (forename or surname) in the Search Pupil/Staff box. A drop-down list of names is displayed.
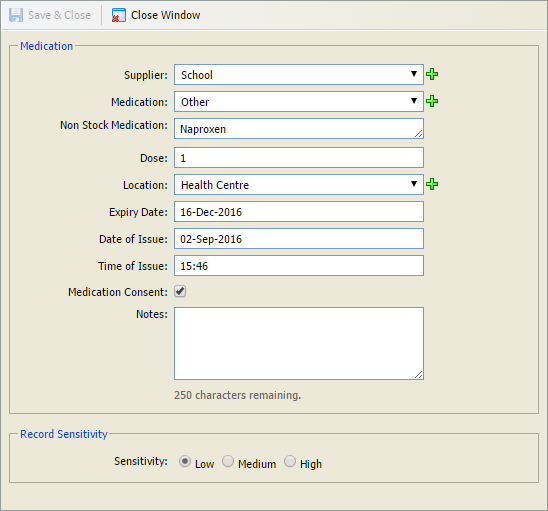
- Select a name to populate the Search Pupil/Staff box and select Select Person. The Medication window is displayed:
- Select a Supplier for the item or select the green plus icon to add a new one.
- Either:
-
Select the Medication from the Stock Item list
or select the green plus icon to
add a new one. If the stock levels are
too low the medication cannot be issued.
or - Select 'Other' in Medication and enter a Non Stock Medication in the field displayed.
-
Select the Medication from the Stock Item list
or select the green plus icon to
add a new one. If the stock levels are
too low the medication cannot be issued.
- Enter a Dose for the medication. Stock levels are updated automatically based on the dose entered here.
- Select the Location where the medication is dispensed or select the green plus icon to add a new location.
- Select an Expiry Date for the medication.
- Select a Date and Time of Issue. This defaults to the current date and time.
- Check the Medication Consent box if this is necessary for the selected medication.
- Enter any additional Notes about the medication in the field available if required.
-
Set the Record Sensitivity for the entry. This defaults to 'Low'.
- Select Save & Close. The entry is listed in the selected patient's medical record.