Importing: Getting your CSV file ready
Watch a video tutorial on importing data here.
You can import data by:
-
Creating a new CSV file
-
Using an existing CSV file
-
Using our template
If you use our template, you must save it as a .csv file to import your data.
Organising your CSV file:
-
Your file must be a CSV file with the data you would like to import in a specific format. The CSV file must have only one header row, containing titles that are easy for you to match with the correct fields in Senta. The importer will attempt to match up each column to a field in Senta, but it might not be able to match all of them, so you will need to map some yourself (basically choosing the field for each column's data to be imported to). Each column in your csv represents a field in Senta.
-
If there are columns in your file you wish to import but cannot find a suitable field in Senta, you may wish to create new fields. To view which fields Senta already has built in for you, navigate to Settings > Forms and view the Forms built into Senta by default and the fields they contain.
-
Each row of your spreadsheet represents one client and can be split into 3 sections:
-
Information about the Client (these columns are blue in the Senta import spreadsheet template)
-
Information about the Services you provide to the client (these columns are pink in the Senta import spreadsheet template)
-
Information about the Contacts of the client (these columns are green in the Senta import spreadsheet template)
-
All of the information you wish to import about a client must therefore be contained within one row of your spreadsheet. For contacts, copy and paste the Contact columns as many times as necessary. The first contact to appear on each row will be imported as the Primary contact and will appear at the top of the Contacts tab for each client.
-
This format applies to all Client types. For example, for a Company, you would likely have more than one contact so you would need to add every contact within that Client's dedicated spreadsheet row. For an Individual with only one contact (themselves), they would still need importing as a new client with their single contact (if you have other contacts like a previous accountant you can also import these and might want to create ‘Contact roles’.
-
You may have a Contact for Company that you also perform work for on an Individual basis. You are able to link these once the data is in Senta. Before the data is imported, you won’t be able to show Senta that they are the same person. Once imported, you can link them.
Re-importing data
-
You don’t need to import all of your data at once. You can perform a re-import at any time. You may wish to start by importing your client data with their respective Contacts and then later import the Services (by this I mean telling Senta which Services to switch on for what clients so that you don’t need to do this manually/individually). You can import your data in as many small imports as you like.
-
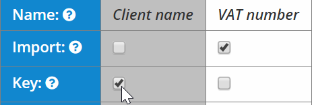
When performing a re-import, if you are importing client data for clients that already exist in Senta, you will need to create a unique key for Senta to identify that client by so it doesn’t create duplicates. This could be a client number, a UTR or just their name - any value that every client has and that doesn't change. You will need to select the column you have chosen as your Key when you come to use the importer tool.
Importing Services to Senta
If you are planning to re-configure the workflows within Senta, we would advise holding off on importing Services until you have done so. Otherwise Jobs that have the default Senta templates will kick off for clients.
When you are ready to switch on Services for clients, you can enable any of them by entering ‘Yes’ or ‘Y’ in each relevant Service column.
Column formatting
Each column represents a field in Senta. There are a variety of field types in Senta that can be used. You will need to make sure that each column only contains data relevant to the field type and no extra data such as ‘n/a’. It might not create many issues now but it means that your data is nice and clean for you to be able to filter and use in future.
Checkbox field type:
Input 'Y' if you wish the checkbox to be ticked for clients, leave blank for not ticked
Yes/no radius field type:
You can input Yes or no / Y or N
Lookup field type:
Many fields in Senta are Lookups (dropdown lists) -- you choose values in them from a dropdown list -- and it's important that the values you enter in the spreadsheet match the values that are already set up in the lookup lists on Senta.
For example, "client state" can be either "Client" or "Prospect" or "Former client".
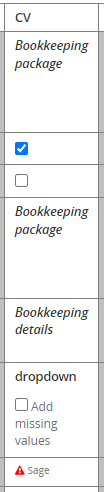
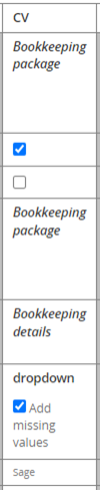
If you want to add extra values to the lookups, you can either do that in advance or ask the importer tool to add missing values by ticking the "Add missing values" tickbox in the importer, as seen below. However, we do recommend you do this in advance, to make sure your data is clean and tidy.
You can see and edit all the lookups in Senta by going to Settings > Lookups.
Another detail to bear in mind is that your data must match the Lookup values exactly. For example, if within the VAT frequency column you had some values of ‘Quarterly’ and others of ‘quarterly’, Senta would see these as two separate items. As the VAT frequency Lookup uses 'Quarterly' by default, you would need to make sure all ‘quarterly’ inputs were amended before importing.
Date field type:
Dates should be in the format "dd/mm/yyyy", e.g. 31/12/2021 (If you have changed the date formatting for your Senta workspace under Settings > General settings > Display then you will need to use the new format within your csv file too)
Day & month field type:
Format should be dd/mm so for 14th January it would be 14/01 (14/Jan or 14-Jan also work)
Quarter field type:
Format should be one of the below
Jan/Apr/Jul/Oct
Feb/May/Aug/Nov
Mar/Jun/Sep/Dec
Telephone number field type:
If you have converted a spreadsheet to a csv file, you may find that the 0s disappear from the front of your telephone numbers. To avoid this, you should convert the column cells type to a ‘Text’ type instead of a ‘Number’ cell type to keep the 0.
User field type:
You must enter the User’s First and Last name exactly as they appear in the system under Settings > Users otherwise Senta will not recognise them.
Manager field type:
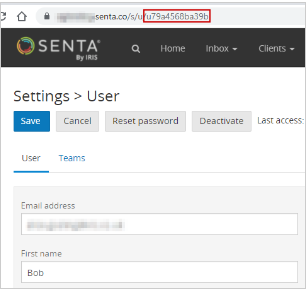
If you are importing the names of users into Manager fields, you will need to use the ID of that user rather than the first and last name. The ID can be found in the URL when accessing the specific user's set up page via Settings > Users. See image below to see an example ID.
Client role field type:
This column should be added to every Contacts section of your spreadsheet. If the client role applies to a contact, input Y to tick this field in Senta once imported. Leave other contacts blank if the role does not apply.