Record client connections
The Connections tab in the Client Details page (Client > Details) is used to record any connected relationship between a staff member and a contact. The relationship is usually recorded because it needs to be considered, e.g. where there might be conflict of interest.
Connections can be recorded and viewed via the Staff Details, Contact Details or Client Details page. See Record contact connections or Add/edit staff connections.
- Search for, then select the required client.
-
Select Client > Details from the menu, then select the Connectionstab.

If the connection has a photo attached to their record, it will be displayed instead of the silhouette.
-
The pages shows any existing, active connections. Select the Inactive to view any connections marked as inactive.
Add a new connection
-
Click the Add button in the applicable section.
-
Officers - use this section if the client works for, or is related to a contact, such as a director.
-
Providers - use this section if the client has a connection with a contact who is a provider (such as a solicitor, referer, etc.)
-
Staff - use this section has a connection to a staff member, e.g. they are related.
-
-
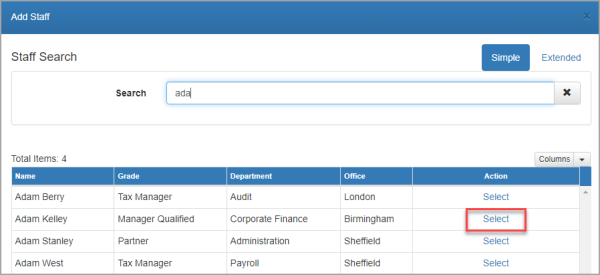
Search for, then select the required contact from the list.
-
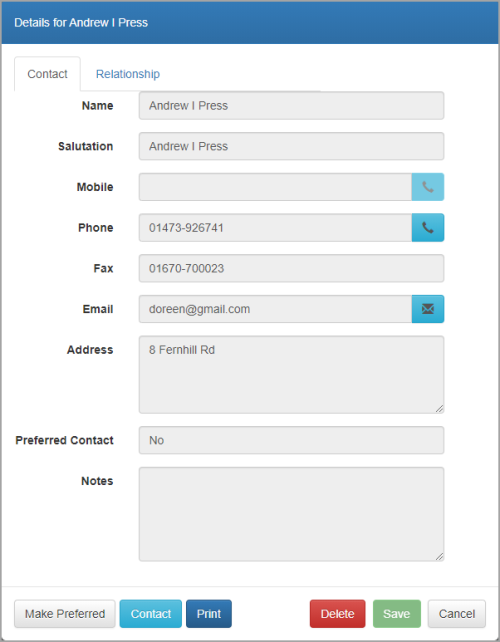
The Relationship tab is displayed by default. Contact information is extracted from the applicable contact record when the connection is saved.
Add/edit connection relationship details
-
Ensure the Relationship is selected, then complete the details as follows:
-
Connection Type - select the type of connection. The values in the drop-down list are defined in categories via the menu. See Set up categories.
-
Relationship Title - provides extra detail to the connection type if required.
-
Notes - enter any notes relating to this relationship.
-
Current - determines whether the connection is active or innactive. If you deselect this checkbox for an existing contact, the system will add the terminated date adjacent to the checkbox.
-
Relationship Number - this can be used to record any applicable number, for example, if you have a separate CRM system.
-
Relationship Date - enter any applicable date.
-
-
Click Save once all required changes have been made.
View/edit details of an existing connection
-
Click the required connection. The Contact tab is displayed by default enabling the contact details to be viewed only.
-
To view/edit the contact record, click the Contact button (the record is displayed in a new browser tab).
Print or email the connection information
To print or email a copy of the connection record, click Print. A print preview is displayed which can the be printed or emailed by clicking the applicable button.
Make the connection the preferred contact
If there is more than one connection, you can mark one of the contacts as the preferred contact. A preferred contact is the main point of contact for the client. If the client is an organisation, then the preferred is usually the main contact person at the organisation. If the client is a person, the preferred contact for a person is usually the organisation where they can be reached.
Click the required contact, then from the Details for window, click Make Preferred. The contact is then marked with a tick.
It is important to have the preferred contacts set up correctly in order to get the mail merge facilities working correctly, as the mail merge will use the preferred contact information to populate contact names and addresses.
Delete a connection
Select the required connection then click Delete. From the warning message, click Yes.