Create draft bills
Managers Partners Billers
Bills can be drafted using the following methods:
-
Select Client > Taskpad from the menu, then click Draft Bill.
-
Select Portfolio > Billing Portfolio from the menu. Select the required option from the WIP list. Choose the required client, then click Draft.
-
From the Draft Bills and Credit Notes dashlet on the Client dashboard, click New.
The Bill Wizard
-
On the opening page of the bills wizard, select the type of bill that is required.
-
Set the date that you want all entries up until.
-
Select whether the bill is to be an Interim bill or a Final bill. (An Interim bill will not use the WIP but will create an On Account entry, a Final bill will use the available WIP.)
-
If permissions allow it is also possible to select to do a single Job bill, a single service bill and a Group bill.
-
-
Click Next to open the Header page.
-
If a Group bill has been selected, an additional page will be displayed that will list all available clients within the group. Select the additional clients that are to be billed and click Next.
-
-
Check the details on the Header page and amend if necessary.
-
Click Next to open the WIP Allocation page.
-
Remove any services that you do not want to bill by clicking the red crosses.
-
Enter the amount to be billed, written off and carried forward for each service with any narrative if it is required. The narrative is for information purposes only.
-
It is also possible to expand each line and select to bill, remove, write off, carry forward the individual entries by clicking onto the + icon next to each service.
-
-
Click Next to open the Debtors page where the fee narratives are built. This is the wording that the client will see on the bill.
-
Select how you would like to build the bill by clicking on the drop-down menu and selecting By Service, By Type or By Staff, or any other option that has been configured.
-
Click Go. Expand each line and enter the narrative required or select a paragraph by clicking Bills Paras.
-
Add any additional lines by clicking Add a line and remove any unnecessary lines by clicking the red cross.
-
Change the VAT rate on individual lines if necessary.
-
Amend the order of the lines by using the arrows on the left-hand side.
-
The value of the lines on the DRS page must match the value of the entries to be billed on the WIP page.
-
View the draft bill by clicking View.
-
Save the draft bill by clicking Close or confirm the bill by clicking Check and then Confirm. (This assumes that bill security is not being used.)
-
If you have chosen to confirm the bill select whether you would like to print a copy of the bill and click OK.
Drafting the Bill
The bill can be drafted from several places:
-
The Client dashboard, using the bills dashlet
-
The New Draft Bill page from the Client menu
-
The Client, Service or Job Ownership portfolios within the Billing portfolio.
When you begin to draft the bill, the New Draft Bill Details page is displayed:
-
The top section of the page contains information relating to the client details and the available WIP, along with any Billing Instructions that may have been entered onto the client's WIP/Billing page.
-
The Bill Details section contains various options that will affect the bill creation. The default settings will be displayed but can be overridden if required and if the user has the relevant permissions. For a manual bill, ensure that the Bill Type is set as Progress (the default option). This will keep the included jobs open for further work.
-
At the bottom of the page, the list of manual jobs with available WIP will be displayed.
-
Select the Job(s) to be included in the bill. Once at least one job has been selected, the Create Draft Bill button will be enabled. This will open the Draft Bill wizard which comprises of 4 tabs:
-
Header - displays the client details and options to set the bill date, the layout to be used, the delivery format and the Bill Partner and Manager.
-
Analysis - displays the WIP that is available on the bill and allows the amounts to be billed to be set.
-
Narrative - allows for the wording of the bill to be entered.
-
Actions - allows for any attachments that will go with the bill to be added.
-
-
On the Header tab, select the icon to display all addresses associated with the client. An alternative address can be selected from this dialog. The Last 5 Bills section displays the last 5 bills raised against the client. Options are available to view the bill or to view the WIP allocation associated with that bill.
-
The Bill Partner and Manager will default to the Client Partner and Manager unless a single job has been selected, in which case the Bill Partner and Manager will be set to match the Job Partner and Manager.
-
Edit any details as necessary.
-
Select the Analysis tab. If the Allocation Type against the job has been set to Manual Per Bill it is possible to expand the Job to display the WIP transactions grouped by Staff, Analysis, Task or Role. For all other allocation types the lines can be expanded to view the WIP but the allocated bill amounts cannot be changed.
-
Enter the amount to be billed into the Bill field. Adjust the Write Off amount if required, any Carry Forward will be automatically calculated. Repeat for all jobs that are included in the Draft Bill.
Hovering over the Job will display a tooltip of the Billing Type and Allocation Type of the job.
-
Select the Narrative tab and select an option from the drop-down. Select Go to create a narrative section for each Service, Type, Staff Member, Job or Client/Job that is included on the Analysis tab of the bill.
-
Enter the wording that is required for each narrative section of the bill. Rich text formatting can be applied.
-
Clicking the Bill Paras link will open the Bill Paragraphs dialog where it is possible to choose from either previously used bill paragraphs for the client or from a list of standard bill paragraphs (if set up).
The amounts that are displayed are generated based on the Analysis tab. The values on the Narrative tab can be adjusted but the total must match the total of the Analysis tab. This is indicated by the two figures in the right corner of the Narrative tab.
-
Select the Actions tab. Click Add A Document to add any attachments. Only PDF attachments can be printed with the bill. Other attachment types can be added to the bill for reference purposes.
-
Change the Delivery Format if required.
-
Select a option from the drop down and click . This will create a narrative section for each Service, Type, Staff Member, Job or Client/Job that is included on the Analysis tab of the bill.
-
Enter the wording that is required into each narrative section of the bill. Rich Text formatting can be applied.
-
The amounts that are displayed are generated based on the tab. These values on the tab can be adjusted but the total must match the total of the tab. This is indicated by the two figures in the right corner of the tab.
Submitting and Confirming the Bill
The bill cannot be confirmed until it has been submitted. The Submit action will run through any policy checks that are in place and indicate if there are any problems with the bill.
-
Click Submit. Once submitted, the Confirm button will become available.
-
If the bill is to be confirmed straight away, click Confirm.
-
A Confirm Draft bill dialog displays. Click OK to confirm the draft bill:
The Draft Bill Wizard
The Draft Bill wizard is used when creating manual bills or editing bills that are based on Job, Task, Scheduled bills, or Recurring bills and are not set to automatically confirm.
When drafting a manual bill an additional page, New Draft Bill, must be completed before the Draft Bill wizard is displayed. When editing an existing draft bill, the Draft Bill wizard will be opened and the New Draft Bill view is not available.
New Draft Bill View
The New Draft Bill is the first stage in drafting a manual bill. This page provides details about the client including the Client Partner, Client Manager, Total WIP, WIP available, Unposted WIP and any Bill Instructions that might be attached to the client. The Client Details panel can be collapsed using the arrow icon in the top-right corner to increase the screen space available for the rest of the details if needed.
The Total WIP is the WIP on all jobs for the client. The Available WIP is the WIP that is against jobs that have a billing type of Manual.
The Bill Details section allows the following settings to be configured for the bill:
| FIELD | DESCRIPTION |
| Organisation | The Organisation field will only be visible if the system is set to allow billing across organisations. This field defaults to the organisation that the client is attached to but allows the organisation to be changed to allow cross organisational billing. |
| Bill Type | The Bill Type field indicates the type of Bill note to be created. It will default to the type set against the client within the Client Extended Details. If the system is not configured to allow RFP's (Request for Payment) then the Bill Type field cannot be changed. Only users with the permission DFFeeType can make changes. |
| Work With WIP |
This checkbox, when ticked, indicates that a WIP bill will be created. This setting can be switched off within the Settings tab of Billing Administration by selecting WIP Bills Requred Unchecking this option on the New Draft Bill view will create a Non WIP bill.
|
| Bill Type | This selects the type of bill that will be created. The options available are:
|
| Group Bill | If the client is part of a group, the Group Bill checkbox will be available. When ticked, any client that has jobs with a billing type of manual will be displayed for including in the bill. |
| Entries Up To | Used in conjunction with the Work with WIP option. This field displays the latest date of the WIP entries to be used against the bill. The field is disabled when the bill is Non-WIP. |
| Show All | When this checkbox is ticked, all jobs with a billing type of Manual will be displayed for inclusion in the bill. This will include those jobs that do not have any WIP to be billed. |
The final section on the view displays the services and jobs that have a billing type of Manual and have posted WIP (unless the Show All checkbox has been selected). The top level displays the services. This can be expanded to display the individual jobs that are included.
At least one job must be selected before the Create Draft Bill button will become active. by checking the box next to the job or by entering a value into the bill amount field. If the client has no draft bills this button will not be available.
If the job is selected, the bill amount will be automatically populated with the value of the available WIP.
Existing draft bills can be edited from the New Draft Bill view by clicking Edit Existing Drafts at the top of the page. This will navigate through to the Client Drafts page.
Clicking Create Draft Bill will open the Draft Bill wizard.
The following tabs are available when creating manual bills and when editing all other types of draft bill.
The Header tab
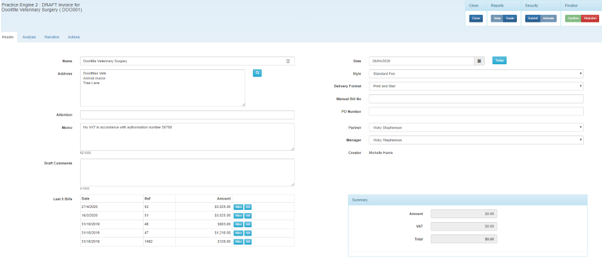
The Header tab provides information and settings that appears on the actual bill that is sent to the client:
| FIELD | DESCRIPTION |
| Name | The client name as it will appear on the bill, defaults to the name of the client selected though this can be changed if the Name Locking option has not been applied within the Client Extended Information. |
| Address | The address that will appear on the bill note. It is derived from the contact details of the client selected for the bill. Additional addresses can be accessed by using the icon. These are any addresses that are on the Other Details page of the client details or any connected contacts addresses. If the Address Locking option has been applied within the Client Extended Information then changing the address will not be possible. |
| Attention | The contact’s salutation as set on the client DRS Collection details or the job billing details but can be changed. |
| Memo | Enter any general notes/memos to be added to the bill. These will appear on the bill if the layout has been written to include the memo field. The memo field can hold up to 1000 characters. |
| Last 5 Bills | This section lists the last 5 bills for the client. Details include the date of the bill, the bill reference, and the amount. Buttons against each bill allow the Bill Allocation report to be viewed (Alloc) and the bill to be printed to screen. |
| Date | The date that will appear on the bill note when confirmed. It will default to the current date, unless the ‘Restrict to Current Period’ option has been set within Billing Admin and the date is outside of the current period - in this instance the date will default to the last day of the current period. |
| Style | The style of bill to be applied. The options are based on the bill layouts that have been created for the organisation that the bill is attached to. |
| Delivery Format | Select whether the bill is to be emailed or sent by mail. This will default to the Delivery format set on the client. |
| Manual Bill No. | If manual bills are used the bill number must be entered here, if nothing is entered the system will generate its own unique bill number. This field will only be shown if the setting 'Allow Manual Bill No.?' is checked in Billing Administration. |
| PO Number | An option to enter a Purchase Order No against the bill. This field will only be shown if the setting 'Allow Purchase Order No.?' is checked in Billing Administration. |
| Partner | Partner allocated to this bill, defaults to the client engagement partner but can be changed to any partner associated with the client. |
| Manager | Manager allocated to this bill, defaults to the client engagement manager but can be changed to any manager associated with the client. |
| Creator | The staff member creating the bill. |
| Collect by D/D | Indicates whether this bill should be collected by a variable Direct Debit. This option will only be available if the client has a valid Direct Debit Mandate. |
| Draft Comments | Any comments that are required on the draft bill but not on the final bill can be entered here. This can be used as an aide memoire or for notes to the bill approver. This is limited to 1500 characters. |
| Collect When | If the bill is to be collected by DD you will also need to decide when it is to be collected. There are three options that are available: Same month as bill Month after the bill 2 months after the bill. |
| Summary | When the information has been populated on the Narrative tab, the values in the Summary section will be calculated. |
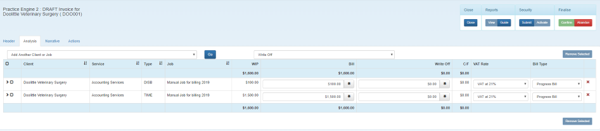
The Analysis tab
The Analysis tab is the second step when creating a bill. This tab details the WIP available on the bill and allows the billing amounts to be edited.
Each job included in the bill will be displayed as a summary line. There will be separate lines for Time and Disbursements. For jobs that have an Allocation Type of Manual per Bill it is also possible to expand the line to view the WIP entries by Staff, Analysis, Task or Role groupings and set the bill amounts against each individual line. For all other allocation types the lines can be expanded to view the WIP but the allocated bill amounts cannot be changed.
Each top level line displays information relating to the Client, Service, WIP Type and Job. The available WIP is displayed along with fields for the Bill amount, Write Off amount, C/F amount, VAT Rate and Bill Type.
Carry Forward or Write Off
The Carry Forward or Write Off drop-down that is visible above the WIP detail can be used to set the default behaviour when changing the bill amount on all lines within the bill except for Final Bills which will always Write Off the unbilled value.
Bill Amount, Write Off and C/F
The bill amount will default to the value entered in the New Draft Bill View (available WIP if you don’t change it) but can be changed to be the required value. Changing the bill amount will cause the system to recalculate the Write Off and C/F.
The Write Off amount can be edited to allow for a profit or loss. If the bill type for a line is Final any WIP that is not being billed will be written off and this figure is not editable. The icon next to the Write Off field switches any value in the C/F to the Write Off field. If there is any value in the Write Off field, a Reason drop-down will be displayed. The available reasons can be used to indicate why there was a write off. The list of reasons is a category, Write Up Reason, that can be edited within categories.
The C/F will be automatically calculated based on the Bill amount and Write Off amount figures.
VAT Rate
The Tax Rate drop-down will default to the tax rate that is set against the client but can be changed if required.
Bill Type
The bill type can be set against each job that is being billed in the bill. The default value is derived from the bill type that was set on the New Draft Bill view when first drafting the bill.
Setting the Bill Type to be Interim will cause the system to change the WIP value of the line to be zero and create an On Account entry that will be billed. A corresponding negative C/F amount will be calculated and will appear on the client WIP as a negative On Account entry. Both Bill and Write Off figures can be edited.
Setting the Bill Type to be Progress from Interim will cause the system to change the WIP value of the line to be the total value of unbilled WIP on the job up to the entry date set on the New Draft Bill view. The bill amount will be set to the WIP amount and the W/O and C/F amounts will be zero. Both Bill and Write Off figures can be edited.
Setting the Bill Type to be Final from Interim will cause the system to change the WIP value of the line to be the total value of unbilled WIP on the job up to the entry date set on the New Draft Bill view. The bill amount will be set to the WIP amount and the W/O and C/F amounts will be zero. Only the bill amount can be edited and the system will calculate the W/O amount to be any WIP not being billed. This is not editable. It is not possible to carry forward WIP against a Final bill. Marking the Bill Type to be Final will mark the Job as Closed when the bill is confirmed.
It is possible to have a mixture of Bill Types included on a bill against different jobs but if there are both Time and Disb lines for the same job that is being Final billed, changing the bill type of one will update the other.
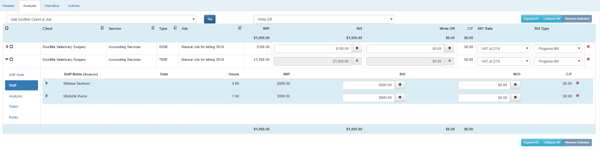
WIP Analysis
For Jobs that have an Allocation Type of Manual per Bill and are either a Progress Bill or a Final Bill, it is possible to expand the line to display the component WIP.
The WIP can be grouped by Staff, Analysis, Task or Role. Clicking on a grouping level will display the WIP. Each line can be expanded to display the individual WIP entries including any timesheet narrative and internal notes. The bill amount can be edited against the individual lines. The W/O can be edited on jobs with a bill type of Progress.
For all other jobs, clicking on the line will display the WIP Note narrative box. This box can be used to make a note about the WIP. This is particularly useful for Interim entries to add additional narrative. The WIP note will be displayed on the billing guide for any outstanding WIP.
Removing WIP
WIP lines at any level can be removed using the cross against each line. If removed by accident it can be reinstated to the bill using the option Add Removed WIP from the Options drop-down. It is also possible to remove lines in bulk using the checkboxes against the lines and clicking Remove Selected.
Add another Client or Job
The Add Another Client or Job option can be used to bring in WIP from another client or another job on the same client.
Select Add Another Client or Job from the drop-down at the top of the Analysis screen and then click Go. The Client Search will be displayed. Search for and select the required client.
The dialog will display the available WIP for the selected client. Select the WIP to be added to the bill and click Add Client or Job.
If the selected client does not have any available WIP, the client can still be added to the bill using the Add Client or Job. The added client is then available on the bill to add On Account entries against.
Add a Group Client
The Add a Group Client option allows WIP from other clients within the same group to be added to the bill.
Select Add a Group Client from the drop-down at the top of the Analysis screen and click Go. A list of clients within the same group will be displayed. Expand and select the WIP that is to be added and then click Add.
Auto Allocate Progress WIP
The Add and Auto Allocate option can be used to Auto Allocate the WIP across the bill, and to also add an Interim Entry.
Select Add and Auto Allocate Progress WIP from the drop-down at the top of the Analysis screen and click Go. The dialog is split into two sections -Selected Progress WIP and Interim Bill.
The Selected Progress WIP tab allows the WIP that is included in the bill to be auto allocated. Time and Disbursements need to be dealt with separately. Enter the Bill amount and any P/L that is required for the Time and Disbursement lines.
The Interim Bill tab allows an On Account entry to be added to the bill. The tab allows the Client, Service and Job to be selected and then the Bill and P/L amounts to be entered. The Interim entry will not be included in the auto- allocated values.
Clicking Add will apply all allocations and Interim entries.
Add Interim Bill
The Add Interim Bill option can be used to add an Interim entry to the bill. An Interim entry can be used when there is no available WIP to be billed. This could be because the bill is being raised before any work has been conducted.
Select Add Interim Bill from the drop-down at the top of the Analysis screen and click Go.
The Add Interim Bill dialog is displayed, allowing the Client, Service and Job that the Interim entry is to be recorded against as well as allowing the bill amount and P/L to be entered. Click Add once all the details have been entered.
Add Removed WIP
The Add Removed WIP option allows any WIP that has been removed from the bill or any WIP that was excluded from the bill when first drafting, to be added to the bill.
Select Add Removed WIP from the drop-down at the top of the Analysis screen and click Go.
The Add Selected WIP dialog will be displayed, listing the clients included in the bill with the ability to drill down to see the jobs and WIP attached. Select the WIP that is to be added and click Add.
Add Unposted WIP
The Add Unposted WIP option allows any WIP that is available but unposted to be included in the bill.
Select Add Unposted WIP from the drop-down at the top of the Analysis screen and click Go.
The Add Unposted WIP dialog will be displayed listing any unposted WIP for the client. An option to include any group clients in the display is also available. Select the WIP to be added and click Add.
Unposted Expenses will only be shown for selection if the Allow Expense Posting option is enabled in the billing settings.
-
Any Unposted WIP that is added to the bill is posted as part of the process. Abandoning the bill or removing the WIP from the bill will not reset the WIP back to Unposted.
Edit WIP
The Edit WIP option allows for the Analysis Code and Narrative to be edited on WIP entries included in the bill.
Select Edit WIP from the drop-down at the top of the Analysis screen and click Go.
The Edit WIP dialog is displayed listing any clients that are included in the bill. Expand the lines to display the entries that need to be edited. Make any changes that are required and click Save.
Transfer WIP Out
The Transfer WIP Out option allows for WIP that is included in the bill to be transferred to a different client or to a different job within the same client.
Select Transfer WIP Out from the drop-down at the top of the Analysis screen and click Go.
The Transfer WIP Out dialog is split into two tabs - Select WIP and Transfer.
On the Select WIP tab, select the WIP that needs to be transferred. Once selected, move to the Transfer tab. Enter the client to transfer the WIP to along with the Service and Job. Click Transfer to complete the transfer. The selected WIP will be removed from the bill and transferred to the selected client.
Transfer WIP In
The Transfer WIP In option allows for WIP to be transferred into the bill from other clients.
Select Transfer WIP In from the drop-down at the top of the Analysis screen and click Go.
The Transfer WIP Out dialog is split into two tabs - Select WIP and Transfer.
On the Select WIP tab, select the client that the WIP is to be transferred in from. Once selected, the available WIP will be displayed. Select the WIP to be transferred and then move to the Transfer tab. Select the Service and Job to transfer the WIP to and click Transfer to complete the transfer.
Add Standard Costs
The Add Standard Costs option is only available if enabled and set up within the Settings of Billing Administration. It allows for standard disbursement costs to be added to the bill.
Select Add Standard Costs from the drop-down at the top of the Analysis screen and click Go.
The Add Standard Costs dialog will be displayed with the various details already populated. It is possible to edit the details if the amount falls between the minimum and maximum amount set up in Settings. It is important to set the Job to be the correct job as the system will default to the first in the list. Click Add to add the costs. The costs will be added to the bill as a Disb line.
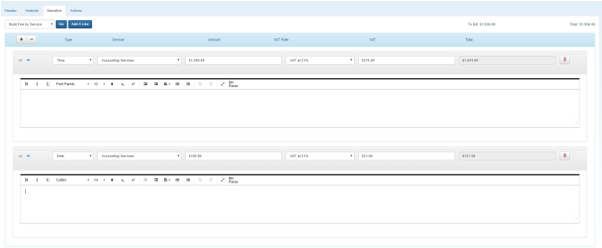
The Narrative tab
The Narrative tab allows you to create the narrative that the client will see on the printed or emailed bill. For Manual bills, this tab will be empty to begin with and it is necessary to either Build the Bill or Add a Line.
The Build Bill box contains the following options:
| FIELD | DESCRIPTION |
| By Service | The By Service option creates a narrative section for each service that is included in the bill on the Analysis tab. |
| By Type | The By Type option creates a narrative section for each transaction type - Time and Disbursements- that is included in the bill on the Analysis tab. |
| By Staff | The By Staff option creates a narrative section for each staff member that is included in the bill on the Analysis tab. Each narrative section will display the staff member's name, the total hours, and the value. An additional narrative line will be added for any disbursements. |
|
By Client |
The By Client option creates a narrative section for each client and type that is included in the bill on the Analysis tab. |
| By Job | The By Job option creates a narrative section for each job and type that is included in the bill on the Analysis tab. |
| By Client/ Job | The By Client/ Job option creates a narrative section for each Client, Job and Type combination that is included in the bill on the Analysis tab. |
Select the build option that is required and click Go. The relevant narrative sections will be added. Any amounts and text can be edited as required. The VAT rate should default to the rates being used on the Analysis tab. If the bill is built again, it will overwrite any narrative and values that have already been entered.
The Add A Line option allows blank narrative lines to be added to the bill.
It is important to ensure that the total value of the narrative sections matches the amount being billed on the Analysis tab. These values are displayed at the top-right of the Narrative tab and will be in red if the values don’t match and green if they match.
The narrative sections can be moved to change the order by dragging and dropping to the required order.
Sections can be removed using the delete icon to the right-hand side of the narrative section.
Rich text formatting can be added to the narrative using the various icons available within each narrative section.
Adding Standard Bill Paragraphs
Clicking the Bill Paragraphs link within the narrative section will display the Bill Paragraphs dialog. This allows for either standard bill paragraphs to be added or previously used bill paragraphs for this client.
Select the Type - Standard paragraphs or Bill Paragraphs; Service and Paragraph from the drop-downs. The selected paragraph will be displayed in the narrative section on the right-hand side of the dialog. If the Standard Bill Paragraph includes a date placeholder, the date format can be chosen - the available options are Full Date, Short Date, Month YYYY, Month only and Year only.
Click Insert to Insert the narrative into the bill. Changes can then be made as required.
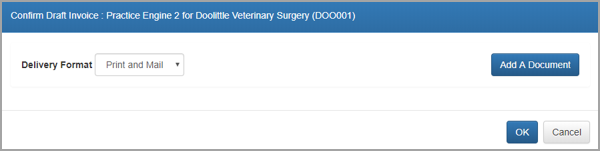
The Actions tab
The Actions tab is used to select what happens when the draft bill is confirmed. The Actions tab will display the Delivery Format, which will default to the format set against the client. There is also the ability to Add a Document that can be printed or emailed with the bill. Documents can be attached to the bill for internal purposes and not printed.
-
The printing of attachments with the bill is controlled by settings within Categories | Billing Layout Options.
A list of retainers and receipts may be displayed that can be allocated against the bill. This is dependent on the user having the permission DraftCashAllocation.
Add a Document
Click Add a Document to open the dialog. The dialog displays a Choose File button where the file can be browsed to and selected. Although multiple file types can be attached to the bill, only PDF documents can be sent with the bill.
Once the file has been selected, click Save. The file will be added to the list of documents on the Actions tab. There are options to set whether the document should be printed and whether it should print before the bill.
If attaching multiple documents, the order of the documents can be set by dragging and dropping the document lines into the desired order.
Questionnaires
If there are any questionnaires that have been applied to the billing process an additional tab will be displayed for each questionnaire that applies to the bill.
If the questionnaire is configured to be mandatory then the bill cannot be confirmed until the questionnaire has been completed and approved.
If the questionnaire is configured to be non mandatory the bill can be submitted and then confirmed without the questionnaire being completed or approved.
Complete the questionnaire and Save. Once the questionnaire has been saved it can be submitted.
If there are unsubmitted mandatory questionnaires the bill cannot be submitted and if the user attempts to submit the draft bill they will receive an error message detailing the unsubmitted questionnaires.
Submitted questionnaires are displayed in the Detail Approval portfolio within the Billing portfolio.
Buttons
The Draft Bill Wizard displays various buttons across the top.
These buttons provide various actions within the bill:
| BUTTON | DESCRIPTION |
| Close | The Close button will save the draft bill and close the wizard. The draft bill can be reopened from the Client Drafts page or the Billing Portfolio. |
| View | The View button will preview the draft bill. The View button is only available if narrative has been added to the Narrative tab. |
| Guide | The Guide button will open the Billing Guide for the client. |
| Submit | The Submit button will check any bill policies and submit the bill for confirmation. Although the button will always be available, if there are any issues with the bill a dialog will be displayed detailing the policy errors. Examples of policy errors include where the bill does not contain a narrative, where the tax rates are different between the Analysis and Narrative tabs or where a questionnaire has not been submitted. |
|
Activate |
The Activate button will activate a submitted bill and allow further editing. |
|
Confirm |
The Confirm button will only become available if the bill has been submitted and all policy checks have passed. If there are any questionnaires that require approval it will not become active. |
|
Abandon |
Abandon will delete the draft bill and release all WIP back to the WIP ledger. |