Create attendance screens
Your organisation may want to capture and record different attendance categories on different screens, and IRIS Cascade enables you to configure this to suit your business needs and processes.
For example, you could use the Absence screen just to record sickness and use an Absence Other screen to record any other type of absence, such as appointments or jury service. You could even break down the information further. For example, to record lateness records on an Absence – Late screen and Keeping in Touch (KIT) days on a KIT Days screen.
You can use the Screen Designer function in IRIS Cascade to create new attendance screens, based on the standard IRIS Cascade Absence screen/attendance table. You can then use these screens to add records which show in the Planner and on Microsoft Outlook.
Before you create additional attendance / absence screens, it’s good practice to review:
- Any existing reports, queries, and workflows in your system relating to absence, and consider how they’ll be affected. If you’re unsure of the impact, contact either your IRIS Cascade project manager or account manager for advice.
- Your attendance categories and associated properties (in Admin > Attendance and Calendars > Attendance Categories) to make sure they’re correct and suitable. You might need to create new attendance categories and set their properties. Refer to Add attendance categories.
When you’ve created new attendance screens, you need to link them to attendance categories and types. You also need to update roles and profiles to make sure that users can access the new screens.
Create a new attendance screen
- In HR, open any employee’s record and select the Absence screen.
- Go to Action > Configure This Screen.
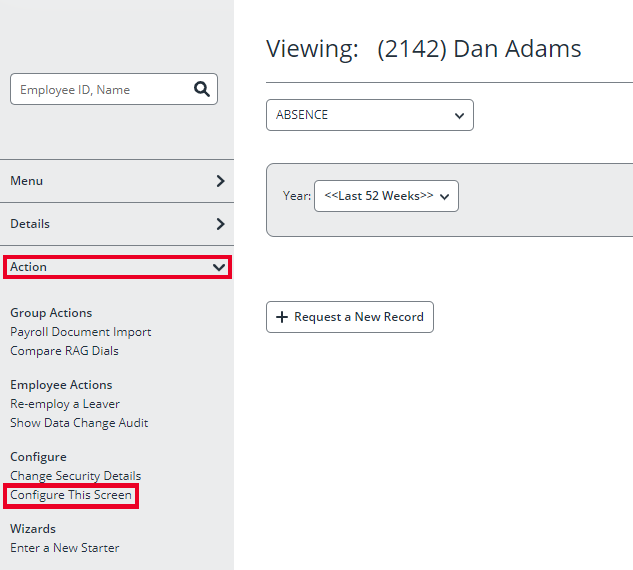
- You will see the Absence screen in Configuration Mode.
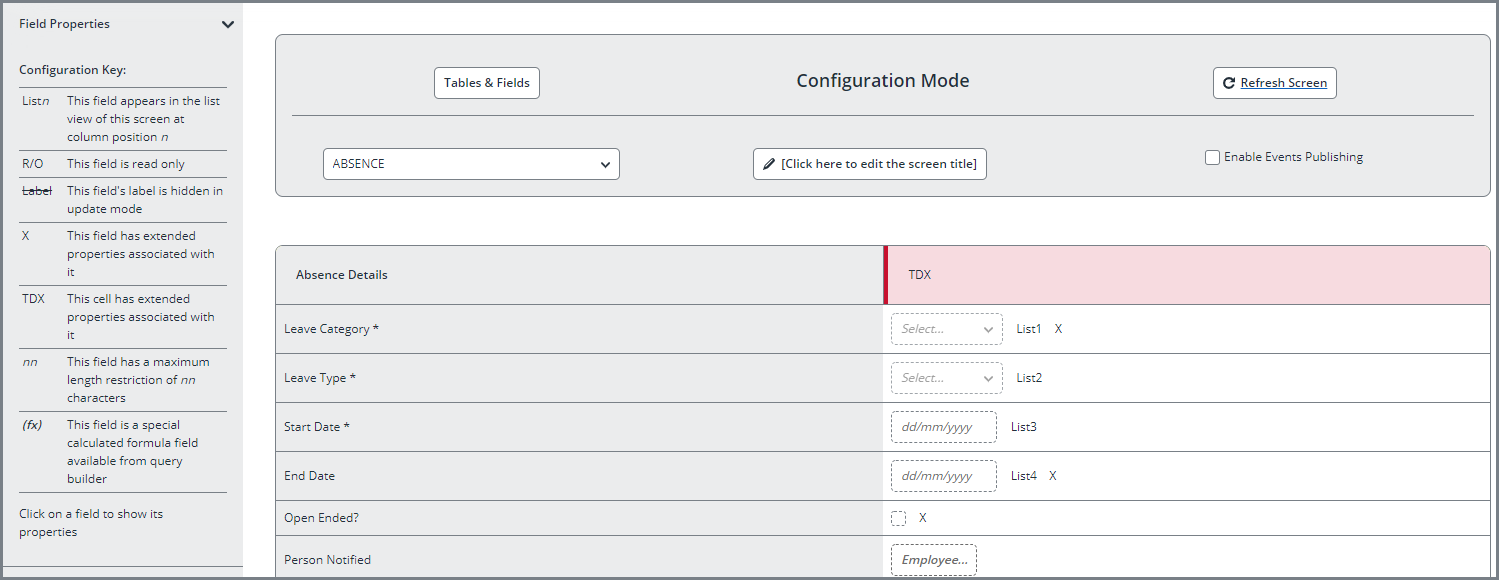
- Select Tables & Fields.
- You will see the Configuration Menu screen. Select Add New Screen/Table.
- Give the screen a name.
- Select Screen Type of List Screen.
- Copy the screen name into the Main Table field.
- Select Save Changes, then Close.
- You will see an exact copy of your current Absence screen, including all the standard fields and any custom fields. Although the screen is based on the original Absence screen, you can rename the field labels on the new screen without affecting any fields on the original Absence screen.
- If you do not want to include all of the existing fields from the original Absence screen on the new screen, use the following methods to remove or hide fields from the screen:
- The Delete Control button. This option deletes the field and any associated data on the new screen. Do not use drop field in the tables and fields section.
- From the Field Properties list, mark the field status Hidden (QB Field) to Yes to hide the field and any other field(s) below it.

You cannot remove or hide the following fields, or the screen will be unusable (but you can rename them if needed):
- Leave Category
- Leave Type
- Start Date
- End Date
- All fields that end with fx
- If you want to add new fields to the screen, use the Tables & Fields option in the usual way.
- Once complete click Save Changes and Close.
Remember to set the access to this screen in your Profiles.