Create and Maintain User Accounts
There are three ways in which you can restrict access to IRIS Reach.
- User Account — the person A parent, legal guardian, carer, or someone responsible for a student. must have an IRIS Reach account
- User Permission Groups — can send messages from a specific group and access any replies
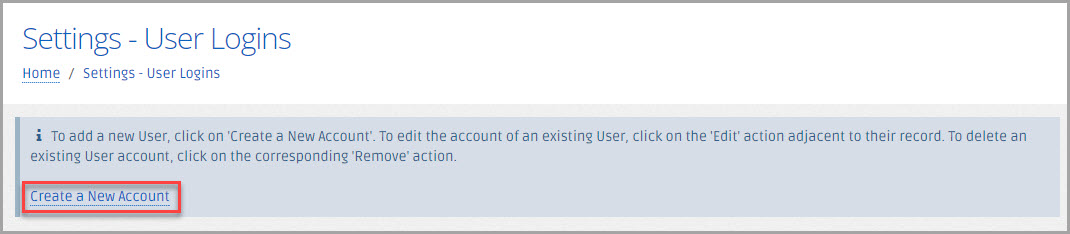
- Select Settings > User Logins.
- The Settings - User Logins page is displayed.
Create User Accounts
-
On the Settings - User Logins page, select Create a New Account.
-
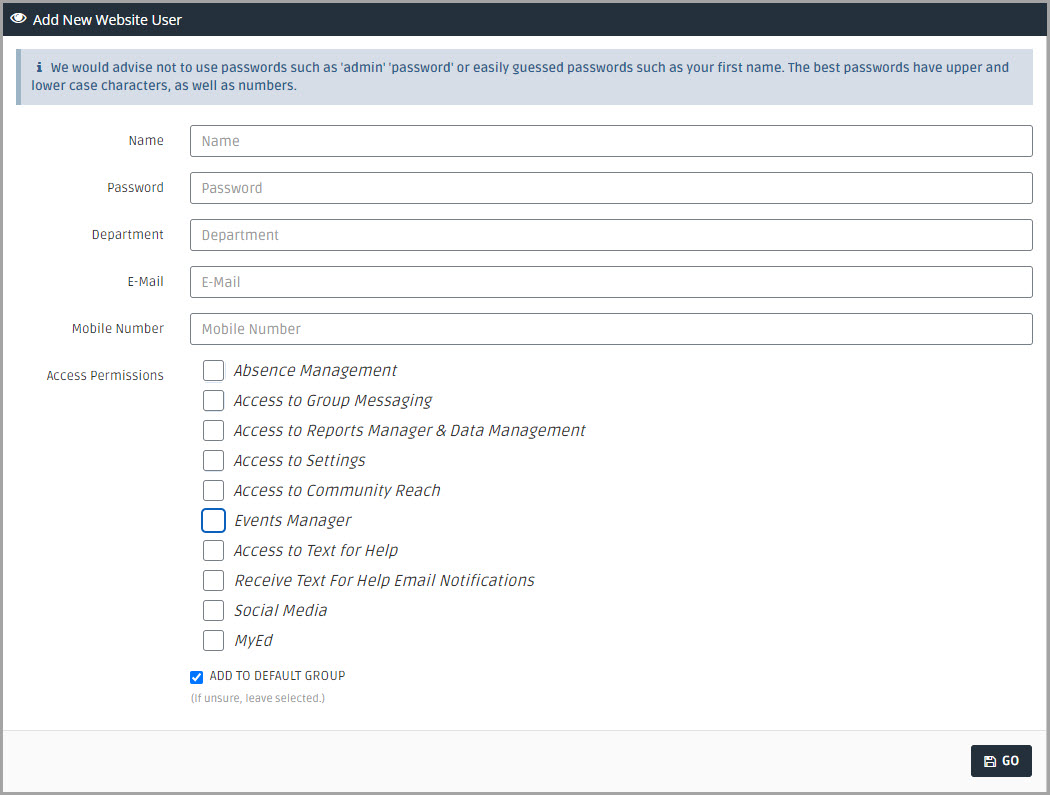
The Settings - Website Access – Add User page is displayed. Enter the following details for the user:
- Name — enter the full name of the person
- Password — enter a password (the person can reset their password when they log in)
- Department — enter the department in which the person works
- E-Mail — enter an email address (the person uses the email address to log in)
- Mobile Number (optional) — enter a mobile number for the person
-
The person is automatically provided with default access. We recommend leaving ADD TO DEFAULT GROUP selected.
If required, you can select the sections within IRIS Reach to which you want the person to have access. Select the required options from Access Permissions.
If you select Absence Management Settings to control default absence message templates and whether they can be changed or edited when sending absence alerts. the person is unable to view absences recorded in the AM Absence Report. You need to edit the account for the person to display an additional set of permissions. Select the required options from Show only the following years in Attendance Messaging, then select Go.
-
When you have entered all the details, select GO to save the details.
If your organisation A school, multi-academy trust (MAT), single academy trust (SAT), club, nursery or organisation that uses the software. uses Two-Factor Authentication (2FA), log a support ticket (a Service Cloud account is required) with our Support Team, so the new account can be activated. When activated the new user can use 2FA. For more information, go to Manage Two Factor Authentication (2FA).
Edit User Accounts
-
On the Settings - User Logins page, select Edit next to the Name of the person.
To find a specific person, enter their name in Search.

- The Settings - Website Access page is displayed. Change the required details, then select Go.
Remove User Accounts
-
On the Settings - User Logins page, select Remove next to the Name of the person you want to remove.
To find a specific person, enter their name in Search.

- A confirmation message is displayed. Select OK to confirm.
- A success message is displayed. Select OK to return to the Settings - User Logins page.