Importing Data
If IRIS ParentMail is connected to your organisation's Management Information System (MIS), a schedule would typically be created at installation time to synchronise the data between the two systems.
However, from time to time, there may be cause to import data into IRIS ParentMail. To do this, the import file must be correctly formatted for the import to be successful.
Import File Format
Note that student and organisation staff import files are formatted differently.
Creating the Student Import File
Add student and their parent or carer contacts to a .CSV file, using the following format:
StudentForename,StudentSurname,StudentID,Year,Reg,DOB,Gender,Relationship,Title,ContactForename,ContactSurname,ContactID,PrimaryEmail,MobileNumber,HouseName,HouseNumber,Street,District,Town,County,Postcode,Priority
where:
- StudentForename — Student's legal first name
- StudentSurname — Student's legal family name
- StudentID — A unique identification reference (ID) for the student
You can choose to differentiate between manually and automatically imported student details by using a phrase as part of the student ID. For example, starting all student IDs with MAN followed by the unique reference, such as MAN-2021-00001.
- Year — Student's year group, for example, Year 10
- Reg — The registration or form group if used, for example, 10A or Blue House
- DOB — The student's date of birth formatted as
DD/MM/YYYY, for example, 24/08/2021 - Gender — The student's gender as either,
M(male),F(female), orU(unknown)
The fields that follow are for the student's contact person. If the student has more than one contact, you must add each person's details with the exact same student details:
- Relationship — The relationship of the contact to the student, from:
- Mother
- Father
- Step Father
- Step Mother
- Foster Father
- Foster Mother
- Grandmother
- Grandfather
- Carer
- Child Minder
- Other Relative
- Son
- Daughter
- Child
- Parent
- Sibling
- Grandchild
- Grandparent
- Spouse
- Step Son
- Step Daughter
- Step Parent
- Foster Parent
- Title — Enter the contact's title, from:
- Mrs
- Mr
- Miss
- Ms
- Mx
- Dr
- Rev
- Prof
- Rabbi
- Hon
- Sir
- Lord
- Lady
- ContactForename — The contact person's legal first name
- ContactSurname — The contact person's legal family name
- ContactID — A unique identification reference (ID) for the person
You can choose to differentiate between manually and automatically imported person contact details by using a phrase as part of the contact ID. For example, starting all IDs with MAN followed by the unique reference, such as MAN-2021-00001.
- PrimaryEmail — The contact person's email address
The email address cannot be shared with another contact. If a match is found, the contact person's details are not imported.
If PrimaryEmail is not supplied, MobileNumber becomes a mandatory field.
If you have a IRIS ParentMail text-only account, leave the PrimaryEmail blank but do not delete the column header.
- MobileNumber — The contact person's mobile number, entered with no spaces
The mobile number cannot be shared with another contact. If a match is found, the contact person's details are not imported.
If MobileNumber is not supplied, PrimaryEmail becomes a mandatory field.
- House Name — If not used in the person's address, leave this field blank
- House Number
- Street — Just the street name of the address
- District — If not used in the person's address, leave this field blank
- Town — Town or city
- County — If not used in the person's address, leave this field blank
- Postcode — Or zip code
- Priority — Indicates whether this person is the primary contact — use 1 to indicate the primary contact for the student and 2 if they not
If Priority is left blank, the value defaults to 0 and the person is not added as a primary contact. It is recommended you assign one student contact person as the primary contact to allow you to specify whether messages are sent to all persons or just those with Priority status.
Creating the Staff Import File
If required, create a staff detail comma-separated file .CSV for import to allow staff to administer and manage IRIS ParentMail, using the following format:
Title,LegalForename,LegalSurname,StaffID,Gender,DOB,WorkEmail,Mobile
where:
- Title — Enter the staff member's title, from:
- Mrs
- Mr
- Miss
- Ms
- Mx
- Dr
- Rev
- Prof
- Rabbi
- Hon
- Sir
- Lord
- Lady
- LegalForename — The staff member's legal first name
- LegalSurname — The staff member's legal family name
- StaffID — A unique identification reference (ID) for the staff member
You can choose to differentiate between manually and automatically imported staff member details by using a phrase as part of the ID. For example, starting all IDs with MAN followed by the unique reference, such as MAN-2021-00001.
- Gender — The staff member's gender as either,
M(male),F(female), orU(unknown) - DOB — The staff member's date of birth formatted as
DD/MM/YYYY, for example, 24/08/2021 - WorkEmail — The staff member's email address
- Mobile — The staff member's mobile number
Importing the Data
If you do not have a registered IRIS ParentMail account, you must create the student and staff import files before attending your organisation's IRIS ParentMail Registration Appointment.
If you require any assistance with an import, select Live Chat to contact the Technical Support Team.
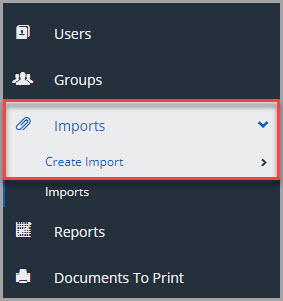
- Go to Imports > Create Import.
- Select Select CSV import file, then locate and select the
.CSVdata file you want to import.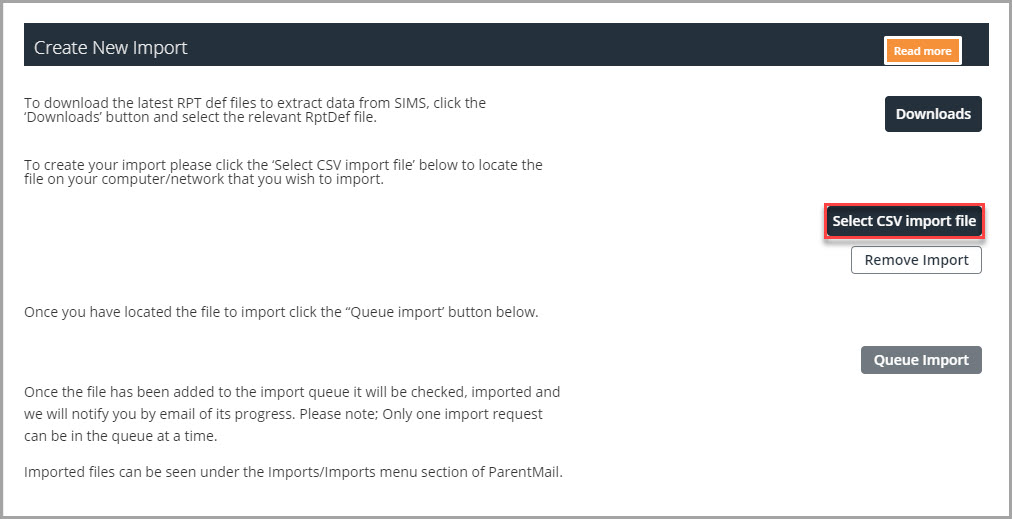
- The import file is displayed adjacent to Select CSV import file. Select Queue Import.

- When the data has been imported, a Summary is displayed with the details of the import.
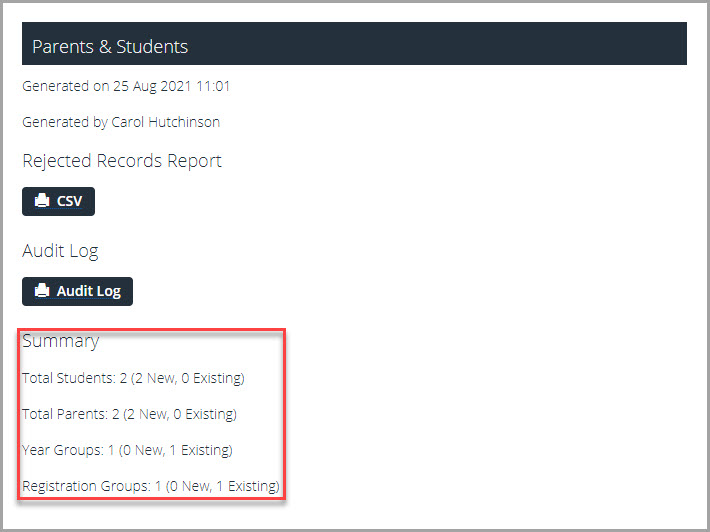
If the data has not imported correctly, the details are available in the Rejected Records Report. For further help and assistance with importing, select Live Chat to contact the Technical Support Team.