Cancelling/Reversing a Document/Transaction
In the event that a document needs to be cancelled you should never delete the document from the system. This would leave gaps in the document numbers and a loss of audit trail.
It is recommended that if you need to cancel a document, it should be reversed and allocated with the original document, with a comment explaining the reason it has been cancelled.
This article explains how to cancel a document using a reverse document. Note that payment documents such as BACS or Cheques can be automatically reversed. To do this, please see the following articles for more information:
- Select Options DocumentEnquiry from the IRIS Financials main menu.
- The Selection Criteria window is displayed. Use the Criteria tab to select the applicable document(s) you need to cancel and click the OK button.
- TheDocument Enquiry window is displayed. Right-click in the grey box to the left of the document and select Copy Document from the pop-up menu.
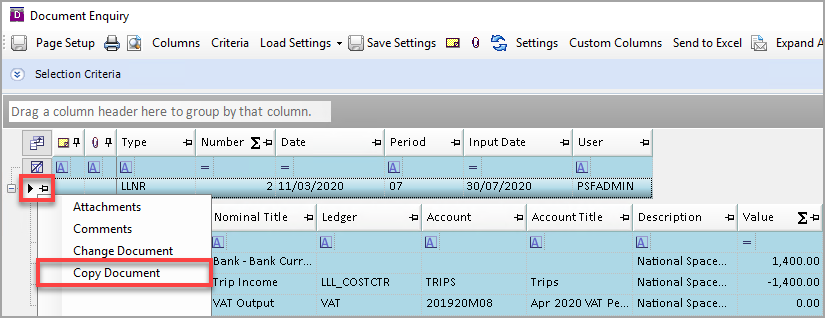
- The Destination document options window is displayed. Select the Reverse Values check box.
-
It is recommended you select a Journal document type from the Document Type drop-down list, as this clearly indicates a correction has been made.
You can select a different document type, however you will only be able to use the PSFJournal input form to post the document regardless of the Document Type you select
-
If you are reversing a POIN document, do not use another POIN document to reverse as this will cause the INV and POIN document numbers to become out of sync.
- Select the applicable Document Date and Document Period and click the OK button.
If you are correcting a document, it is recommended you use the same Document Date and Document period as the original document where possible. If this is not possible, use the next available Document Date and Document Period. - The System Journal Input window is displayed. The entries on the journal will be the reverse of the original document (providing you ticked the Reverse Values check box in step 4). Enter an applicable description in the Description field.
-
Press F8 which displays the Document Comment window. Enter a document comment explaining why the document is being cancelled and click the OK button. It may be several months before you refer back to the document (i.e. during a company audit process) and it may be difficult to remember why the original document was cancelled.
Click theDate Stamp button to automatically add the date to the comment.
- Press Shift+F5 to post and allocate the document.
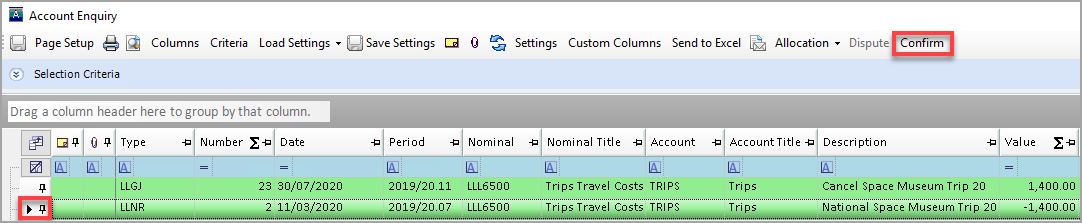
- The Account Enquiry window is displayed. The Journal document is highlighted green. Select the grey box to the left of the original document to turn the line green and click the Confirm button to allocate.
For more information about allocating documents, see Allocating Documents