Creating General Journals
In IRIS Financials, journals are used to record one-off, location specific transactions or extra-ordinary postings that happen rarely. These include:
- Corrections and Contra entries
- Reprographics journals
- Payroll journals
- Accruals and Prepayments
- Depreciation
- Opening Balances
In most circumstances, these are carried out by the Finance Managers or System Administrators however, there may be occasions when a journal needs to be created.
Journals were used in previous versions to correct documents, for example, where incorrect information had been selected for the cost-centre or nominal etc. In IRIS Financials incorrect documents (in some instances) can be corrected using the edit function. For more information, please see Editing and Reposting Documents.
It is necessary to understand the concept of double-entry accounting so that credits and debits can be applied appropriately when creating a journal.
Double-entry accounting involves a minimum of two nominals for every transaction, where debits must equal the total credits. Debits are on the left and credits are on the right.
When recording income, the balance sheet nominal is debited and the income nominal and account are credited, if applicable.
When recording expenditure, the expense nominal and account are debited and the balance sheet nominal and account are credited, if applicable.
An example of recording income for 4 weeks sports hall hire, the entries would be:

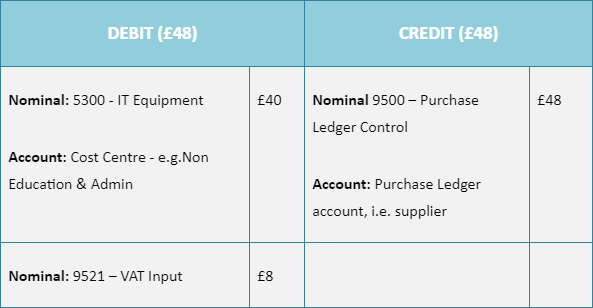
As an example of recording expenditure where a printer is purchased for the admin office:
If using a journal to make corrections, reverse any credits/debits originally entered.
- Click Documents, then select Document Input from the menu.
- The Document Input dialog is displayed. Select the applicable Journal document type from the Document Type drop-down list.
- The General Journal input form is displayed in Input form.
- The Number defaults to the next number in the sequence for the selected document type.
- The Date defaults to the current date (i.e. today's date) and can be changed by clicking the down arrow and selecting the required date from the calendar. The date should be the same date the transaction being recorded was made/received.
- The Period defaults to the current accounting period and can be changed by clicking the ? button, then double-clicking to select the required period from the Select a period dialog. The period needs to be the accounting period in which the transaction was made/received. If the required accounting period is now closed and no longer available, select the next open accounting period.
- Click OK to confirm your selections.
- The General Journal document input form is displayed populated with the details entered in the Document Input dialog.
- Double-click in Nominal to select the nominal to which the transaction is to be coded from the Select a nominal dialog.
- Double-click in Account to select the account to which the transaction is to be coded from the Select account dialog.
There may be instances where there are no accounts linked to the nominal and therefore an account does not need to be selected. For example, when recording transactions coded to the bank nominal. - Enter a Description to help identify the transaction in the system.
- Enter the Debit or Credit amount in applicable item line, e.g. 1000.00 (do not enter any currency symbols, i.e. £, $, etc.)
- When the Debit and Credit balance, press F5 or click POST to post the journal.
- A blank General Journal document input form is displayed. Enter the details for another journal or close the form.