Processing Invoices
Invoices should be added to the system when a physical invoice is received from the applicable supplier. This process generates an invoice from an authorised purchase order, which can then be checked against the supplier invoice and amended as required. This process also automatically creates a POIN in IRIS Financials.
An invoice can only be processed if:
-
the purchase order has been produced and authorised.
-
a GRN has been generated to confirm that the goods have been received or services carried out.
-
a physical invoice has been received from the supplier.
Once you have posted the invoice, you may want to add a scan of the physical supplier invoice as an attachment. For more information, refer to Adding Attachments to Documents.
If you want to create any prepayments, refer to Processing Prepayments In IRIS Purchasing.
Processing invoices consists of the following:
Dealing with Supplier Split Invoices
Dealing with Invoices Where Items are Missing/Damaged
Dealing with Duplicate Invoices
VAT Nominal Cannot be Found Error Message
Creating the Invoice
- From the Home page, select the Invoice icon.
- By default, a list of suppliers with goods received notes is displayed.
- Either scroll through the list, or search for the required supplier via the Search Criteria field at the top of the window. You can enter any element of the supplier’s account code or name/title. The list is reduced based on the criteria entered. Select the required supplier to select them.
By default, any element of the supplier's account code, name/title is searched. If you find that your search is taking longer than expected, deselect Advanced Search. - The Select your details lines window is displayed.
The list is ordered by the date the GRN was added to the system. It is therefore important to note that if multiple GRNs were produced for the same order, they may not appear sequentially in the list (and may not be visible in the initial display if the list is long). If the required order is not visible, enter the order number in Filter detail lines... at the top of the window. - Lines from any purchase orders for the chosen supplier are displayed. In the previous example, there are several purchase orders for exercise books as we have produced several orders to demonstrate the various invoicing scenarios.
If the required purchase order items are not displayed in the list, please check that a goods received note (GRN) has been created. Only purchase orders that have a GRN recorded against them are displayed. If any items have not arrived or have been damaged, refer to Dealing with Missing or Damaged Items. -
Select the order item lines required for the invoice, then select Progress. In this example, all the goods have arrived, and the invoice matches the purchase order.

Checking the Invoice Detail
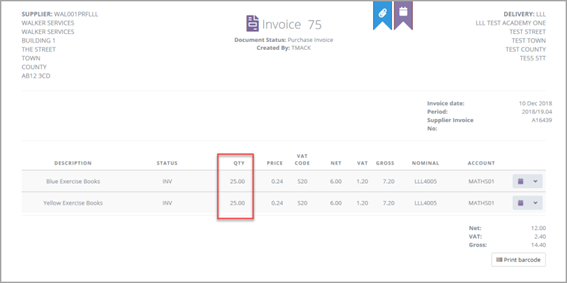
- The details from the chosen orders/GRNs are then progressed to the invoice as shown in the following graphic:
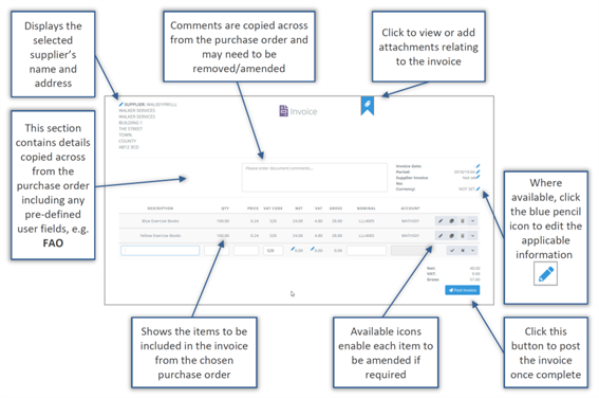
- Check the invoice details as follows:
Item
Description
Comments
Shows any comments included in the purchase order. Add any comments for the supplier relating to this invoice.
Invoice Date
Select the Edit (blue pencil) icon to enter the required Invoice Date to match the physical invoice (mandatory).
Period
In the invoice details section, Period defaults to the current accounting period. This usually only needs to be changed in the unlikely event that you are adding a retrospective invoice.
It is important to note that if you change the accounting Period in the invoice details section, the accounting Period for each item line is not automatically updated. This is intentional as you may want an individual item posted to a different accounting period.
As a consequence, if you amend the accounting period in the invoice details Period and have existing items in the invoice, you need to check the Period in the item line addition information section correctly reflects the required accounting period. This is acheived by selecting the down-arrow at the end of the applicable item line, as shown in the previous graphic.Supplier Invoice No.
Enter the invoice number provided on the supplier's invoice (mandatory).
Currency
Only needs to be set if the invoice is in a different currency.
- Next, review the individual items:

The icons adjacent to the items can be used to make amendments as follows:Icon
Description

Select to edit the item details. You need to validate the item once complete, irrespective of whether any changes have been made.

Select to produce a copy of the current item which can then be amended and validated.

This button appears greyed out (as you are unable delete items that have been progressed from an authorised purchase order). It is enabled for any new or duplicated items.


Select this to view any additional information about the item including for example Period, Discount, and Comments. The fields displayed here are defined by your System Administrator and consequently may vary from these.

Select this to validate any new or amended item line.
- Check the quantity (QTY) and PRICE match the supplier’s invoice. Select the Edit icon if any changes are required.
- If any items are missing or have been damaged, refer to Dealing with Invoices Where Items are Missing/Damaged.
- If there are delivery charges on the supplier invoice that have not been accounted for in the purchase order, or you want to apply delivery charges to a different nominal/account, refer to Dealing with Delivery Charges.
- If the supplier has agreed to split invoices, refer to Dealing with Supplier Split Invoices.
- Next check the VAT code to ensure that the goods are invoiced correctly. To change the rate, hover over VAT CODE, select the magnifying glass, then select the required VAT code.
From time to time, there may be rounding differences where the supplier’s finance system has rounded the amount differently to IRIS Purchasing. If this is the case, you need to amend the NET and VAT values (by selecting the pencil icon) to match the supplier’s invoice values. - Check that the nominal to which the item relates is correct. This can be changed by hovering over NOMINAL, selecting the magnifying glass, then selecting the required nominal from the Select window.
-
Alternatively, enter a relevant word, e.g. books in NOMINAL. The system displays any matching nominals, as shown in the following graphic. Select the required nominal from the drop-down list.
-
Also check that the correct cost centre account is displayed in ACCOUNT. If required, this can be amended using the same process as for nominals.
Checking/Applying Discounts
Discounts may have been included in the requisition or purchase order, for example, the person placing the order knew that a discount had been offered. At invoice stage, discounts can only be applied to individual lines.
You need to check any existing discounts are correct and/or ensure any discounts from the supplier invoice have been accounted for.
If the discount was not applied at the purchase order stage, apply it using the process described in this section. This completes the purchasing process (the purchase order and GRN is no longer be outstanding), and a discrepancy is recorded in IRIS Financials for audit purposes, to show a difference between the purchase order and the invoice.
If an item has the discount icon displayed adjacent to the NET value, this indicates that a discount has been applied.

Hovering over this icon displays the original item value prior to the discount.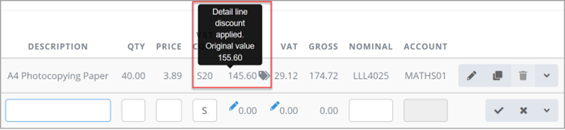
- If the discount has not already been applied, select the item down-arrow to display additional information.

- Enter the required discount in Discount, then select the Validate button to apply the discount. Repeat for any other required lines.
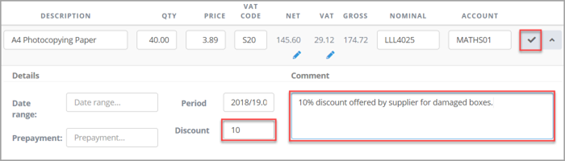
- The discount icon is be displayed against the NET to indicate that the discount has been applied.
Dealing with Delivery Charges
Supplier delivery charges are not usually known at the order stage and/or if they are known, the person creating the order may not have access to apply the delivery charge to the applicable nominal/account.
-
If the delivery charge is correctly included in the invoice, check that the delivery is applied to the correct nominal/account. The invoice can then be progressed.
-
If a delivery charge has not been included in the order, create a new line in the invoice, add the delivery details and cost applying to the applicable nominal/account. The invoice can then be progressed. The delivery cost shows up as a discrepancy for audit purposes.
-
If the delivery charge has been included in the order but is a higher amount in the invoice, this amount must be amended (to ensure that it is paid). Check that the delivery is applied to the correct nominal/account. The invoice can then be progressed. The difference in delivery cost shows up as a discrepancy for audit purposes.
Dealing with Supplier Split Invoices
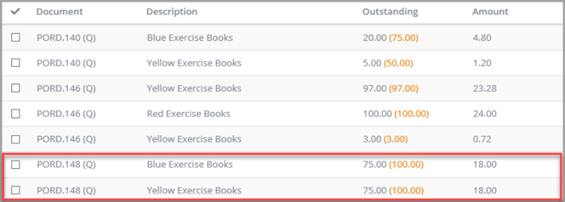
If the supplier has split the order across several invoices (e.g. four invoices for 25 blue and 25 yellow exercise books), use the following process:
- Generate the invoice from the applicable purchase order/GRN(s).
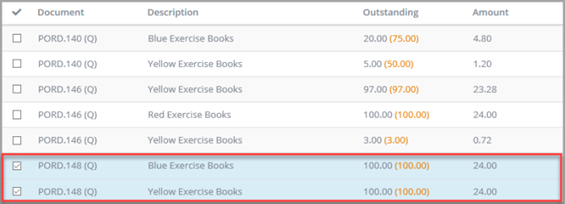
- Edit the quantities to match the split supplier invoice then post as usual.
- The applicable purchase orders/GRNs remain outstanding with the amended quantities until all the split invoices have been paid.
Dealing with Invoices Where Items are Missing/Damaged
The process for dealing with missing or damaged items very much depends on what has been agreed with the supplier and/or what has been recorded in the goods received note (GRN).
Example 1: From the 100
-
A separate GRN for the 3
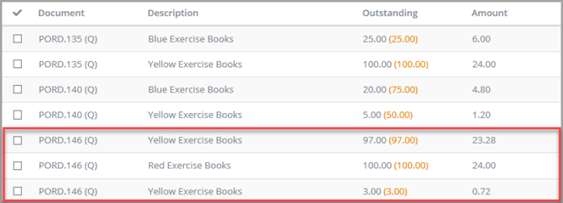
Example 2: From the 100
-
Contact the supplier and reject the invoice. Ask them to send new invoices - one for 97 items and a further invoice for the outstanding 3 items, which you pay for once they have been delivered.
-
Contact the supplier and reject the invoice. Ask them to send a new one for 97 items and not to re-deliver the outstanding items. You then need to write off the 3
For more information, refer to Writing off or Cancelling Documents.
Example 3: From the 100
-
Create a GRN for the remaining 3
-
Query the damaged
-
Pay the invoice and ask the supplier to raise a credit.
Posting the Invoice
When you are sure that everything on the invoice matches the supplier invoice, select Post Invoice. Any errors are highlighted in red and need to be rectified before proceeding.
On successful posting, two messages are displayed, showing that the invoice has been successfully posted in IRIS Purchasing and that a POIN has been successfully created in IRIS Financials.
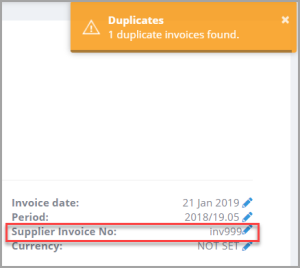
Dealing with Duplicate Invoices
If the invoice number already exists in the system (against the same supplier account code), a duplicate invoice message is displayed:
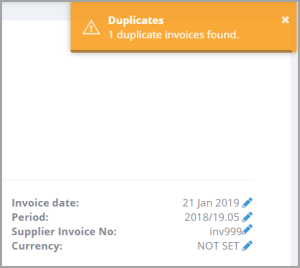
Selecting on the error message displays a list of the invoices with the same number.
Select Proceed to add the current invoice – you need to amend the invoice number. Select Back to return to the input screen.
VAT Nominal Cannot be Found Error Message
If this error message is displayed, it indicates that there are either no open VAT accounts or that the applicable VAT nominals cannot be accessed. If this occurs, please contact the person within your establishment / organisation who administers your system