Creating a Purchase Requisition
This topic explains how to create a requisition in , IRIS Financials Purchasingtogether with some of the common questions asked.
Purchase requisitions are created in IRIS Financials Purchasing to enable members of staff to raise a requisition for authorisation, which is then made available to the authoriser for approval. Once authorised, the requisition can then be progressed through the remainder of the purchasing process (purchase order, goods received note, and invoice). This process is not required if you use an internal/manual requisition process.
If the Requisition icon or any other settings mentioned in this article are not visible, the person within your establishment/organisation with System Administrator access i.e. CUSTADMIN login, needs to review the settings as described in Giving Users Access to IRIS Purchasing.
Creating a requisition consists of the following steps:
Completing the Requisition Details
Adding Items to the Requisition
Checking the Budget Before Posting
Creating a Requisition
-
On the IRIS PurchasingHome page, select the Requisition icon.
-
A list of suppliers is displayed in the Select your Supplier window. Enter search criteria here, such as supplier code, name/title etc.
-
Either scroll through the list, or search for the required supplier via the Search Criteria field at the top of the window. You can enter any element of the supplier’s account code or name/title. The list is reduced based on the criteria entered. Select the required supplier to select them.
By default, any element of the supplier's account code, name or title is searched. If you find that your search is taking longer than expected, deselect Advanced Search.
-
If the supplier is not known at this point, you can select New to create a requisition without a supplier. The requisition is then available for selection via all supplier accounts when being progressed to a purchase order (once the requisition has been authorised).
Your system may be set up so that providing a supplier is mandatory at this stage. -
Once identified, select the required supplier to select them. The requisition form is populated with the chosen supplier’s details (account code, name, and address).
Suppliers are added . If IRIS Financialsthe required supplier is not displayed, they need to be added to IRIS Financials by a user with applicable access levels. For more information, refer to Creating Or Editing Supplier Accounts.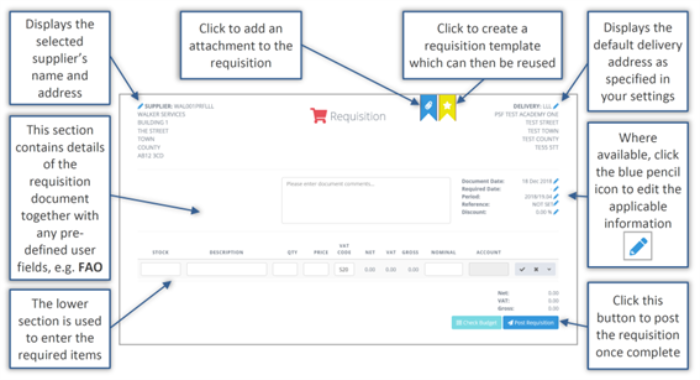
Completing the Requisition Details
The delivery address defaults to the address specified in the Current User settings tab (accessed by selecting Settings on the Home page). This is usually your establishment/organisation address. There may however be multiple addresses for separate departments, locations, and so on. For more information, refer to Adding a New Deliver Address To IRIS Purchasing.
-
If there is no delivery address displayed, or you want to change the delivery address, select the blue Pencil icon.

-
From the Select Your Delivery Address window, select the required address to select it.
-
The centre section of the document is used to complete details relating to the requisition itself.

-
Select the blue Pencil icon to open the calendar enabling a different date to be selected.
-
Complete/edit the remaining requisition information as follows:
Comments
Enter any comments relating to the requisition. There are two potential uses for the comments field:
-
You can add comments to be used internally (for example, to provide information for the requisition authoriser, such as See attachments for quotes).
-
You can add comments for the supplier, such as delivery instructions or any special requirements.
Document Date
Required Date
This date is blank by default but can be populated by selecting the blue Pencil icon and selecting the required date form the calendar, then selecting Done. Enter the date that the item(s) are required by.
Period
In the requisition details section, the Period field defaults to the current accounting period. This usually only needs to be changed in the unlikely event that you want to create retrospective purchase orders.
It is important to note that if you change the accounting Period in the requisition details section, the accounting for each item line is not automatically updated. This is intentional, as you may want an individual item posted to a different accounting period.
As a consequence, if you amend the accounting period in the requisition details Periodfield, and have existing items in the requisition, you need to check that the Period field in the item line additional information section correctly reflects the required accounting period. This is achieved by selecting the down-arrow at the end of the applicable item line, as shown in the previous graphic.
Reference
Enter any required reference in Reference, such as a quote number, an establishment/organisation reference number, and so on. This reference is carried through to the purchase order once the requisition is authorised.
Your system may be set up so that providing a reference is mandatory.
Discount
The Document field in the requisition section is blank by default. If you know that a discount is available when the order is placed, it can be entered here. The discount is applied to all the item lines in the requisition.
If required, you can edit the discount for any individual item lines by selecting the down-arrow at the end of the required item line.
Adding Required Items to the Requisition
Once the document details have been completed you can proceed to enter the items required. The following process should be carried out for each item required.
-
If known, enter the supplier item stock code in STOCK, then press the Tab key to move to the next field. This is not a mandatory field and can be left blank, providing it is not required by the supplier.
If a supplier catalogue has been imported into IRIS Financials, when you hover over STOCK, a magnifying glass appears, which when selected enables a stock code to be selected. This automatically populates Description and Price. For more information, refer to Importing Supplier Catalogues.
-
Enter a Description for the required item, e.g. Blue Exercise Books, then press the Tab key to move to the next field.

An unlimited number of characters can be entered, but only 30 characters are displayed in Description. The system automatically copies any description over this limit to the item additional information Comments. You can view this by selecting the View Additional Information (down arrow) icon on the far right of the line. -
Enter the Quantity and unit Price for this item.
-
The VAT CODE defaults to the standard rate (this setting can be amended your System Administrator and may be different).
Requisitions and purchase orders are raised exclusive of VAT, so this field can be amended during the invoice stage. However, if you know that VAT is not applicable for the item or that the rate is incorrect, it can be changed. Hover over VAT CODE, select the Magnifying Glass icon, then select to select the required VAT Code from the Select window. -
The NET, VAT and GROSS are calculated automatically.
-
Select the nominal to which the item relates. Hover over Nominal, select the magnifying glass icon, then select to select the required nominal from the Select window.
Alternatively, enter a relevant word, e.g. book into Nominal. The system displays any matching nominals, as shown in the following graphic. Select the required nominal from the drop-down list. -
Choose the cost centre account to which the item should be charged (this can only be done once a nominal has been selected). Hover over Account and select the magnifying glass icon, then select, or search for the required cost centre account from the Select window.
A default cost centre account can be set up in the Current User settings tab (accessed by selecting the Settings icon on the Home page) and can subsequently be changed, as required. If this setting is not available, please contact the person in your establishment/organisation with the CUSTADMIN login.
-
Choose a cost centre by entering a relevant word, such as Maths. The system displays any matching cost centre accounts, as shown in the following graphic. Select the required account from the drop-down list.
Adding additional item information
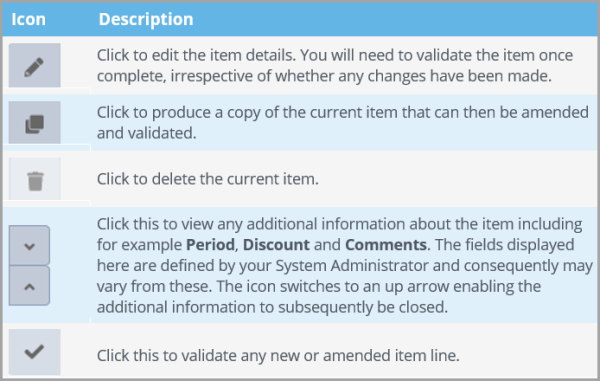
Additional information can be added to each item by selecting the Show Additional Information (down arrow) icon on the far right of the item line.

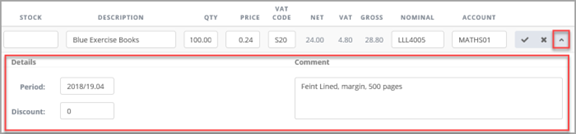
The fields that are displayed in the additional information section are defined by the person within your establishment/organisation with the CUSTADMIN login, and may not necessarily be the same as those shown here.
In this example, you can apply a specific Period or Discount to this item by making changes to the applicable fields. You can also add additional information in Comment.
It is important to note that if you change the accounting Period in the requisition details section, the accounting Period for each item line is not automatically updated. This is intentional as you may want an individual item posted to a different account.
As a consequence if you amend the accounting period in the requisition details Period field, and have existing items in the requisition, you need to check that the Period field in the item line additional information section correctly reflects the required accounting period. This is achieved by selecting the down-arrow at the end of the applicable item line, as shown in the previous graphic.
Validating an item line
-
Once you have finished adding the item information, select the Validate icon (tick) to validate the line.

If the validation fails, an error message is displayed on the top, right-hand corner of the requisition document, and the field with an error is displayed in red.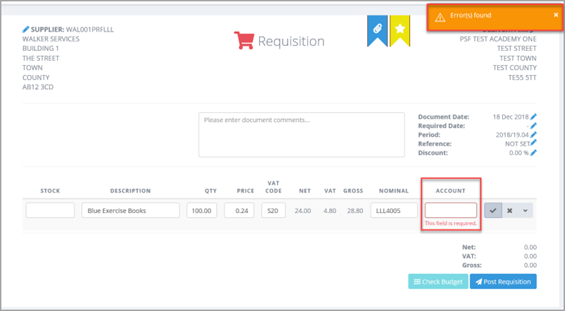
-
Correct the information and validate again. You are unable to add further items until the item line has been successfully validated.
Adding Additional items
Once an item line has been successfully validated, a new line is automatically created. The total Net, VAT, and Gross for the requisition are automatically updated to reflect the validated items.
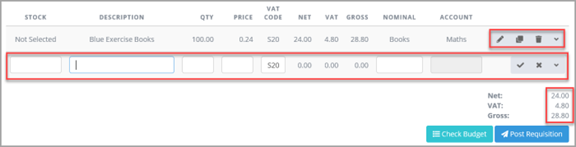
The icons to the right of the validated item line can be used to make amendments as follows:
Complete the new item information in the same way as previously described. If the item is similar (for example, yellow exercise books), it can save time to copy the existing line and make minor adjustments, as described in the following section.
If delivery charges are known at this stage, they should be added. However, it is best practice to only add them if you have access to the correct nominal/account to which delivery charges should be applied. Check with the person in your establishment/organisation with the CUSTADMIN login if you are in any doubt or leave the delivery charge to be added at the purchase order/invoice stage.
Copying existing items
-
To copy an existing item, select the Copy icon on the right-hand side. A new line is displayed with the exact same content.

-
Make the required amendments. In the following example, the colour of the books has been amended to Yellow.

-
Validate the line in the usual way. As before, the Net, VAT and Gross for the requisition are automatically updated to reflect the new item(s).
Viewing or Adding Attachments
You can add attachments to the requisition at any point during or after the creation process. For example, you may want to attach a quote, an email, a photo, etc. For more information, refer to Adding Attachments to Documents.
Checking the Budget Before Posting
Depending on how your system has been set up, you may see Check Budget at the bottom of the requisition. This functionality is often used by cost centre managers, such as heads of department, to check the impact of this order on their budget.
If Check Budget is visible, selecting it allows you to see the impact of this purchase on the chosen budget/nominal and whether the item is within budget limits, as shown in the following graphic.
This window may look slightly different if your system has been set up to check a budget at account level. In this case, it is grouped on account code and there is no nominal column.
Depending on how your system has been set up, a Budget Information window may be displayed showing the impact on any applicable ledger. In the previous example, the requisition falls within the applicable budget and therefore the line is highlighted in green. If the requisition goes over budget, then the information is highlighted in red. Select Back if you need to return to the requisition to make amendments.
Posting the Requisition
If this requisition is one that you are likely to use again, i.e. the items are to be regularly ordered, you can save this requisition as a template that can be re-used. For more information, refer to Creating Document Templates.
Once all the required items have been entered and validated, select Post Requisition.
Error messages are displayed if any lines have not been validated or any mandatory data is missing (the affected mandatory fields are then highlighted in the purchase order). These errors must be corrected, or the applicable line deleted before the requisition can be successfully posted.
Once the requisition has been successfully posted, a requisition document number is automatically generated, and a success message is displayed in the top right-hand corner of the window. Selecting the message opens a read-only copy of the requisition.
By default, you are returned to the Home page, but this can be changed via the Current User tab in settings (accessed by selecting the Settings icon on the Home page) so that a read-only version of the posted document is automatically displayed. For more information, refer to Personalising IRIS Purchasing.
The requisition is now ready for authorisation and once authorised, can be progressed to purchase order. An email is sent to the person responsible for authorising this requisition. For more information, refer to Authorising Documents.