General applicant details
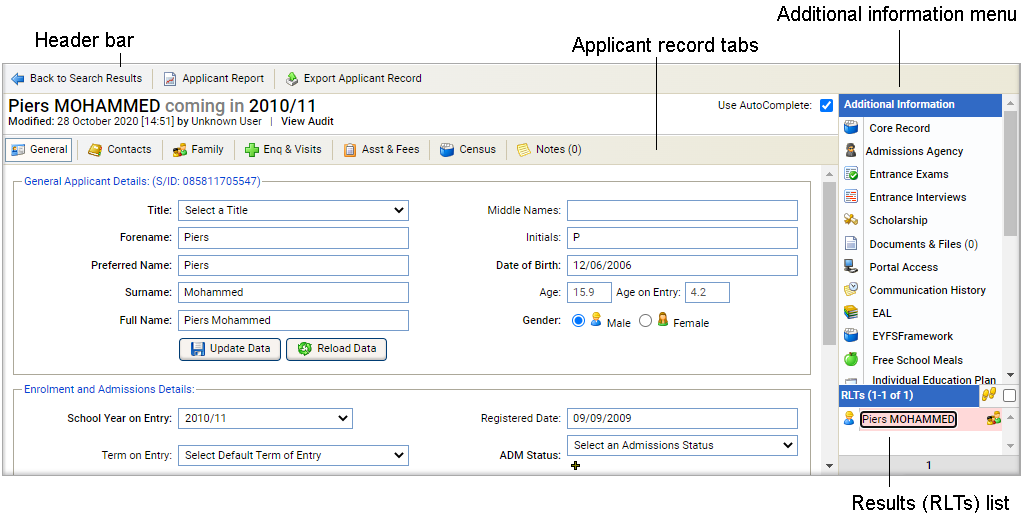
Once you have opened an applicant record in the Pupil Manager module, use the General tab to view and manage basic information, such as an applicant's name and age or their admission status:

This tab may contain Custom Fields.
Use the AutoComplete checkbox in the top of the screen for fields to capitalise automatically as you complete them. Uncheck the AutoComplete box to override automatic capitalisation.
Click the add icon next to a field to add a new option to a drop-down list.
Most of the fields in the General tab are completed for you using information from the Admissions module:
- In the Pupil Manager module, select the Applicants tab.
- Search and select a student record to work with and select the General tab.
- In the General Applicant Details section, select in a field and add or amend the name and age information displayed.
- Click Update Data to save the new data.
-
Complete the Enrolment and Admissions Details section:
Field Explanation School Year on Entry Select the academic year that the applicant is due to start at your school. Term on Entry Select the term that the applicant is due to start at your school. Year Group on Entry Select the year group which the applicant will join when they start at your school. Residential House on Entry Select a Residential House which the applicant will join when they start at your school. School Status Select the applicant's expected boarding status from the drop-down list. Form on Entry Select the form group which the applicant will join when they start at your school. Academic House on Entry Select an Academic House which the applicant will join when they start at your school. Registered Date
Select a registration date for the applicant, this is the date that registration documentation and fees have been received by your school. ADM Status Select the applicant's current status in the admissions process. You can change this at a later date as the admission process moves forward. Current School Either: - Click the hand icon and enter the applicant's current school name in the window displayed.
- Select the applicant's current school from the list displayed.
- Click OK to return to the General tab.
- or
- Click the information icon to display a current school's details. This is useful for checking information. or
- Click the add icon to add a school if the current school is not listed. This is a shortcut to the Other Schools module.
Current Education Log the type of school that an applicant currently attends. This is useful for reviewing your feeder schools. Offer Type Select the type of offer that has been presented to the applicant. Use this to clarify whether an offer is a scholarship, bursary or full fee school place. School Code This is optional.
Use School Codes to identify applicants for different intake years, if required. You can duplicate the School Codes you use here (School Codes must be unique when entered in a current student record). School codes can be set so that they are automatically generated if required.
Enrolment Date Select an enrolment date. If you have chosen to activate the auto enrolment function, the applicant is automatically enrolled on the date you select here. - Click Update Data to save the new data.