Export student records
Use the Pupil Manager module to export student record information into an Excel report.
Select the fields in student records that you want to include in your export such as student medical conditions or previous schools. A wizard is available to help you.
Lists of exported student records are held in the module. These can be deleted when you no longer need to keep a log of exported records.
Step 1: Export student records
To export student records, follow the steps below:
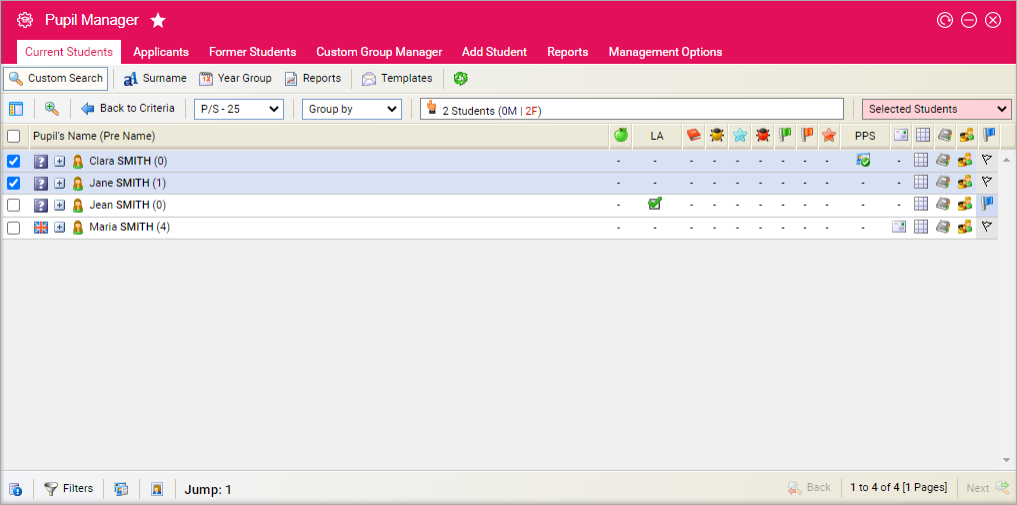
- In the Pupil Manager module, select a student records tab.
- Use your preferred search method to find the student records that you want to work with. The Student/Pupil Records List is displayed:
- Either:
- Select student records using the checkboxes next to each Student/Pupil's Name. Check the box in the header bar to select all the records displayed.
- In the pink drop-down list select Export Students Records.
- Click on a selected student's name to display their record.
- Click Export Student Record/Export Applicant Record above the student's name.
Step 1 of the Export Manager Wizard is displayed:
-
Select either:
- Create new export using new fields and options.
Create your own export. You can choose to save the fields selected
for your export and share it with other users, if required.
or - Use an existing export that I created and saved.
Select a previous export from the list displayed.
or - Use a shared export that I or someone else created. Select an export from the list displayed.
- Create new export using new fields and options.
Create your own export. You can choose to save the fields selected
for your export and share it with other users, if required.
- Click Next to go to the next step of the wizard.
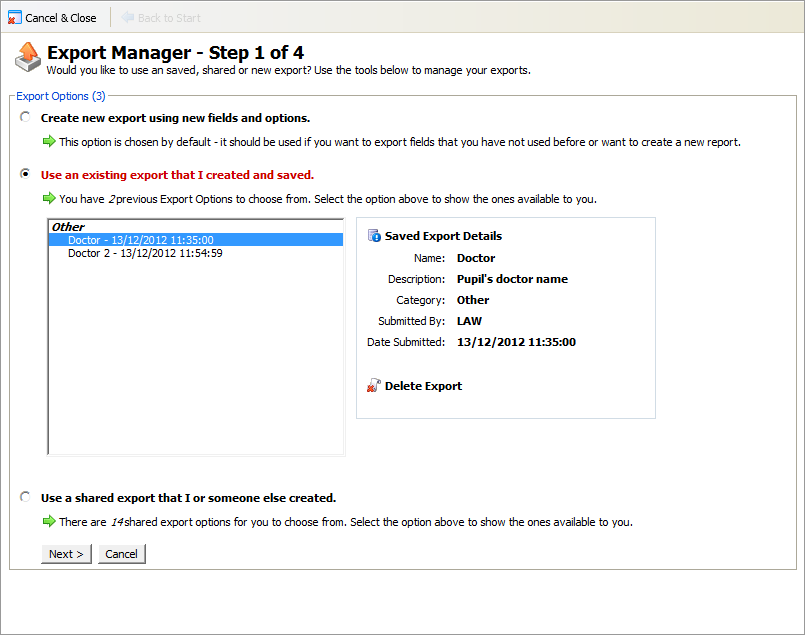
Choose to delete an existing or shared export from Step 1 of the Export Manager Wizard, if required. See Delete a student records export for more information.
Step 2: Export student records
Use Step 2 of the Export Manager Wizard to select the fields that you want to include in your export:
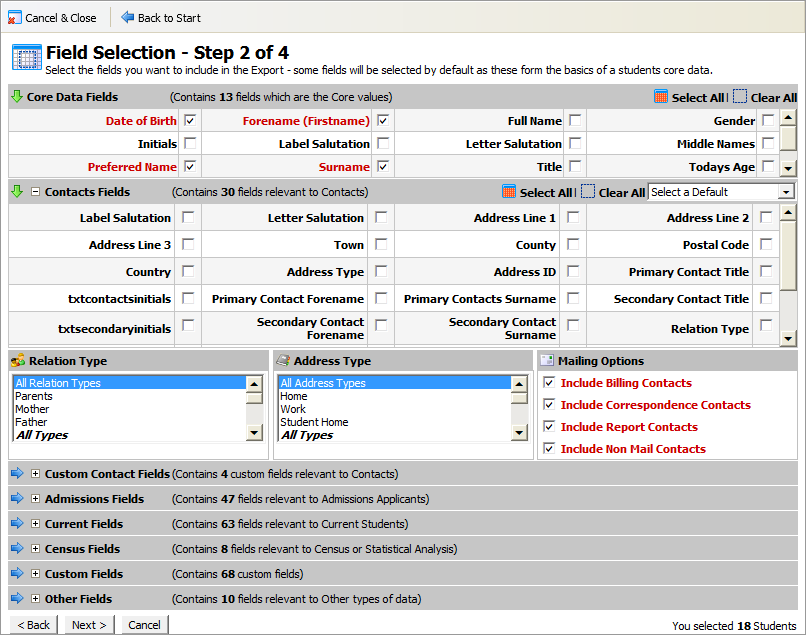
- Expand and collapse the sections available, as required.
- Use the checkboxes displayed in each section to select the fields that you want to include in your export. Default selections are made to help you.
-
Use the selection tools, if required:
- Select All. Checks all the boxes in a section.
- Clear All. Unchecks all the boxes in a section.
-
If you are using the Contacts Fields section. Use the lists
available at the bottom of the section to filter student contacts. Hold
Ctrl to make multiple selections in a list, if required.
Select:
- Relation Type. The types of student contact that you want to list in your export.
- Address Type. The addresses that you want to list in your export.
- Mailing Options. Student contacts are set up to receive different types of correspondence. Filter the student contacts you have selected using the checkboxes available.
- Click Next to go to the next step of the wizard.
Steps 3-4: Export student records
An example of Step 3 of the Export Manager Wizard is shown below:

- In the Order Results By section, change the default order that records are listed if required.
- In the Export Format section, select a format for your export.
- Check the Save Export box if you want to save the field selections you have made.
- Enter a clear and concise Export Name. The nature of the export content must be clear as this is listed when you select to use an existing or shared export. The box on right warns you if the Export Name has been used before.
- Enter a description for the export, this is optional.
- Check the Shared Export boxes if you want other users to access and edit your saved export.
- Check the Save Options box to save this export as new. The existing or shared export you are using is saved in its original state.
- Click Create Export to go to the next step of the wizard.
-
In Step 4 of the Export Manager Wizard either:
-
Click Download the Export File containing the Data.
Open or Save and print the file
as required.
or -
Click
Return to Previous Field Selection Page
to return to
Step 2 of the wizard
and amend the fields selected.
or - Click Return to Previous Options Page return to Step 3 of the wizard to change the order, format or saved settings of the export.
-
Click Download the Export File containing the Data.
Open or Save and print the file
as required.
- Click Cancel & Close.
Delete a student records export
Choose to delete an existing or shared export from Step 1 of the Export Manager Wizard, if required. This is a useful housekeeping tool.
To delete a student records export, follow the steps below:
- In the Pupil Manager module, select a student records tab.
- Select the Basic tab and select Search. The Student/Pupil Records List is displayed:
- Either:
- Select any student record using the checkboxes next to each Student/Pupil's Name. This is to make the pink drop-down list available, it does not matter which student record you select.
- In the pink drop-down list select Export Student Records.
- Click on a student's name to display their record.
- Click Export Student Record above the student's name.
-
Select either:
- Use an existing export that I created and saved.
Select to delete a previous export from the list displayed.
or - Use a shared export that I or someone else created. Select to delete an export from the list displayed.
- Use an existing export that I created and saved.
Select to delete a previous export from the list displayed.
- Click Delete Export. You are prompted Are sure you want to delete the selected saved export?
- Select Yes. You are prompted when the export has been removed.
- Click Cancel & Close.