Student documents and files
Once you have opened a student record in the Pupil Manager module, use the Documents & Files option to upload and manage correspondence or reports that have not been written in Ed:gen.
Ensure that you add security permissions to the documents that you upload as required. This ensures that confidential information is stored appropriately.
To work with student documents and files, follow the steps below:
- In the Pupil Manager module, select a student records tab.
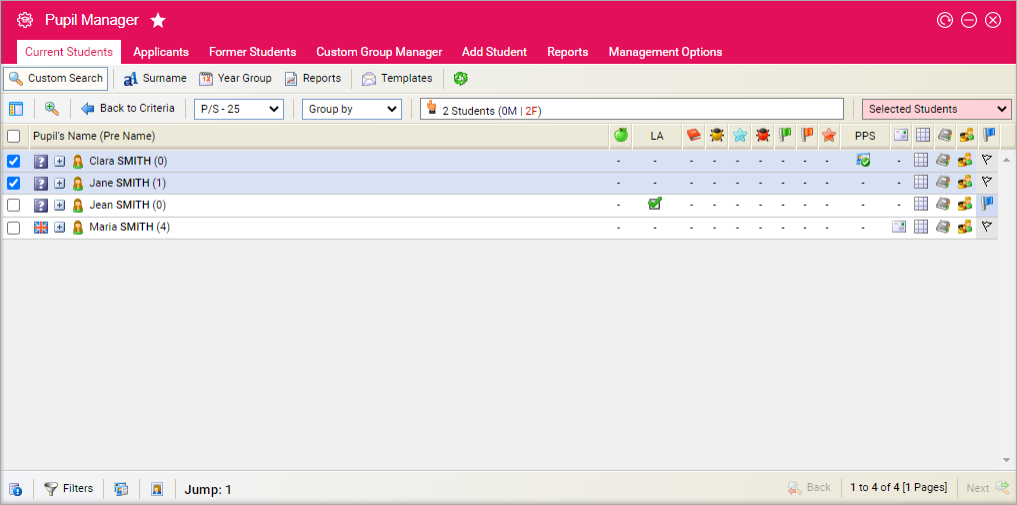
- Use your preferred search method to find the student records that you want to work with. The Student/Pupil Records List is displayed:
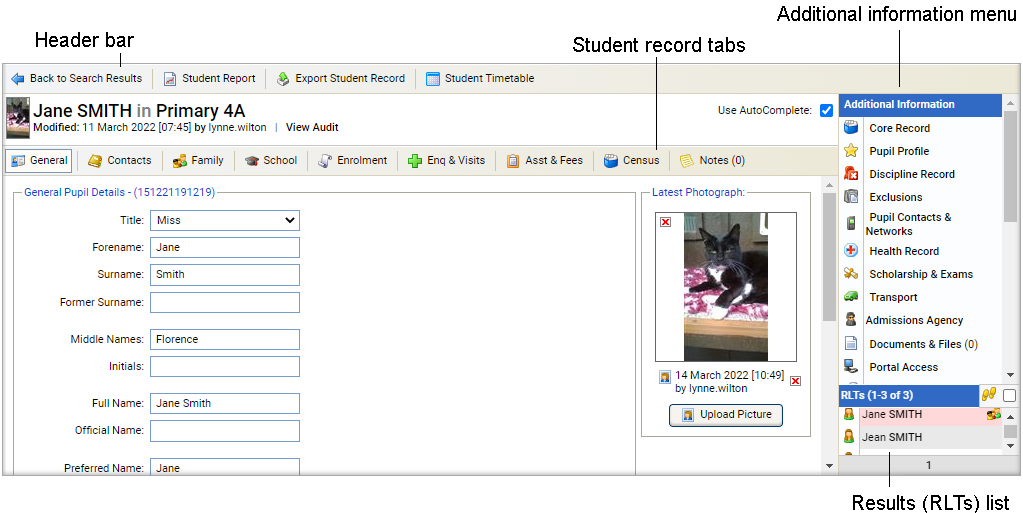
- Click on a student's name to display their record:
- Go to the Additional Information menu and select Documents & Files.
-
Choose to:
- Upload a document to a student record.
- Download a document. Download a document if you need to see a hard copy. You can also download a document to edit it, then upload the revised version. The number of times that a document has been downloaded is listed in the Documents & Files option.
- Edit student document details. Change the name of a document, the description or the category.
- Delete a student document. Permanently remove any documents which are obsolete or have been added in error.
- Edit a document category. This is useful for updating the security access for all documents listed in a selected category. The permissions you set are applied to all documents in the category you select.
- Delete a document category.

Upload a document to a student record
- Click Upload Document in the header bar. The Upload File or Document window is displayed:
- Click the upload icon and select the file that you want to import.
- Enter a clear and concise Document Name. This defaults to the file name.
- Add more detail about the document in the Description field.
-
Either:
-
Select an existing Document Category to group documents.
or -
Add the document to a new category:
-
Click the add icon to the right of the Document Category list. A second popup window is displayed:

- In the Category tab, enter a clear and concise name for the new category.
- Click Save Category. The popup window closes.
-
-
-
Check that access permission for the document is as required.
This is important to ensure that confidential information is stored appropriately and is not accessed by all users.
Ensure that the Document Category you want to apply to the document is selected.
Click the edit icon to the right of the Document Category list.
Select the Security tab and select Add...:

-
Select 'Everyone'.
This must be selected first if a category needs to be restricted to specific user/s.
- Set Permissions as 'Hidden'.
- Click Add Permissions.
-
Now set the restrictions to users or groups as required. Select
either:
-
An individual user. Select a user from the drop-down list.
or - A user group. Select a user group from the drop-down list. These are groups set up in the Control Panel > User Accounts.
-
An individual user. Select a user from the drop-down list.
-
Use the radio buttons displayed in the bottom half of the window
to set up the level of access for your selected user/s:
- Full Control. Users can edit and delete documents.
- Modify. Users can edit documents.
- Read Only. Users can only view documents.
- Hidden. Users have no access to the documents.
- Click Add Permission. The access permissions are listed.
- Click Save Category. The popup window closes.

- Click Upload Document. The document is listed in the student record. Click on a document name to open it.

Download a document
- Click on your selected document category to expand it and display all the documents.
- Click on your selected document.
- Open or Save the document, as required. The document downloads count is revised automatically.
Edit student document details
- Click the edit icon in your selected document. The Document Details window is displayed:
- Edit the Document Name. Enter a clear and concise name for the document. This defaults to the file name.
- Edit the Description for the document, if required.
- Either:
Select a Document Category to group documents.
orAdd the document to a new category:
Click the add icon to the right of the Document Category list. A second popup window is displayed:
- In the Category tab, enter a clear and concise name for the new category.
- Click Save Category. The popup window closes.
-
Check that access permission for the document is as required.
This is important to ensure that confidential information is stored appropriately and is not accessed by all users.
Ensure that the Document Category you want to apply to the document is selected.
Click the edit icon to the right of the Document Category list.
Select the Security tab and select Add...:
-
Select 'Everyone'.
This must be selected first if a category needs to be restricted to specific user/s.
- Set Permissions as 'Hidden'.
- Click Add Permissions.
-
Now set the restrictions to users or groups as required. Select
either:
-
An individual user. Select a user from the drop-down list.
or - A user group. Select a user group from the drop-down list. These are groups set up in the Control Panel > User Accounts.
-
An individual user. Select a user from the drop-down list.
-
Use the radio buttons displayed in the bottom half of the window
to set up the level of access for your selected user/s:
- Full Control. Users can edit and delete documents.
- Modify. Users can edit documents.
- Read Only. Users can only view documents.
- Hidden. Users have no access to the documents.
- Click Add Permission. The access permissions are listed.
- Click Save Category. The popup window closes.
- Click Save & Close. The amended document is listed in the student record.

Delete a student document
- Click the delete icon in your selected document. You are prompted Are you sure you want to delete this document?
- Select Yes. The document is removed from Ed:gen.
Edit a document category
- Locate the document that you want to work with and select the edit icon.
-
Either:
-
Select a Document Category to group documents.
or -
Add the document to a new category:
-
Click the add icon to the right of the Document Category list. A second popup window is displayed:
- In the Category tab, enter a clear and concise name for the new category.
- Click Save Category. The popup window closes.
-
-
-
Check that access permission for the document is as required.
This is important to ensure that confidential information is stored appropriately and is not accessed by all users.
Ensure that the Document Category you want to apply to the document is selected.
Click the edit icon to the right of the Document Category list.
Select the Security tab and select Add...:
-
Select 'Everyone'.
This must be selected first if a category needs to be restricted to specific user/s.
- Set Permissions as 'Hidden'.
- Click Add Permissions.
-
Now set the restrictions to users or groups as required. Select
either:
-
An individual user. Select a user from the drop-down list.
or - A user group. Select a user group from the drop-down list. These are groups set up in the Control Panel > User Accounts.
-
An individual user. Select a user from the drop-down list.
-
Use the radio buttons displayed in the bottom half of the window
to set up the level of access for your selected user/s:
- Full Control. Users can edit and delete documents.
- Modify. Users can edit documents.
- Read Only. Users can only view documents.
- Hidden. Users have no access to the documents.
- Click Add Permission. The access permissions are listed.
- Click Save Category. The popup window closes.
- Click Save & Close to return the the Documents & Files screen.
Delete a document category
- Locate the document that you want to work with and select the edit icon.
- Click the delete icon to the right of the Document Category list. You are prompted Are you sure you want to delete it? All data will be lost.
- Click OK. The category is removed. Any documents listed under it are now listed under 'Unknown Category'.
- Click Save & Close to return the the Documents & Files screen.