|
 |
|
|
This topic explains the process of requesting and completing the payment for invoices by uploading the Invoices to OpenSpace within Time & Fees. The upload to IRIS OpenSpace can be done from Client Maintenance screen, Client dashboard and IRIS Fees.
Within Practice Management, select a client registered in Time & Fees | Client Maintenance screen | Communications tab | select the Item to be uploaded | right-click and select Upload to IRIS OpenSpace.
Within Client Search | select a client registered in Time & Fees | Client dashboard | Recent Communications widget | select the item to be uploaded | right-click and select Upload to IRIS OpenSpace.
Within IRIS Fees navigate to
Enquiries menu | Account
details | Fees Account Display
screen | select a Time and Fees registered client | right-click an invoice
that has not been matched | select Print
the invoice | opens the IRIS AutoMail
– Merge Letters screen.
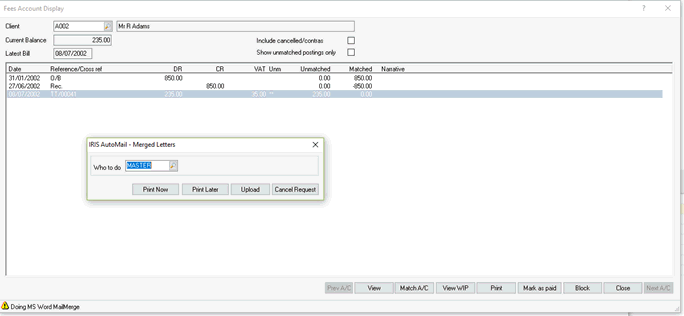
Clicking Upload will upload the invoice to OpenSpace. Only templates of type pdf can be uploaded. Any template of type Word will be converted to pdf on upload.
Once the invoice has been paid electronically within OpenSpace, it will be automatically downloaded by IRIS and appear on the Pending Payments screen within Time & Fees.
To view the Pending payments on IRIS, log onto IRIS
Fees | Posting menu | Pending ePayments sub menu | Pending ePayments screen.
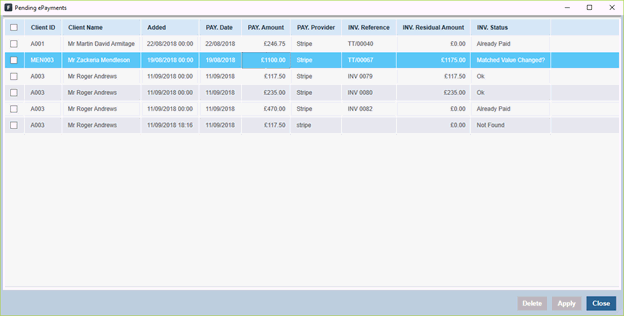
The columns that appear in the Pending ePyament screen are:
Client ID – the ID of the client.
Client Name – the name of the client.
Downloaded – the date when the invoice was downloaded from OpenSpace.
PAY. Date – the date when the payment was made in OpenSpace.
PAY. Amount – the payment amount made in OpenSpace.
PAY. Provider – the payment provider in OpenSpace.
INV. Reference – the invoice reference number.
INV. Residual Amount – the invoice unmatched amount.
INV. Status – the invoice status.
The different status that can diplay are:
Apply is enabled only when one or more ePayment entries are selected. For ePayments that have the Invoice Status as OK, the receipt will be posted and matched to the original invoice. For the entries where the Invoice Status is Not OK, the receipt will be posted but will not be matched.
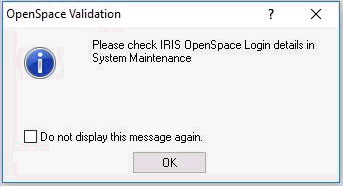
The Apply option also validates the OpenSpace credentials.
When Apply is clicked and the Openspace credentials within System Maintenance are incorrect, a dialog displays, as shown below.
Clicking OK will close this window. If you don't want to see the message again, select 'Do not display this message again'.
Click Apply when Opensapce credentials
are correct in System Maintenance; message will NOT display and Apply should work as mentioned above.
Delete will be disabled for any selected postings that have the invoice status as OK. For all other invoice status, Delete will be enabled.
After selecting one or more ePayment items and clicking Apply,
the selected ePayment will be applied to the Fees Ledger.
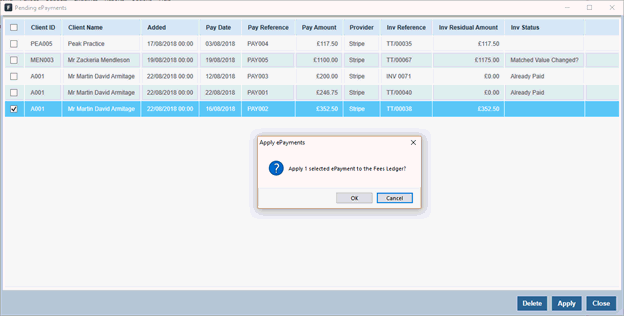
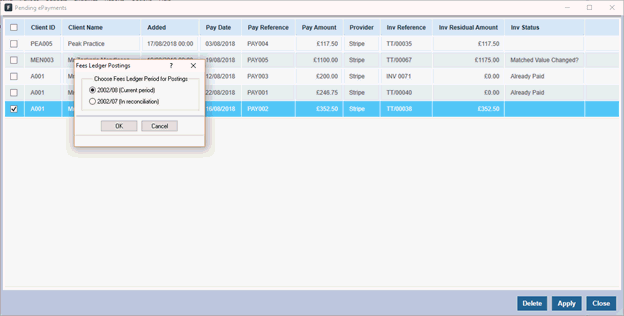
Clicking OK will display the
Fees Ledger Posting screen to allow you to choose which period the receipt
posting(s) should apply to and will eventually post the payment to the
Fees Ledger.
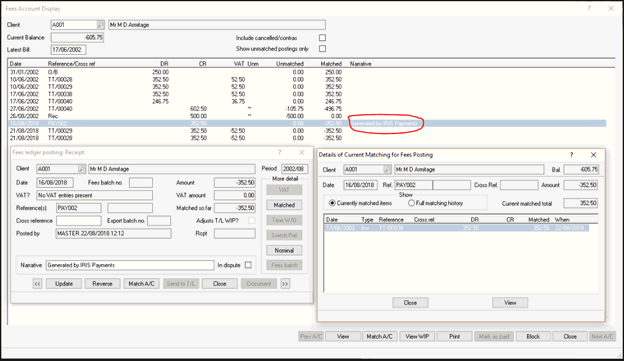
The receipt postings generated by IRIS Payments can be viewed on the
Fees Account Display screen.