 |
 |
This topic explains how to install of Microsoft SQL Server 2008 R2 with Tools.
Microsoft SQL Server Express is only recommended for installations of up to six users. For full system requirements please click here.
Download the SQL Server 2008 Express with Tools installation file. This can be obtained from the Microsoft website. Click here to download.
Please download Microsoft SQL Server 2008 from https://www.microsoft.com/en-gb/download/details.aspx?id=30438
Click Download and when prompted, select the appropriate version:
For 32 bit machines download SQLEXPRWT_x86_ENU.exe
For 64 bit machines download SQLEXPRWT_x64_ENU.exe
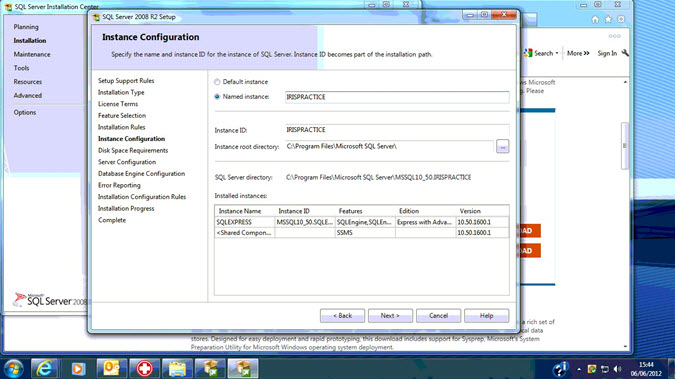
Accept all the defaults, until this screen displays.
On the Instance Configuration page, select the Named instance option.
Change the instance name to IRISPRACTICE and click Next.

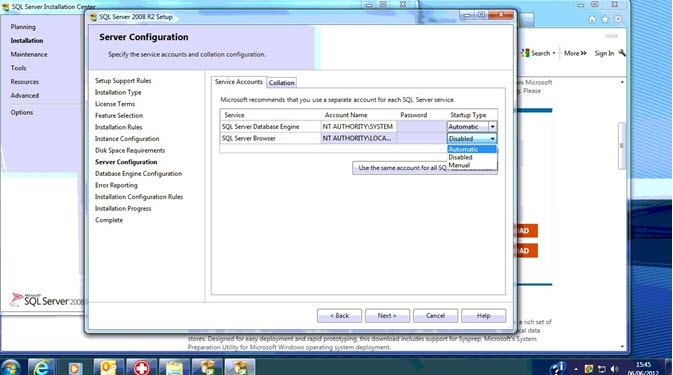
On the Server Configuration screen, select Use the same account for all SQL Server services.
In the Account Name box, select NT AUTHORITY\SYSTEM and click OK.

From the Startup Type drop-down for the SQL Server Browser, select Automatic and click Next.

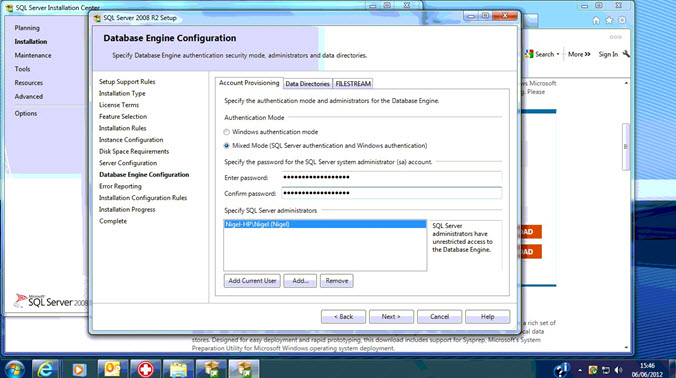
On the Database Engine Configuration page, select the Mixed Mode option.
Enter a strong password for the system administrator and confirm the password.
Click Add Current User.
Click Next and accept all other defaults. The install of SQL should now complete successfully.

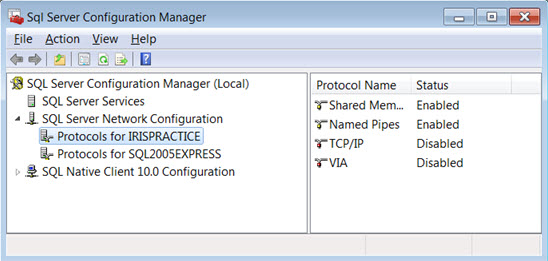
Once installed, you will need to check that your SQL Server Client Protocols have been configured correctly.
The IRIS installation requires that they are as follows:
Shared Memory, Named Pipes and TCP/IP are enabled and VIA is disabled.
For Standalone machines only, TCP/IP can also be disabled.
To enable or disable a client protocol:
Click Start, All Programs, Microsoft SQL Server 2008 R2 or equivalent.
Select Configuration Tools.
Select SQL Server Configuration Manager, expand SQL Server Network Configuration, right-click Client Protocols, and then click Properties.
Click a protocol in the Disabled Protocols box, and then click Enable, to enable a protocol.
Click a protocol in the Enabled Protocols box, and then click Disable, to disable a protocol.

If you enable or disable a protocol
you will need to restart the SQL server service before the change
will take effect.
This can be done by selecting SQL Server Services, then right-clicking
on your SQL instance and selecting restart.