 |
 |
|
|
The easy way to plan your team's work, staff Planning is fully integrated with other IRIS practice products. Alternatively, use as a standalone product.
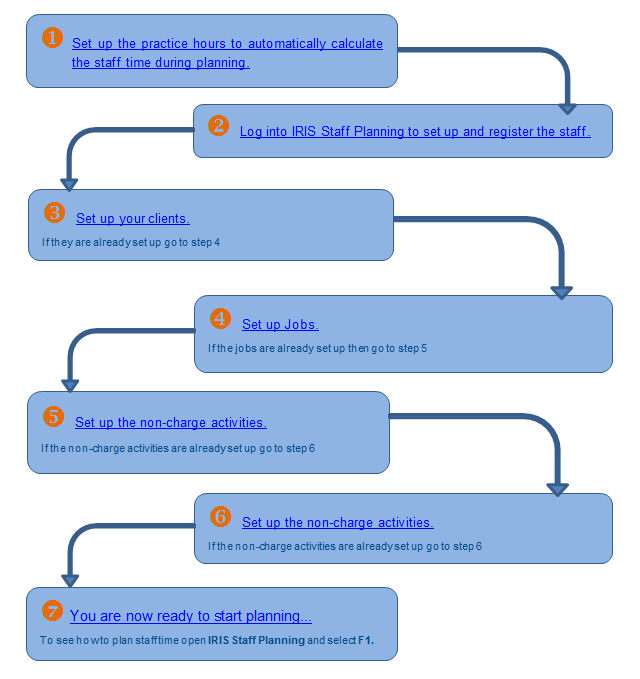
Log into System Maintenance as MASTER.
Select Practice | Practice Options | Practice Hours
Enter AM Start, AM End, PM Start and PM End using the 24 hour clock. If each day in the week corresponds to the standard working day, click Set on each day of the week.
Click OK and go to the next step.
Select File | Exit to log out of System Maintenance.
Select IRIS
Staff Planning from the main menu, and log in with your own
user name.
The first time you log into IRIS Staff Planning there is a prompt to
register the staff.
The New Staff Member screen displays.
Staff identifier
1st name
Surname
for the Staff group enter the group, if in doubt use MASTER
select the Is allowed to sign on to the system option
Click OK.
The Staff Maintenance screen displays.
Click Close.
In order to plan jobs and edit diary bookings in IRIS Staff Planning you must have the relevant staff permissions enabled.
These permissions are:
Can Plan Jobs - Yes/No
Can Edit Diary Bookings for other staff members - Yes/No
To enable the permissions:
Open the IRIS Main Menu.
Select System Maintenance and login as MASTER.
Select Staff | Staff Maintenance
Select the staff member you would like to change, and click View.
Select the Privileges tab.
Select the appropriate permissions.
Click Save then Close.
Repeat Steps 2.2 and 2.2.1 until all the staff are set up. Then go to the next step.
This will take a staff member licence, so only register those staff you want to plan for.
If you are in the Staff Browser screen from Step 2.2 then highlight the staff member and click View. If not, from the main menu, select Setup | Staff, highlight the staff member and click View.
Select the Staff Hours tab.
Select the Registered with Staff Planning option.
If the staff member's hours are different from the standard week then select the Part time option and change the hours.
Click Save.
To move onto the next staff member select Next Staff.
Repeat until all the staff have been registered then click Close.
As a minimum:
Select Next.
Enter if the client is a Business or Person and click Next.
Enter the client Name, Type of Business and Address (optional) and click Next.
Assign a Partner and Manager identifier or click the magnifying glass to select and click Next.
Click Finish.
Enter a Client Identifier and click OK.
Repeat for all clients.
The jobs describe the client work such as accounts, or personal tax.
To set up each job:
Select Setup | Job types | Job types | New. The Job type definition screen displays.
Enter the Job type code and a job description.
Select the interval from the Subsequent jobs repeat at drop-down list (for example accounts jobs occur once every accounting period).
Click OK.
Set up a job type for each of the following:
Accounts
Personal tax return
Company tax return
Partnership tax return
Sole trader tax return
Trust tax return
New client procedure
Link these jobs to the standard job types within Setup | Job types | Standard Job types if they are not already set up.
To do this:
Click the magnifying glass next to the first job Personal Tax Returns.
Highlight the job and click Select.
Repeat for each of the above.
Click Close and go to the next step.
You can set up as many jobs as you would like, but we recommend around 10 for easy management as a starting point.
If the non-charge activities are already set up go to step 6.
This is the non-chargeable time spent by each staff member, such as holiday or training.
To set up each non-charge item:
Select Setup | Non-charge | Activities
Click New.
Enter an Identifier and Description for each, followed by Close.
Enter an In Non Charge Code, or click the magnifying glass to select.
Repeat for each non-chargeable activity and then go to the next step.
If this is already set up go to step 7.
Set up all the days the office is closed (excluding weekends), for example bank holidays.
To do this:
Select Setup | Non charge | Public holidays
For each, enter the Date, select Whole Day, Morning or Afternoon, the Non-charge activity code, and add the Description.
Click Add to List.
Click Close and go to the next step.
To see how to plan staff time open IRIS Staff Planning then press F1.