 |
 |
|
|
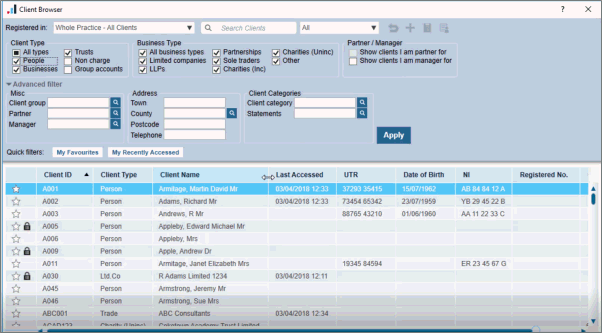
This topic explains how the new Client Browser can help accessed client data more efficiently and dynamically, from all products in the Accountancy Suite.
The Client Browser can be accessed from any product; Client | Select
For information on the following functions, click the link:
The filters available are dependent on the product you are in:
You can filter clients in the following ways:
All clients
Registered clients
Clients registered in a particular module
Unregistered clients
You can search for clients by their:
Client ID and Name
Client ID
Client Name
Registered Number
UTR
National Insurance Number
Date of Birth
Charity Number
These options  when selected allows you to search on ("?",
"*") and the range separator character (">",
":" or "-" depending on how the system is configured).
when selected allows you to search on ("?",
"*") and the range separator character (">",
":" or "-" depending on how the system is configured).
When hovering over this option, the following text displays:
"Tick to search using wildcard (*?) or a range e.g. 1>10 or AA>AZ etc)"*.

You can reset all filters back to the default options by clicking on this icon:

To create a new client, click on this icon, this will load the new client window:

To copy the information on screen, click here, this will copy all columns and all clients shown:

To generate a client list report, click on this icon:

The filters at the top update the list displayed as each filter is selected
The default Filters available are dependent on the product the client browser is accessed from.

You can filter by:
Client Type:

Business type:

Whether you are partner or manager of clients:

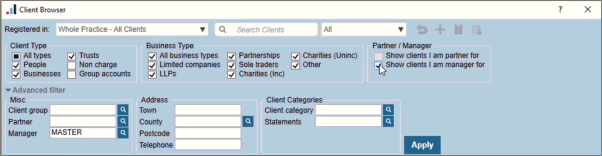
To access advanced filter, click on the highlighted area shown below:

In this area you can filter for, Client group, Partner and Manager:

The address and telephone number for the client:

Any client categories that you have created:

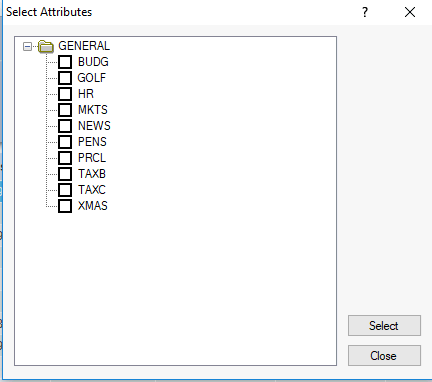
Any Client Attributes that you have created:
Click the magnifying glass to list the Attributes and select one attribute at a time:
To use these filters, you need to click Apply.
For example, if you enter a category and click apply only the relevant clients show.
If you select clients I am a manager for with the advanced filter displayed, the user ID shows in the manager field.
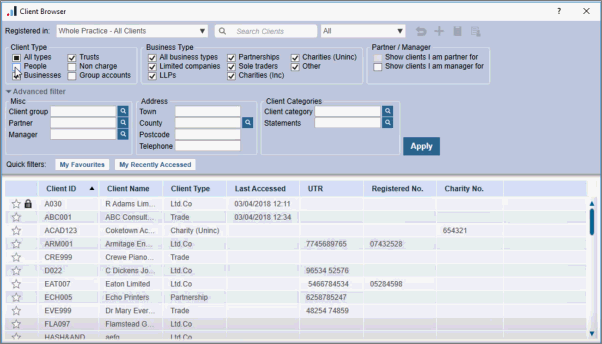
There are 2 quick filters available:
My favourites – this will show clients who have been marked as favourite using the option in the left-hand column.
My recently accessed - will show clients who you have viewed in the last month.

Confidential clients will show a padlock symbol to indicate this status:

There are new columns within the results of the client browser. These will only appear if relevant to the selection criteria, for example Date of birth and NI will not show if People is not selected:
The new columns on this screen are:
UTR
Date of Birth
NI
Registered No.
Charity No.
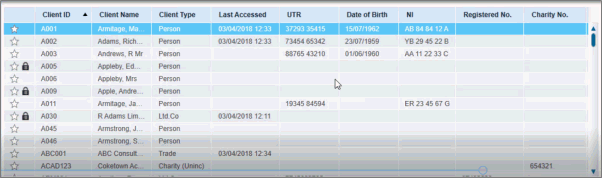
Columns can be moved by dragging them to the appropriate position.
These can also be resized by clicking and dragging from the edge of the column:
 - delete a client click
here.
- delete a client click
here.
 - view the client maintenance
screen click here.
- view the client maintenance
screen click here.
 - select a client click
here.
- select a client click
here.
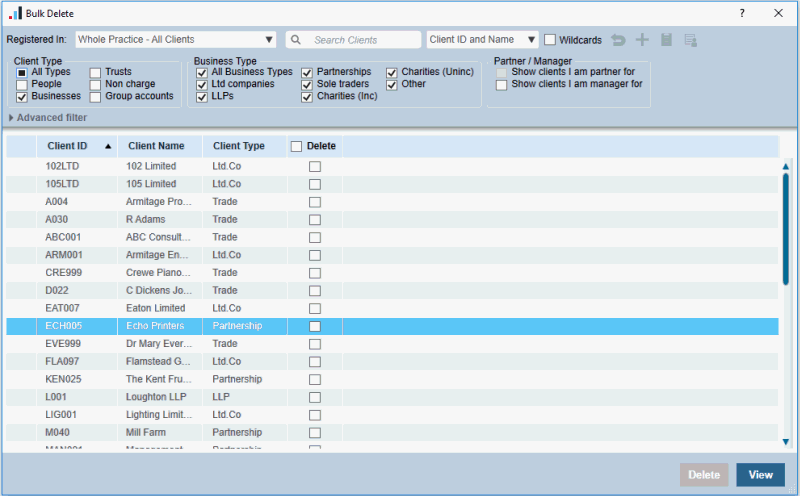
The Bulk Delete functionality is available in the following products:
It can be found by clicking:
Client | Bulk Delete, select a number of clients then click Delete from within
or
Practice | Bulk Delete, select of number of clients then click Delete from within System Maintenance
MASTER User
By default only the MASTER user will have permissions to access this screen.
In System Maintenance select Staff | Staff Maintenance | View | Privileges and select the Can bulk delete clients option under Deletion of client data to enable other users to access this option.
This screen displays a list of clients that can been selected for deletion.
IRIS recommends taking a backup of the database before deleting a large amount of clients.
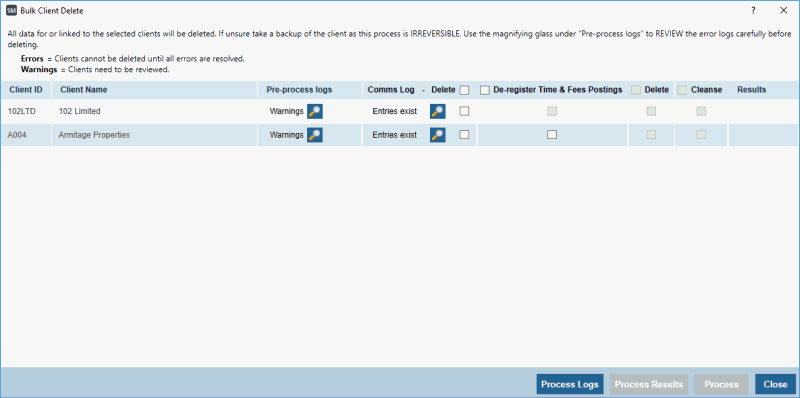
The following screen displays with a number of options available.
This field shows any errors or warnings that exist on the client that could affect the delete and cleanse process. Clicking the magnifying glass in this field will display a list of all the information that will be deleted along with more information on any errors or warnings.
A progress bar will be shown at the bottom of the screen showing the progress of the pre-delete cleanse process.
Errors – if there is an error on a client it will not be possible to delete or cleanse them and the Delete and Cleanse fields will be greyed out until the errors are resolved outside of the bulk delete cleanse process.
Warnings – there are two types of warnings, those that require manual intervention before the client can be deleted or cleansed and those that are for information only.
Examples of warnings that require intervention would be if Communications Tracking entries exist or if the client is registered in Time & Fees and has outstanding balances.
If the client has entries in Communications Tracking, Entries exist will appear in this column; the Delete and Cleanse option will not be selectable until a decision is made about these entries. Clicking the button in this field will display the options for a specific client. This is the same screen that will appear if you delete a single client.
There is also a Delete and Cleanse tick field in this column and a 'select all' in the column heading. Select this if all Communications Tacking entries are to be deleted.
If the client is registered in Time & Fees and has outstanding balances, the tick field in this column will become active. These clients will not be able to be deleted or cleansed unless this field is ticked.
Deleting or cleansing a client with outstanding Time & Fees balances will automatically de-register the client from Time & Fees and could cause inconsistencies in the Time & Fees data. This action is not recommended.
Select the tick field in this column to include this client in the bulk delete process. This field will only be available if the client has no errors and all warnings that require attention have been cleared.
Select the tick field in this column to include this client in the bulk cleanse process. This field will only be available if the client has no errors and all warnings that require attention have been cleared.
Once all applicable clients have been selected this option will start the delete and or cleanse process. If the client is registered in Time & Fees the delete process will automatically de-register them.
Once the delete cleanse process has started a progress bar will appear in the bottom left corner of the screen to show the progress of the bulk delete cleanse. The bulk delete cleanse can be stopped at any time by clicking Close. This will stop the delete cleanse process after the current client has been deleted or cleansed.
Once a client is deleted 'Deleted' will appear in this column. Click the button to display a full list of all the information that was deleted. Once a client is cleansed, 'Cleansed' will appear in this column. Click the button to display a full list of all the information that was cleansed.
This will export all the information contained in the pre-delete log for all clients listed into a .txt file.
This will export all the information contained in the delete results log for all deleted clients into a .txt file.
Close – closes the screen.
IRIS recommends taking a backup of the database before deleting a large amount of clients.
This is the second stage of the deletion/cleansing process. The screen gives a summary of the data that will be deleted and retained depending upon whether the user selects ‘Delete’ or ‘Cleanse’. In some cases, it will not be possible to delete the data. Refer to the list and look for lines marked ERROR.
It is not possible to delete a client while there are ledger entries in Time or Fees because to do so would create an imbalance in the ledger. Use the Time & Fees function to de-register the client so that it can be deleted.
A communication log screen may appear once the summary is completed. This happens where there are documents linked to the client. It is necessary to either delete these documents or, more likely, move them to another location.
IRIS stores these documents in complex file folders and it would not be possible to trace the information after the client ID has been removed. We recommend that important documents are moved to a folder created specifically for storing important archive material, using the client ID or name to help identify the contents.
The summary will show WARNING where there is a link with another person, business or trust (except employments). The relationship, and data associated with it, will be removed when the client is deleted. As this may have a consequence in other parts of IRIS, the warning is given to highlight the information.
Click Delete or Cleanse to continue. If the option is greyed out it means there was an ERROR in the summary above.
The Print option prints the information shown on the summary.