 |
 |
|
|
IRIS Interactive Reports provide you with a complete workflow for viewing, editing and finalising your accounts. They allow you to edit every aspect of your final accounts including client details, account descriptions, disclosures, and notes as well as allowing you to add, amend or cancel postings directly from the on screen preview.
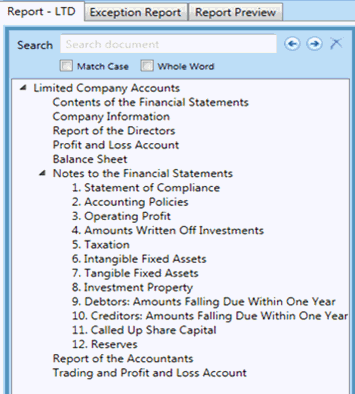
Using the bookmark navigation, you have single click access to any section
of the report to make accessing the desired location even more efficient.
In addition there is a search feature allowing you to quickly find words,
phrases or even numbers within the report.
IRIS Interactive Report provides the user to review and make adjustments within the report such as:
The interacting report includes an Extended Report which displays additional drill down items that allow non-generated content to be added from within the report e.g. add new Note, add an accounting policy or add further text to existing reports.
Furthermore using the interactive report the user has the ability to link Final Accounts to Workings – Working Paper links. Working papers and other documents can be linked (at chart or client level) to individual items for reference within a set of financial statements generated under Interactive reporting (available under the “Working papers Links” tab).
Version 17.1 has seen a number of changes, for example now includes an option to flag various parts of the report setting the status to review or reviewed, accompanied with the ability to make notes with a date stamp, within the Working Papers Index.
This accompanied with the choice to print individual reports or the option to pick different combinations as pack, thus assisting communication between different users working on the same customer accounts.
These changes will speed up the review and creation of final accounts
giving you everything you need as part of your standard workflow, with
the ability to provide notes, flag statuses, cross reference entries to
different workbooks and working papers outside of the software (excel),
thus removing the need to navigate between multiple screens optimising
efficiency.
Version 17.1 applies to Limited
Companies, LLPs, Partnerships and Sole Traders using all accounting
standards.
This option is not currently available for Charities/Academies,
Groups or clients
which have been set up on a discontinued chart, for example, IRIS
Chart.
Click the links below to jump to a particular section:
Step 1 – Generating an Interactive Report
Step 2 – Amending single data entry fields
Step 3– Amending freeform text fields
Step 4 – Amending the current year trial balance
Step 5 – Using the Drilldown Exception/Warning report feature
Saving to Word, PDF or Uploading to IRIS OpenSpace
Section 1 - Using the Extended Report
Section 2 - Referencing to the Notes
Section 1 - Setting up chart level working papers links
Section 2 - Client level working papers links
Section 3 - Interactive Reports
Section 5 - Setting Flags for review/reviewed status
Section 6 - Including Working Papers Reference for each item on the report
Section 7 - Working Papers Note Report
Section
8 - Printing the Working Papers individually or as a pack
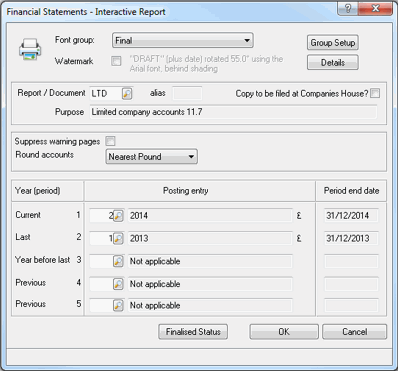
The following screen displays.
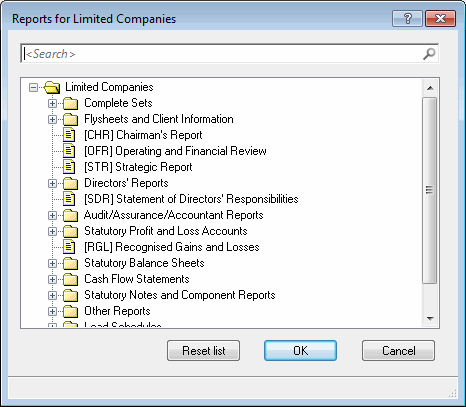
The following screen displays.
Highlight the relevant report mnemonic, for example, LTD.
Click OK.
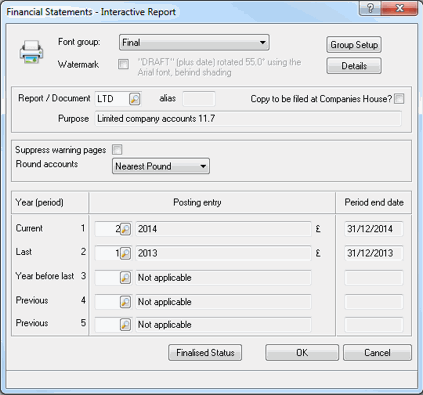
The following screen displays.
Click OK.
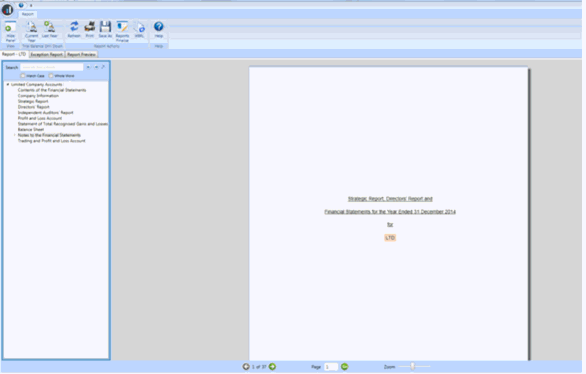
The following screen displays.
Items which are amendable will appear highlighted. There are four main areas of the accounts which can be drilled down within the interactive report.
These are:
Singles data entry fields - such as the registered number, company name, address lines and group/account descriptions.
Freeform
text fields - such as notes within the financial statements. These
item will appear with the following  icon in the
top left-hand side of the highlighted text box.
icon in the
top left-hand side of the highlighted text box.
Current Year Trial Balance – this allows users to view, add, cancel and amend postings. You can also drill down from the entries within the trial balance directly to the transactional data within KashFlow where any amendments can be made directly in the source data.
Exception/Warning
tab – option to drill down from any warnings/exception reports
to quickly address any potential problems.
The Bookmark Navigation feature on the left-hand panel (as displayed below) allows quick and easy access to certain parts of the report by selecting the relevant section.
This feature also includes a Search
box where you can enter specific words, phrases or even numbers within
the report.
In the Interactive Report screen, click on the relevant item highlighted in orange, for example, the business name.
When creating a set of FRS101, 102, 102 Section 1A or FRS 105 accounts, the additional data screens display:
FRS transitional relief
Cash flow incl. cash flow adjustments (that get made in the comparative year)
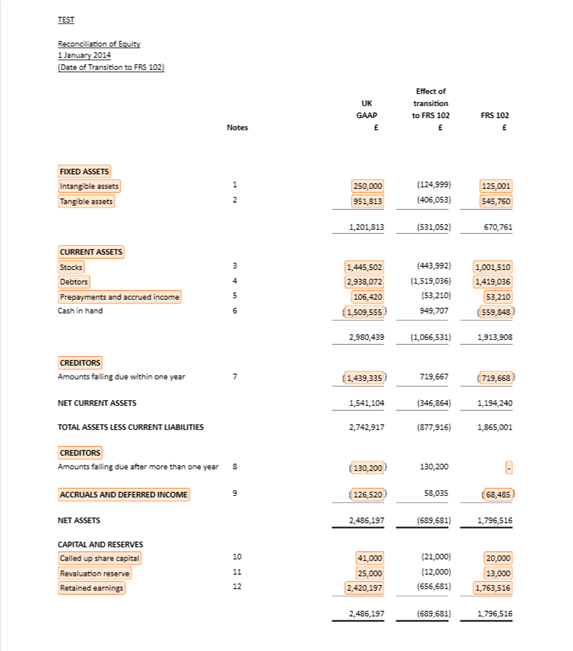
Reconciliation of equity
Reconciliation of profit or loss
For example, when selecting Reconciliation of Equity the following screen will displays, allowing single-click access to the data screen for adjustments.
Make the relevant amendments.
Click OK or Save then Close.
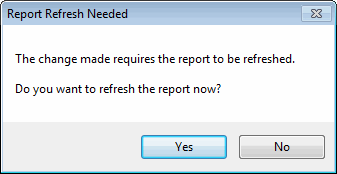
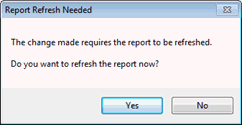
Yes - to refresh the report now.
No
- to refresh the report at a later stage.

The report is updated immediately with the amendments made.
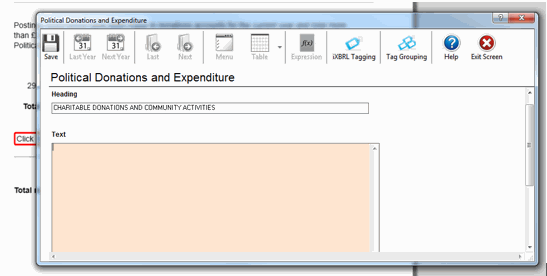
In the Interactive Report screen, click on the relevant item highlighted in orange, for example, the Deferred Tax Accounting Policy.
Make the relevant amendments.
Click the save  icon.
icon.
The following message displays.
Yes – to refresh the report now.
No
– to refresh the report at a later stage.
If No
has been selected, the following  will display
in the bottom left-hand side of the screen. The
will display
in the bottom left-hand side of the screen. The  icon will need to be selected at a later stage. This allows multiple
amendments to be made before refreshing the report speeding up the
process.
icon will need to be selected at a later stage. This allows multiple
amendments to be made before refreshing the report speeding up the
process.
To revert account & group descriptions to their default, select them within the interactive report to view the edit screen, remove the description to leave it blank and click OK. This will then automatically revert back to the default Account/ Group description.
The Interactive Report screen displays.
The following screen displays.
Highlight the relevant Account.
Click Postings.
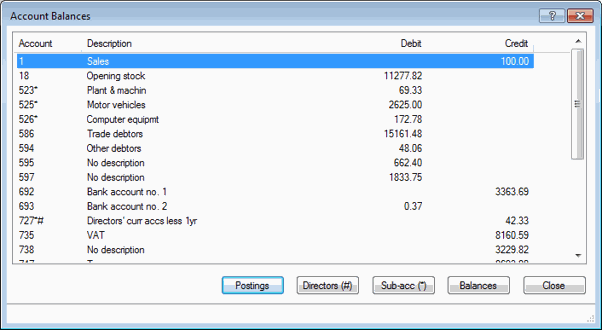
The following screen displays showing the drill-down of postings.
Click one of the following:
Add Posting – to add an additional journal entry.
Cancel Posting – to cancel the highlighted journal entry.
Amend Posting – amend the highlighted journal entry.

Click one of the following options:
Yes – to refresh the report now.
No – to refresh the report at a later stage.
If No has been selected, the following
 will appear within the bottom left-hand side of the screen.
The  icon will need to be selected at a later stage. This allows multiple amendments
to be made before refreshing the report speeding up the process.
icon will need to be selected at a later stage. This allows multiple amendments
to be made before refreshing the report speeding up the process.
If there are any Exception/Warning errors,
these will appear as tabs:

Users are now able to drill down from any warnings and exception reports
to quickly address any potential errors.
Click the Exception Report or Warning Report tab to display the errors with the option to make the amendments from the same screen.
Click on the Exception/Warning highlighted in red to display the appropriate data screen, enabling you to make the changes.
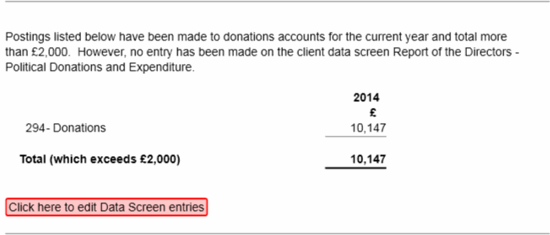
Make the necessary amendments.
Click the Save  icon.
icon.
The following screen displays.
Click one of the following options:
Yes – to refresh the report now.
No
– to refresh the report at a later stage.

If No
has been selected, the following  will appear
in the bottom left-hand side of the screen. The
will appear
in the bottom left-hand side of the screen. The  icon will need to be selected at a later stage. This allows multiple
amendments to be made before refreshing the report, speeding up the
process.
icon will need to be selected at a later stage. This allows multiple
amendments to be made before refreshing the report, speeding up the
process.
Click the Save
As  icon.
icon.
The following screen displays:
Click Browse…
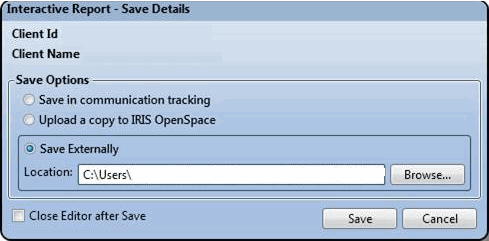
Click on the Save as type drop-down and select the preferred format that is, Microsoft Word or PDF.
Enter the File name.
To upload to IRIS OpenSpace select and click Save.

To upload to IRIS OpenSpace
simply select  and click Save.
The Extended Report displays additional drill down items that allow non-generated content to be added from within the report for example, to add a new Note, add an accounting policy or add further text to existing reports.
This gives the facility to access data screens
via drill down for 'non-generated content'
for example, to allow additional disclosure without having to close the
report, enter the data screens and re-generate.
Small Companies Regime (ONLY)
Where the small companies regime applies a 'Filter' option will also be provided.
By default this will be set to 'Required by Law' for example, only show Insertion Points for required disclosure. Selecting 'All' will include all other Insertion Points (should further disclosure be required).
In addition, there is an option to navigate throughout the report to the appropriate notes with a single click of a button. For example, within the extended report a single click on the Income Statement or the Statement of Financial position, the user will be able to jump directly to the corresponding note using its reference.
Section 1 – Using the Extended report
Section
2 – Referencing to the Notes
Applies to all business types which allow Interactive Reports.
Select Show Extended report via the tool bar.
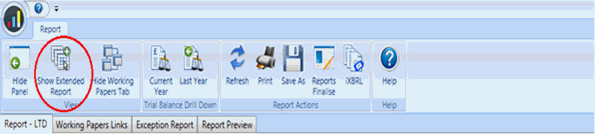
Where Extended Report is selected
the report content will include additional drill down items identified
by an icon (we refer to these as insertion
points).
icon (we refer to these as insertion
points).
An insertion point is provided for the following:
New Accounting Policy
New Note
Additional Text (to existing note)
For example, by selecting Basis of preparing
financial statements, a second screen will open directly linked
to the relevant data screen, i.e. Edit
| Data Screens | Notes
to Financial Statements | Accounting
Policies | Standard Accounting
Policies | Basis of Preparation
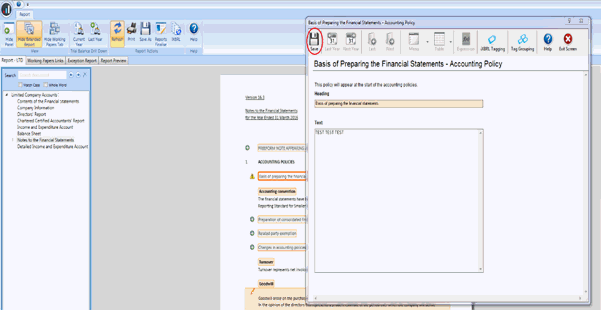
Enter the relevant information, click Save and the screen will close.
Click Refresh.
Where drill down changes have taken place,
the will
now change to
will
now change to indicating that alterations have
made and a refresh is required (once refreshed the content will become
“generated” content).
indicating that alterations have
made and a refresh is required (once refreshed the content will become
“generated” content).

Generate the extended report illustrated in Section 1.
The Income statement and Statement of Financial
Position includes note referencing, this is shown as a hyperlink (see
below).
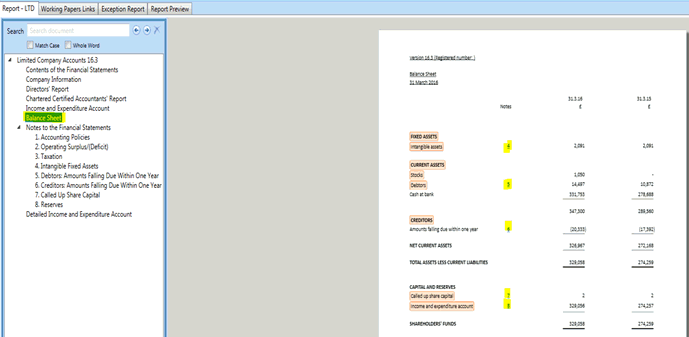
By clicking on the note reference,
the interactive report will navigate directly to the corresponding
note within the Notes to the Financial Statement.
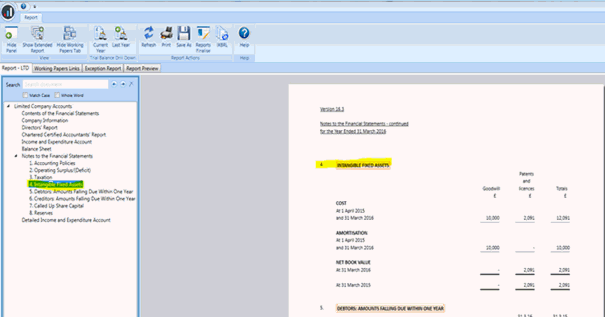
For example selecting reference 4 on the above balance sheet Intangible
assets, the Interactive Report will directly jump to Notes to the
Financial Statement.
To improve the workflow of a paperless office experience, there is an option to link a working paper(s) an external Excel file to the Interactive Report.
Links can be added within the Interactive Report for any Balance Sheet, Profit & Loss figure and some Note totals. This will then directly open the linked external Excel file, allowing users to open and view this onscreen, with the drill down functionality to make any necessary amendments without ever needing to exit the report.
This gives you an end to end paperless review process with full work paper file referencing and access.
Working papers and other documents can be linked (at chart and/or client level) to individual items for reference within a set of financial statements generated in Interactive Reports (available under the Working papers Links tab).
Applies to Limited Companies, LLPs, Partnerships and Sole Traders using all accounting standards.
Section 1 - Setting up chart level working paper links
Section 2 - Client level working paper links
Section 3 – Interactive Reports
To access chart level working paper links you will need to:
From the Accounts Production home
screen select Setup | Account Charts
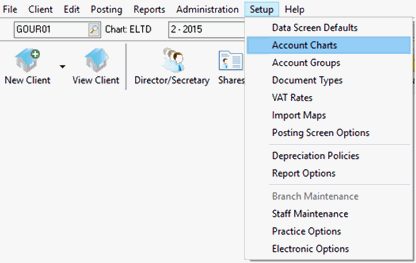
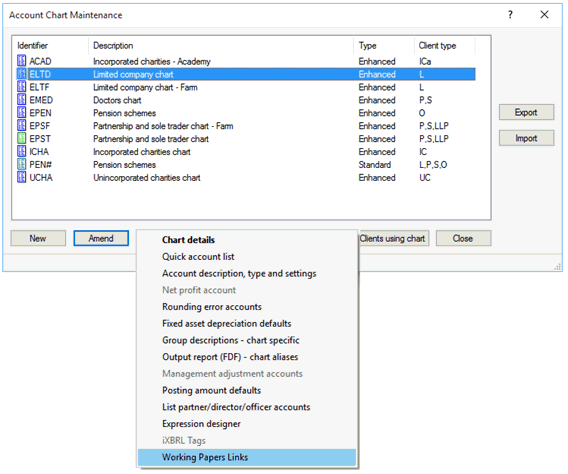
Select the Chart.
Click Amend.
Click the Working Papers Links option.
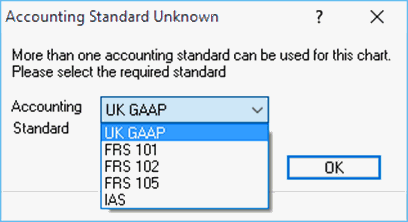
Select the relevant Accounting Standard and click OK.
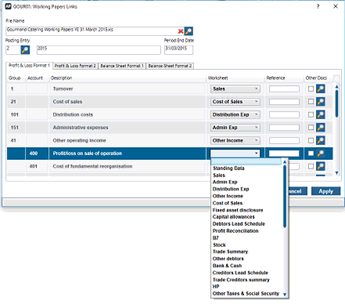
Select your Working
Paper template (excel file).

Assign the relevant worksheet to the
relevant Group/Account codes as displayed below:
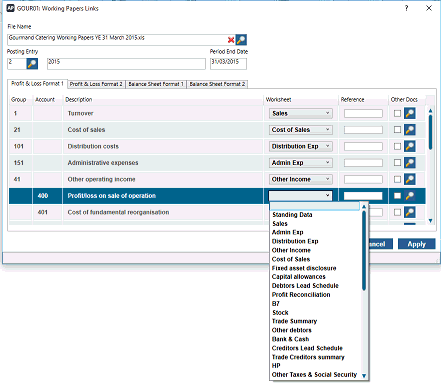
To add a working paper reference for cross referencing purposes:
Click Apply then OK.
From the Accounts Production home screen select Edit | Working Papers Links
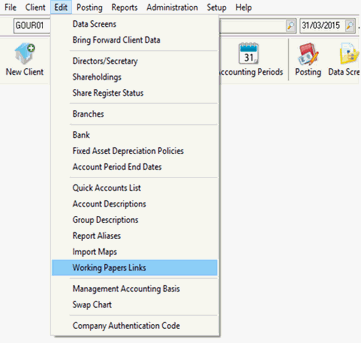
Select your Working Paper template (excel file)

Assign the relevant worksheet to the relevant Group/Account codes as displayed below:
To add a working paper reference for cross referencing purposes.
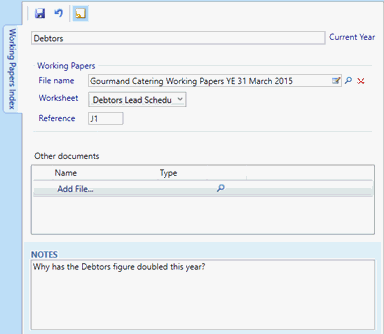
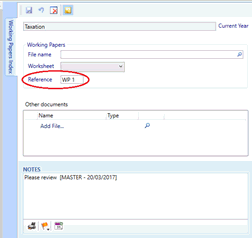
The Working Papers Index panel
on the right also allows users to link to their Working Papers, by selecting
the Worksheet.
The Reference box allows you to cross reference items to its Working Paper.
The Other
documents section allows users to link other documents and add
notes (please refer to section 4).
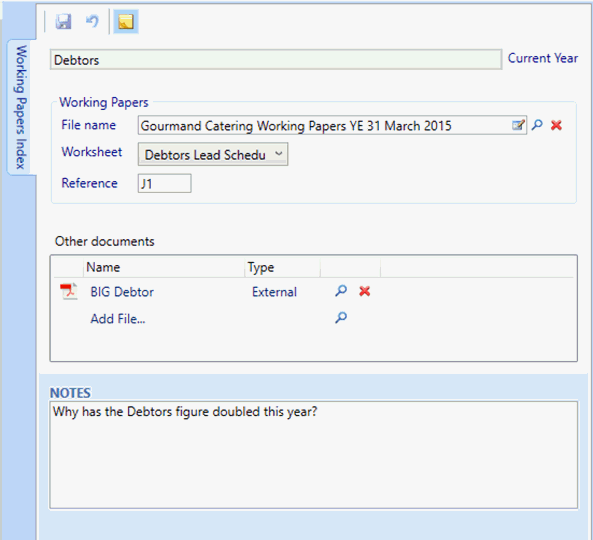
The screenshot below shows that the Debtors
on the balance sheet has been linked to the ‘Debtors Lead Schedule’ tab
in working papers document:
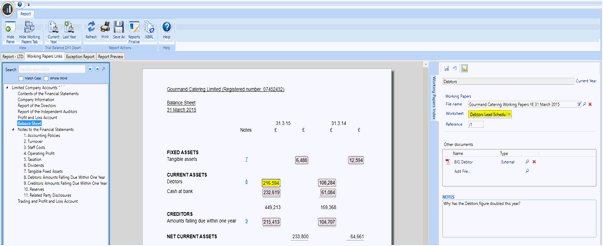
By double-clicking on the Debtors figure (216,594 in this instance), the Excel document that is linked will open externally to the specified workbook tab:
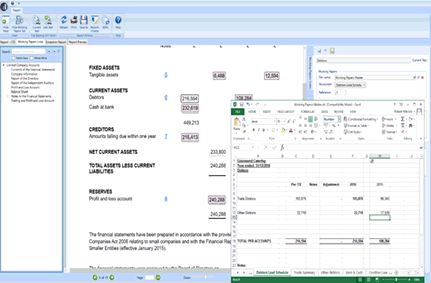
This enables you to review a set of accounts on screen with direct links to any supporting information.
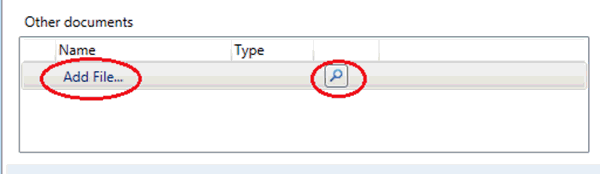
To add additional supporting documentation
to the interactive report i.e. a Word doc or PDF, please use the following
Working Papers Index tab.
Double-click Add
file or click the magnifying glass within the Other
Documents section to open a dialog to allow you to select a
file from your file system or communications tracking:
Select the required file and select Open.
Ensure the correct file path has been inserted and click OK.
The linked document will display in the list.
Using version 17.1, from the Working Papers Index panel on the right, this includes an option to set flags on various areas of the report, setting the status to 'review or reviewed'.
Users also now have the option to include a stamp, consisting of the
date and username.
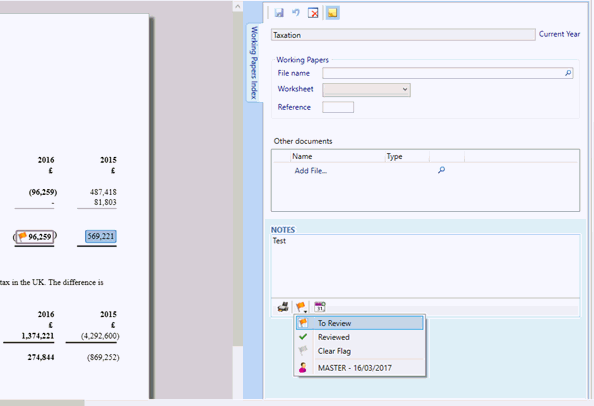
Select the item for review from the report (within the working papers links tab)
From the working papers index panel, enter in any required notes,
Select the appropriate status from the menu:
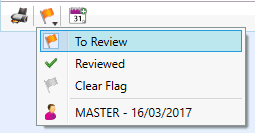
This will then be set against the item and is also shown within the Report tab.
In addition to review/reviewed
status, there is also an option to leave a date & username stamp,
by clicking  .
.
Once the status and date stamp have
been set, to save click  .
.
To remove the status, click 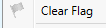 .
.
To clear/remove ALL the information linked
to this item click  .
.
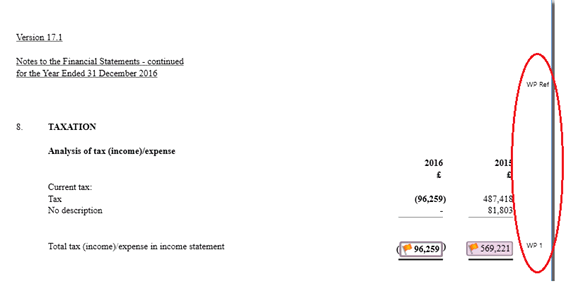
Interactive Report changes to the referencing now allows each item on
the report to be referenced to its Working Paper. This is achieved from
the 'Working Papers Index Panel' on the right, within the reference box,
shown below:
The working paper reference will appear on the right hand margin of
the working papers links report:
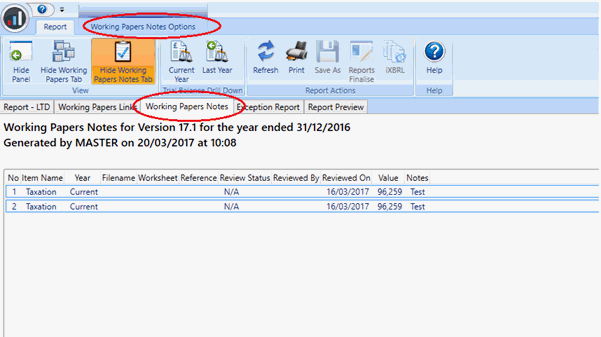
In version 17.1 we have introduced a new report 'Working
Paper Notes' report, which highlights these different statuses,
date stamps and notes all in one place, matched with the ability to set
different filters and an option to print or export the report.
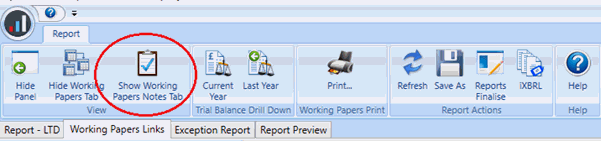
This report can be found within the interactive
report icon ribbon: 'Show Working Papers
Notes' tab:
By selecting the 'Show
Working Papers Notes' tab, an additional tab 'Working
Paper Notes Options' and the report will be generated such as shown
below:
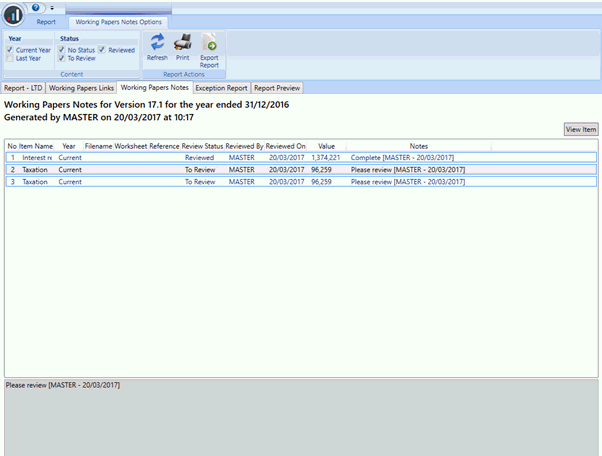
Year / Status - options to filter the report according to the status set and for each year.
Print - option to print the report.
Export Report - option to export report will export the report as an excel .CSV file with the ability to save externally.
Generated results - result of the items according to the filters set.
View Item - by selecting 'View Item', this will allow the user to be redirected to the selected item within the 'Working Papers Links' tab.
Date and
Time stamp - the complete note and date stamp for the highlighted
item.
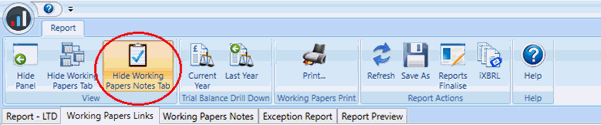
In order to exit the report, the previous option to 'Show Working Papers Notes' tab once selected will have changed to 'Hide Working Papers Notes' tab as shown below:
Select Hide
working Papers note tab.
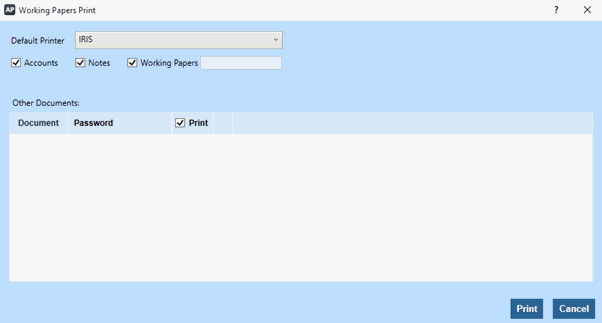
The Working Papers Print gives the ability to print all documents that
have been linked to a set of reports including the accounts, working papers,
notes and other linked documents.
This option can found within Working Papers
Links tab by clicking Print:

Default Printer - combo-box will provide a list of all available printers from which the user can select.
Accounts option - is ticked by default but users must select the Notes and Working Papers option for them to be included in printing.
Other Document section - is where other documents that have been linked to the accounts can be selected for printing.
Document column displays all the linked documents which could be Excel, Word Document, PDF, Images / Screenshots, Emails (.msg) and Text files (.txt).
Password column enables passwords to be entered for documents that are password protected and the Print column enables users to select which documents from the list they would like to print.
Up/Down Arrow icons beside the Print column is for movement up and down between the rows. Next to that is a feedback column where any errors / progress messages relating to the documents are reported.
Cancel - when selected exits the screen
Print - at the bottom right corner of the screen prints selected documents that have been ticked. The progress is displayed in the feedback column, if there is an error when printing, possibly because the user entered an incorrect password or another user is editing the same file, this is displayed here.
Select the following:
 to Save
as / Exit screens
to Save
as / Exit screens
 to view,
drill down, add, cancel or amend the Current Year Trial Balance
to view,
drill down, add, cancel or amend the Current Year Trial Balance
 to view
and drill down into Last Year’s Trial Balance
to view
and drill down into Last Year’s Trial Balance
Postings cannot be added, cancelled or amended for Last Year’s Trial balance within the Interactive Report.
 to Refresh/regenerate
the Annual Report
to Refresh/regenerate
the Annual Report
 to Print
the Annual Report
to Print
the Annual Report
 to save
as Microsoft Word or PDF
to save
as Microsoft Word or PDF
 to finalise
the report =
to finalise
the report = 
 to generate
an iXBRL set of accounts
to generate
an iXBRL set of accounts
 to view
the Help screens
to view
the Help screens
 to change
the page of the Annual Report
to change
the page of the Annual Report
 enter the
Page number and select Go
enter the
Page number and select Go
 to Zoom
in or out of the Annual Report
to Zoom
in or out of the Annual Report